How to Install the Same Printer Twice on One Windows PC?
Install the Same Printer Twice on One Windows PC:
If you use different color settings and paper sizes while printing, you must wonder how I can install the same printer more than once on Windows 10. If yes, then we have some good news for you. This setup has been made possible for quite some time now.
This process was much easier on Windows XP as users could create new printer devices by copying and pasting the old ones. This process got a bit tough for Windows 7 and Windows 10 users. nevertheless, you can install the same printer more than once. Below, you will learn how to do so.
Find the Port and Driver of Your Printer
If you wish to install a printer manually more than once, then you need to know everything about the driver and port of your printer. You can easily acquire this information by carrying out the instructions mentioned below.
Step 1: Press the Windows and S keys simultaneously on your keyboard.
Step 2: Enter Control Panel and then press the Enter key.
Step 3: Go to the option of Hardware and Sound and then choose the option of Devices and Printers.
Step 4: Search for the printer that you wish to copy. Right-click on it and then select printer Properties.
Step 5: After that, open the Ports tab and then you are required to note the selected port of your printer. This is the port you need to choose after adding your printer.
Step 6: Then navigate to the Advanced tab. After that, search for the name beside your driver. This is the driver you choose after you install your printer again.
Step 7: Select Cancel to close the window.
To make sure that your printer works without any issue, you are required to repair or update your drivers. This can be done manually but it is recommended to do this automatically. Manually updating the driver can be time-consuming.
If you select this option, then you need to go to the main website of the manufacturer to find the correct printer drivers for your system. If you end up installing the wrong version of the driver, then your PC can suffer from serious instability issues.
It is recommended to update the drivers automatically. You need to search for the tools online that are particularly designed for this purpose. Auslogics drivers can get the job done in an accurate and efficient manner. When this program gets activated, it recognizes your system automatically. Additionally, it searches for corrupt, outdated, or missing drivers. You can't even take the risk of installing the wrong drivers.
The driver-updater will search for all the versions recommended by the manufacturer. This tool will perform driver downloading and installing tasks for you. Moreover, it addresses all the driver-related issues. However, it doesn't address problems related to your printer. When you are done with the process, your computer will perform the tasks more efficiently.
How to Install a Copy of Your Printer?
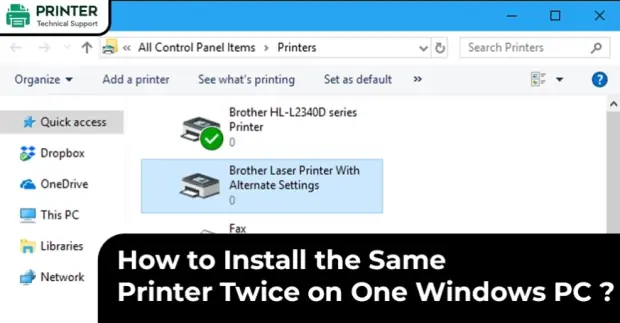
If you have the information you require, you can install the same printer two times. Mainly, you are creating a new virtual device in Windows. It has its own printing preferences.
To start this process, carry out the instructions mentioned below.
Step 1: Go to your taskbar and then select the search icon.
Step 2: Type Control Panel and then press the Enter key.
Step 3: Choose the option of Hardware and Sound. After that, select Devices and printers.
Step 4: Select the button of Add a Printer.
Step 5: Now, add the printer manually by selecting the option, "The printer I want is not listed".
Step 6: Select "Add a local printer or network printer from manual settings" and then select Next.
Step 7: Make sure that you have selected the option of "Use an existing port".
Step 8: From the drop-down list, select the port that your printer is using.
Step 9: Search for the appropriate driver and then select Next.
Step 10: Select the option of "Use driver that is currently installed" option. After that, select Next. This will make sure that the printer device you have created is using the same port and driver as the original copy.
Step 11: Enter the name of your printer and then select next to go ahead with the process. Select whatever name you want but it is recommended to keep a name that is different from your old printer settings.
Step 12: The last step is to ensure whether you prefer activating printer sharing or not. Select Next.
Use the Printer Device
When you try to print a file, you are going to view the new printer device as one of the available options. You can select a different preference on every device by selecting the option of Preferences. When you are done selecting the settings, Windows will store your selection in its memory.
If you want, you can also change the name of every printer. All you have to do is to right-click on the device and then select Rename. It is extremely important to select a name associated to your device's settings.
In case you are using one device for high-detailed color printing, then you need to name it accordingly. This way, you won't have to change the printer settings again and again. So, this is how you can install the same printer twice on Windows PC.
Also Read:
- How to Fix Printer Redirection is Not Working in Windows 11?
- How to Fix Printer has No IP Address on Windows 10?
- How to Fix Windows 10/11 doesn’t Find Wireless Printer?
FAQ for Install the Same Printer Twice on One Windows PC
- Mick
 Brand: Other
- Last Update: 1 month ago
 Top Related Question
Related Articles


Top Searches in Other
How to Fix Printer Spooler Problems on Windows 10?
May 23, 2026
9 Best Printer to Buy for Home Office Use in 2026
May 23, 2026
How to Fix Boot Device Not Found 3f0 Error?
May 23, 2026
How to Fix Print Job Stuck in Queue?
May 23, 2026
How to Make Printer Online in Windows 10?
May 23, 2026
Why is a Printer Printing Blank Pages on Windows 10?
May 23, 2026
How to Troubleshoot Wireless Printer Not Printing?
May 23, 2026
Featured Articles
How to Get Canon Printer Online on MAC?
Jun 4, 2026
How to Fix Printer Printing Horizontal Black Lines?
May 23, 2026
How to Scan from HP Printer to Computer Windows 10?
Jun 13, 2026
Ricoh Printer Stuck on Processing
May 23, 2026
Brother Printer Only Printing in Black and White
Jun 21, 2026
How to Clean Kodak Printhead?
May 23, 2026
How to Install Lexmark Printer to Computer Without CD?
Jun 12, 2026
Why My Samsung Printer is Not Printing Clearly?
May 23, 2026
Top Questions
Why Won't My Canon Printer Print after Changing an Ink Cartridge?
May 23, 2026
How do I Fix a Canon Printer 1403 Error?
May 23, 2026
How do I Connect My Canon MG3050 Printer to WiFi?
May 23, 2026
How to Change Printer from Offline to Online Canon?
May 23, 2026
How to Turn My Ricoh Printer Online from Offline?
May 23, 2026
Brother MFC Printer Won't Print Black Despite Full Ink Cartridges
May 23, 2026
How to Fix Epson Printer Filter Failed or Stopped on Mac Error?
May 23, 2026
How do You Get a Lexmark Printer Back Online?
May 23, 2026