How to Install a Ricoh Printer Driver on a Windows?
Install Ricoh Printer Driver on Windows 10 -
If you wish to know how you can install Ricoh printer driver on Windows, then these are some of the steps that you need to follow.
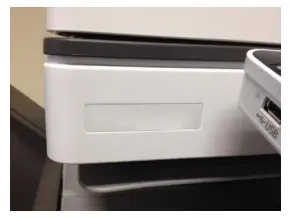
Step 1: Determine the Ricoh Printer Model Number That You Have
Find the model number of your Ricoh printer by looking at its front part. You will see the model number either on the machine’s door or to the operator control’s left.
Step 2: Find the IP Address of Your Ricoh MFD
Go to the ‘User tool/counter. Then, navigate to the ‘Printer Features’, and then move to the page of configuration. After that, the configuration page will get printed. Now, go to the column on the right hand side and locate the IP address under the heading of host interface.

Step 3: Determine the bit Version of Your Windows
In the next step to know how to install a Ricoh printer driver, you need to know whether your Windows is running on 64 or 32 bit version.
- If you have Windows 7 or Windows 10, then go to the Start menu, then select computer, and then click on properties.
- In case you are a Windows 8 user, then press the Windows key and then type ‘this PC in the search area and then select Properties.
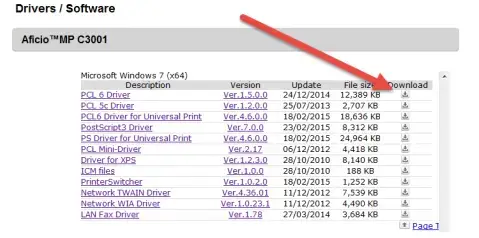
Step 4: Download the Right Driver
- Type http://www.ricoh-ap.com/downloads/ in the address bar of your internet browser.
- Now to install a Ricoh printer driver, select ‘Drivers and Software’ by going to the product category.
- Now, choose your model number out of the list appearing before you.
- After that, select your operating system.
- Then, select the PCL6 driver’s download link, which is usually on the top.
Step 5: Simultaneously, Make a Folder for the Driver You are Downloading
- If you are a user of Windows 7, Vista, or XP, launch the file explorer, go to the C drive and create a folder by the name of Ricoh. Right click and then create new folder.
- If you are a user of Windows 10 or Windows 8, press the Windows key and then click on the option of “This PC”. Now to install a Ricoh printer driver on a Windows, move to the C drive and then create a new folder and name it ‘Ricoh’.
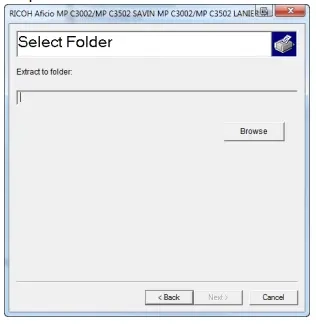
Step 6: Run the Driver You Just Downloaded
When the driver is downloaded click on Browse and go to the Ricoh driver you created in C drive. Now, to install a Ricoh printer driver on a Windows, click on the option of next and continue to follow the commands for completing the extraction. Hit finish, when it is done.
Step 7: Make Windows Print Queue
- If you are a user of Windows 7 or Windows Vista, then you first need to go to the start menu, then devices and printers, and then finally add a printer.
- In case you are using Windows 8 or 10, then enter devices on the Home Screen. Now, click on device and printers, when it prompts. In the next step to install a Ricoh printer driver on a Windows, select ‘Add a printer’.
- Then a Windows 7 user is required to click on ‘Add a local printer’. After that, choose ‘Create a new port’ and then select ‘IP/TCP port’ by going to the drop down box.
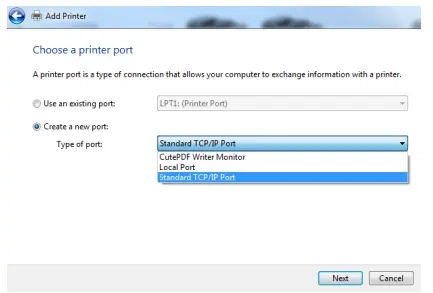
- Windows 8 users click on the ‘printer I want is not listed’ and then choose “Add a printer by TCP/IP Address or host name and then go to ‘next’.
- In some of the cases Windows 8 or 10 will detect the printer automatically. To get the best reliability, It is recommended for you to add print queue in a manual way.
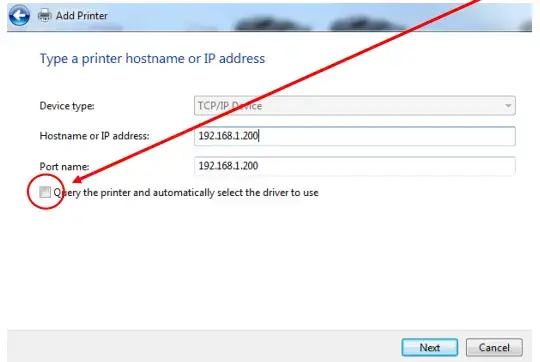
- In the box after ‘IP address or Hostname’, enter the IP address that we located in the second step. You are only required to enter the full stops and numbers. It is important for you to ensure that the option of ‘Query the printer and automatically select the driver to use’ is not ticked and then click on Next.
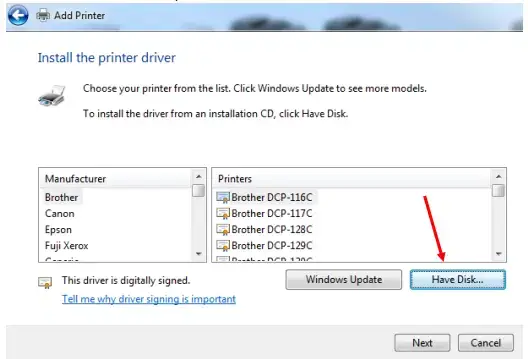
- Go to Have Disk and then select ‘Browse’. Now, go to the Ricoh folder that is placed in the drive C.
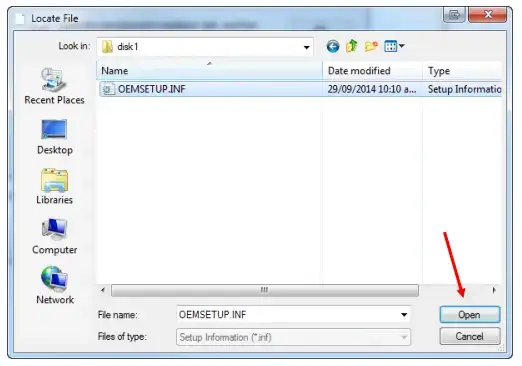
- Now to install a Ricoh printer driver, go to the ‘OEMSETUP.INF’ in the folder of Disk 1 and then open it.
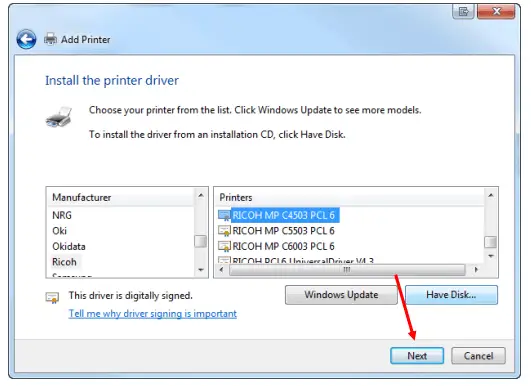
- Under the option of ‘Manufacturer’ select Ricoh and highlight it. After that to install install a Ricoh printer driver, select the Ricoh MFD model below ‘Printers and then click on ‘Next’.
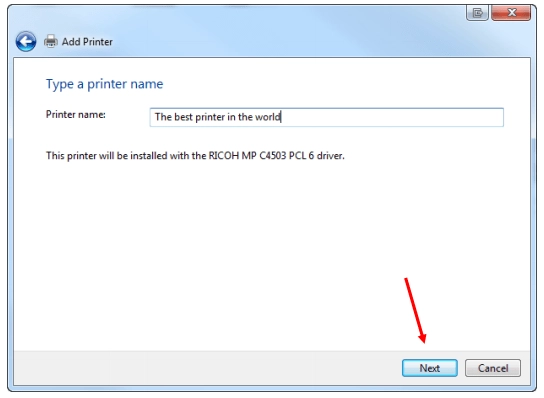
- Give descriptive name to the printer and then select ‘Next’.
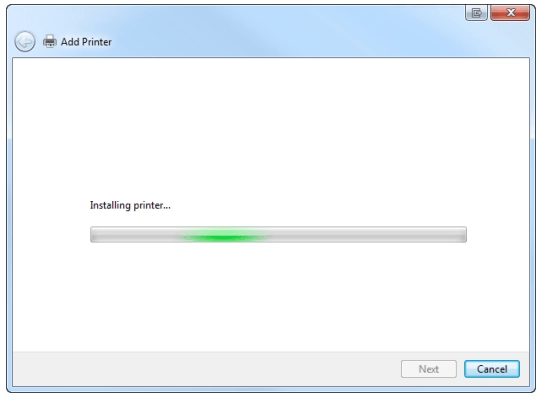
- Wait for the Ricoh printer to get installed.
- The printer sharing dialog box will appear in front of you.Please ensure that the option of ‘Do not share this printer’ is chosen, and then click on Next.

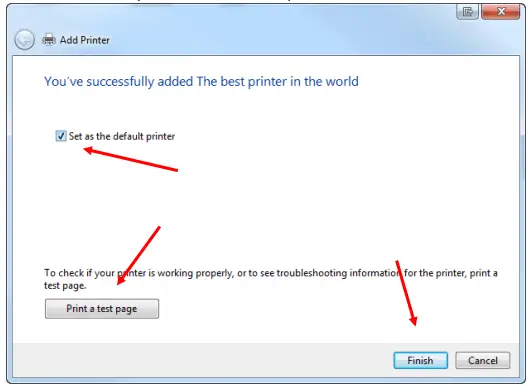
- In case, the printer that is getting installed is the one that you will be using the most, then check the option of ‘Set as the default printer’. Now, click on the option of ‘Print a test page’ to check the printing and color. The defaults will be set in the coming steps. Now, click on Finish for completing the installation process.
Step 8: Setting Print Queue Defaults
It is recommended to set the default color mode to black and white. Change the settings to color in case you need colored print outs in your day to day tasks. It is important for you to check whether the default behaviour is double or single side the pages. In case you have a user code for printing, then you must enter it before you print anything black and white or colored. Otherwise you will not be able to print it.
Also Read:
- How to Sign in as Machine Administrator on Ricoh Printers?
- Ricoh Printer Stuck on Processing
- How to Fix Paper Jam in Ricoh Printer?
FAQ for Install a Ricoh Printer Driver on a Windows
- Mick
 Brand: Ricoh Printer
- Last Update: 1 month ago
 Related Articles


Top Searches in Ricoh Printer
How to Turn My Ricoh Printer Online from Offline?
May 23, 2026
How to Connect Ricoh Printer to MAC?
May 23, 2026
Ricoh Printer Stuck on Processing
May 23, 2026
How to Clear a SC546 Error on a Ricoh?
May 23, 2026
How to Install Ricoh Printer Drivers Without CD?
May 23, 2026
How do I Connect My Ricoh Printer to My Computer?
May 23, 2026
How to Fix Ricoh MP C2050 Service Error Code SC542?
May 23, 2026
How to Install Ricoh Printer Driver on Windows 10?
May 23, 2026
How do You Change a Printer from Offline to Online?
May 23, 2026
Featured Articles
How to Get Canon Printer Online on MAC?
Jun 4, 2026
How to Fix Printer Printing Horizontal Black Lines?
May 23, 2026
How to Scan from HP Printer to Computer Windows 10?
Jun 13, 2026
Ricoh Printer Stuck on Processing
May 23, 2026
Brother Printer Only Printing in Black and White
Jun 21, 2026
How to Clean Kodak Printhead?
May 23, 2026
How to Install Lexmark Printer to Computer Without CD?
Jun 12, 2026
Why My Samsung Printer is Not Printing Clearly?
May 23, 2026
Top Questions
Why Won't My Canon Printer Print after Changing an Ink Cartridge?
May 23, 2026
How do I Fix a Canon Printer 1403 Error?
May 23, 2026
How do I Connect My Canon MG3050 Printer to WiFi?
May 23, 2026
How to Change Printer from Offline to Online Canon?
May 23, 2026
How to Turn My Ricoh Printer Online from Offline?
May 23, 2026
Brother MFC Printer Won't Print Black Despite Full Ink Cartridges
May 23, 2026
How to Fix Epson Printer Filter Failed or Stopped on Mac Error?
May 23, 2026
How do You Get a Lexmark Printer Back Online?
May 23, 2026