How Do I Reset a Ricoh Aficio CL3000e Printer to Factory Defaults?
Hello, Please let me know that how do i reset a Ricoh aficio cl3000e printer to factory defaults. Help me.
 1 Ans
1 Ans- 5 years ago
Reset Ricoh Aficio Printer to Factory Defaults
 Do you want to reset the Ricoh Aficio printer to factory defaults? How to do that? At certain times, there is an essential need to reset your printer or copier machine back to its original factory settings.
This may be caused due to network changes, re-positioning the printer to a new location, adding new accessories to the machine, or randomly making a particular setting as a default setting. But, above all that, the good thing is that you can easily reset a Ricoh Aficio cl3000e printer to factory defaults which can be accomplished in just a few steps.
Why You Need to Reset Ricoh Printer?
Suppose you have changed your router and you want to connect your printer to the new router network. In such a scenario, your printer attempts to connect to the old wifi settings. This complete thing triggers the need to reset a Ricoh aficio cl3000e printer to factory defaults.
Important Note: The steps to factory reset are similar for most Ricoh's machines, some may require slightly different steps or may not have different buttons than other models. So, this answer gives you a basic factory reset procedure for all types of Ricoh printer machines. For the more specific procedure, you can take assistance from the device manuals.
How is Backup Required During Ricoh Factory Reset?
When you reset a Ricoh printer, it means you restore all the configured settings back to the original factory settings. One might delete or reset the saved settings as they may want to clear copy settings that were mistakenly saved as a default setting. The only important thing one should realize is that when you reset a Ricoh, you actually clear all saved information on the Ricoh machine.
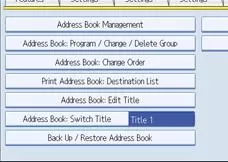
Step 1: Backup of Address Books
Take a backup of address books saved in the Ricoh copier settings that you may need in the future. With the help of the owner's manual, follow the steps to back up any information that you want to keep safe and do not want to lose.
This is because resetting the device to factory defaults will erase all the stored data from the printer's memory.
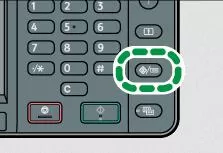
Step 2:
Press and hold the "./*" key and the "#" key on the Ricoh copier panel for about 10 seconds. While you are holding the buttons for 10 seconds, you won't see anything happening on the screen.
Once after 10 seconds are completed, the Ricoh printer automatically shuts down and starts to reboot. By doing this process, you can reset the Ricoh Aficio cl3000e printer to factory default settings.
Step 3:
Perform a quick test to ensure that the complete reset process worked to succeed. Go through the menu options on the panel screen and you will notice that all your old settings have been discarded and replaced with the original default settings. Your address books have been cleared.

If this same thing has happened, this means that the steps to reset a Ricoh Aficio cl3000e printer to factory defaults are correct and successful. If the reset steps haven't worked well and you find anything missing, you can check your owner's manual. This is because the procedure for some Ricohs may differ from this process.
This information can be anything including any documents earlier saved to the copier's hard drive, stored user codes, and saved fax numbers and addresses. By taking a backup, you save all the important data on your device. Just like reset, data backup is also simple and you can easily check the user's manual to learn how to back up this information.
More Important Pages for Ricoh Printers
How to Fix Error Code SC899 on Ricoh Printer?
How to Troubleshoot Ricoh Printer Stuck on Processing?
How to Clear a SC546 Error on a Ricoh?
How to Connect Ricoh Printer to WiFi Network?
- 2 years ago
 Related Articles

Top Searches in Ricoh Printer
How to Turn My Ricoh Printer Online from Offline?
May 23, 2026
How to Connect Ricoh Printer to MAC?
May 23, 2026
Ricoh Printer Stuck on Processing
May 23, 2026
How to Clear a SC546 Error on a Ricoh?
May 23, 2026
How to Install Ricoh Printer Drivers Without CD?
May 23, 2026
How do I Connect My Ricoh Printer to My Computer?
May 23, 2026
How Do I Reset a Ricoh Aficio CL3000e Printer to Factory Defaults?
May 23, 2026
How to Fix Ricoh MP C2050 Service Error Code SC542?
May 23, 2026
How to Install Ricoh Printer Driver on Windows 10?
May 23, 2026
How do You Change a Printer from Offline to Online?
May 23, 2026
Featured Articles
How to Get Canon Printer Online on MAC?
Jun 4, 2026
How to Fix Printer Printing Horizontal Black Lines?
May 23, 2026
How to Scan from HP Printer to Computer Windows 10?
Jun 13, 2026
Ricoh Printer Stuck on Processing
May 23, 2026
Brother Printer Only Printing in Black and White
Jun 21, 2026
How to Clean Kodak Printhead?
May 23, 2026
How to Install Lexmark Printer to Computer Without CD?
Jun 12, 2026
Why My Samsung Printer is Not Printing Clearly?
May 23, 2026
Top Questions
Why Won't My Canon Printer Print after Changing an Ink Cartridge?
Oct 7, 2020
How do I Fix a Canon Printer 1403 Error?
Dec 30, 2020
How do I Connect My Canon MG3050 Printer to WiFi?
Mar 30, 2021
How to Change Printer from Offline to Online Canon?
Nov 27, 2020
How to Turn My Ricoh Printer Online from Offline?
Feb 20, 2021
Brother MFC Printer Won't Print Black Despite Full Ink Cartridges
Nov 7, 2020
How to Fix Epson Printer Filter Failed or Stopped on Mac Error?
Dec 7, 2021
How do You Get a Lexmark Printer Back Online?
Sep 29, 2020