How do I Connect My Ricoh Printer to My Computer?
Hello, Please let me know that how do I connect my Ricoh printer to my computer. I bought an new Ricoh printer and now trying to connect with my computer. But it's not connecting. Help me.
 1 Ans
1 Ans- 5 years ago
Do you want to know how to connect the Ricoh printer to the computer? If yes, then you have made the right decision to open this link. Here, you are going to read out all the steps that you need to perform to connect your printer to the computer directly.
How to Enable Soft AP Function Using the Power Key on the Printer?
Carry out the steps below to enable the soft AP function on Windows.
Step 1: Press the power key to turn on your printer.
Step 2: Press the power key and keep on holding it for longer than a second. The power light will turn blue and the wireless function will get enabled on your printer.
Step 3: Press the power key for another second. The power light will flash twice and the soft AP function will get turned on.
Step 4: Set papers on your printer.
Step 5: Press the power key three times in a row. The system settings page will get printed from the printer.
Step 6: Confirm that the soft AP function is enabled on the sheet of system settings. In case the soft AP is not enabled, then carry out all the steps from step 1 to turn on soft AP.
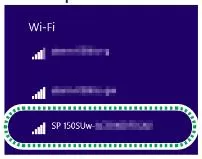
Step 7: Click on the icon of wireless on the taskbar of your PC. Available network names will be displayed before you.

Step 8: Select the name of your printer from the list.
Step 9: Enter the password for soft AP and then select connect.
- Enter the password for soft AP in the section of passphrase below soft AP on your sheet of system settings.
- The password and network name can be changed with the help of the Ricoh printer.
- In case you wish to disable the soft AP function, then press the power button for more than a second. The power indicator will flash before you three times in a row.
Now, you can print your documents on the computer through a wireless network by choosing the option of print from the applications menu.
How to Enable Soft AP Function on Your Ricoh Printer?
Before you start with the steps, you need to install the Ricoh printer on your computer first. Once you are done installing the printer, then you can proceed with the steps below.
Step 1: Press the power key and then turn on your printer.
Step 2: Use a USB wire to connect your printer to the computer.
Step 3: Look for the Ricoh printer icon on the screen and then click on it. The app will be launched.
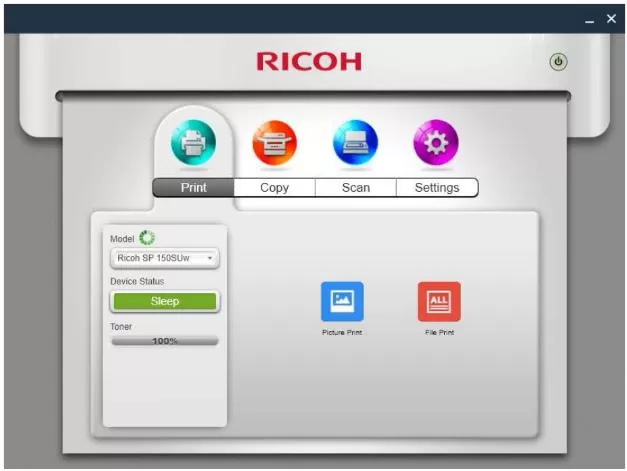
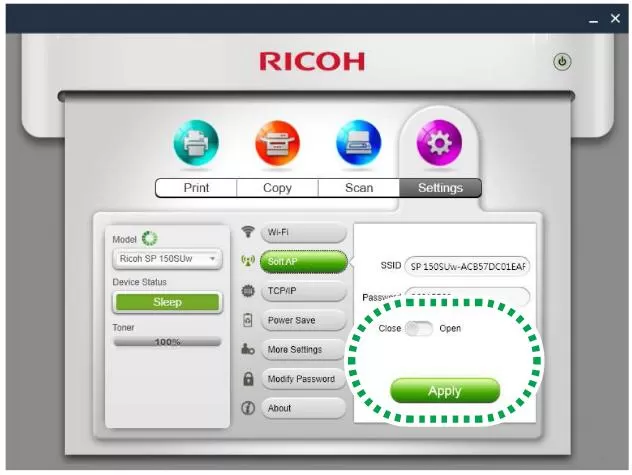
Step 4: Select settings.
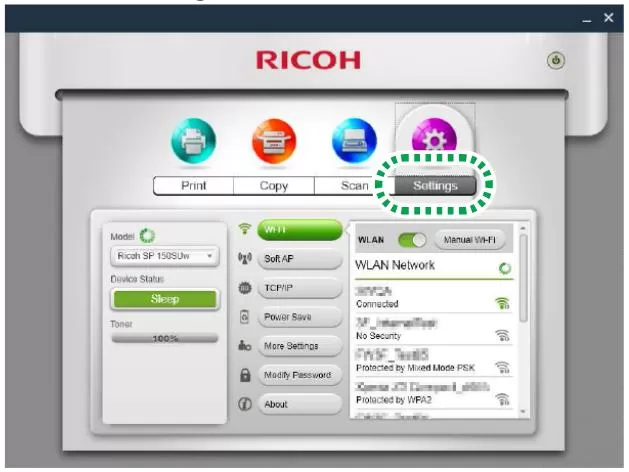
Step 5: Now select the option of Soft AP. The SSID and the password for the printer will be set by default. You can reset the network name and password for Soft AP. Select the SSID text box and then put in the SSID in 32 characters. Select the passphrase textbox and then enter the new password in 8 to 63 characters.
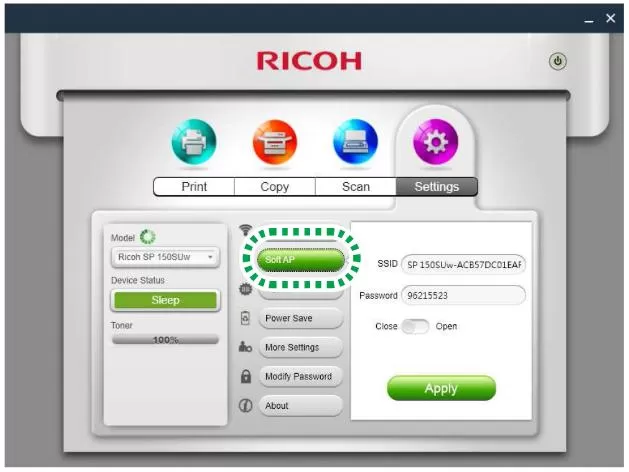
Step 6: Toggle the switch to turn on the soft AP function and then select Apply.
In case there are some changes in the settings, the authentication password screen will open up after clicking on Apply. Enter the default admin password 888888.
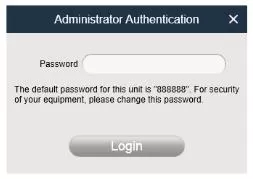
You can also reset the password by going to the section of "modify password" in the menu of settings. Restart your printer to apply the changed settings.
Step 7: Select the icon of the wireless network on the taskbar of your computer. You can search for the available access points and the access points found will appear on the list.
Step 8: Select your printer from the list.
Step 9: Enter the password for Soft AP and then select Connect.
The printer has a soft AP function, which makes your printer a temporary router device. The advantage of this feature is that you can connect your Ricoh printer to the computer without using a Wi-Fi router. However, this soft AP function only works in the case of a Windows computer. Let us now get to know how to enable the soft AP function on Windows.
More Important Pages for Ricoh Printers
How to Fix Error Code SC899 on Ricoh Printer?
How to Troubleshoot Ricoh Printer Stuck on Processing?
How to Clear a SC546 Error on a Ricoh?
How to Connect Ricoh Printer to WiFi Network?
- 2 years ago
 Related Articles


Top Searches in Ricoh Printer
How to Turn My Ricoh Printer Online from Offline?
May 23, 2026
How to Connect Ricoh Printer to MAC?
May 23, 2026
Ricoh Printer Stuck on Processing
May 23, 2026
How to Clear a SC546 Error on a Ricoh?
May 23, 2026
How to Install Ricoh Printer Drivers Without CD?
May 23, 2026
How do I Connect My Ricoh Printer to My Computer?
May 23, 2026
How Do I Reset a Ricoh Aficio CL3000e Printer to Factory Defaults?
May 23, 2026
How to Fix Ricoh MP C2050 Service Error Code SC542?
May 23, 2026
How to Install Ricoh Printer Driver on Windows 10?
May 23, 2026
How do You Change a Printer from Offline to Online?
May 23, 2026
Featured Articles
How to Get Canon Printer Online on MAC?
Jun 4, 2026
How to Fix Printer Printing Horizontal Black Lines?
May 23, 2026
How to Scan from HP Printer to Computer Windows 10?
Jun 13, 2026
Ricoh Printer Stuck on Processing
May 23, 2026
Brother Printer Only Printing in Black and White
Jun 21, 2026
How to Clean Kodak Printhead?
May 23, 2026
How to Install Lexmark Printer to Computer Without CD?
Jun 12, 2026
Why My Samsung Printer is Not Printing Clearly?
May 23, 2026
Top Questions
Why Won't My Canon Printer Print after Changing an Ink Cartridge?
Oct 7, 2020
How do I Fix a Canon Printer 1403 Error?
Dec 30, 2020
How do I Connect My Canon MG3050 Printer to WiFi?
Mar 30, 2021
How to Change Printer from Offline to Online Canon?
Nov 27, 2020
How to Turn My Ricoh Printer Online from Offline?
Feb 20, 2021
Brother MFC Printer Won't Print Black Despite Full Ink Cartridges
Nov 7, 2020
How to Fix Epson Printer Filter Failed or Stopped on Mac Error?
Dec 7, 2021
How do You Get a Lexmark Printer Back Online?
Sep 29, 2020