
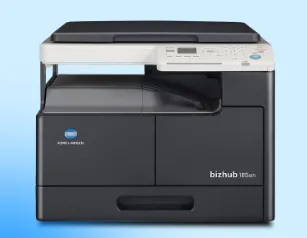
How to Set up Scan to Email on Konica Minolta Printers?
Set Up Scan to E-mail on Konica Minolta Printers:
When everything is set up, you may sign in to the printer and set up scan to email on Konica Minolta printers option.
Follow the instructions below to set up scan to email so that anyone can scan or send e-mails to the business's Microsoft 365 and Office 365 mailboxes.
- Sign in to the Microsoft 365 admin page in a new browser tab (admin.microsoft.com).
- Select from the navigation menu View all.
- After choosing Settings, choose Domains.
- Choose your domain from the DNS records tab. E.g.:- acme.com
- Note the POINTS TO ADDRESS value for the MX record. In step 9, you must have the MX record. acme-com.mail.protection.outlook.com, for example
- Enter the web page for the printer and log in as the administrator.
- From the main menu, choose Network.
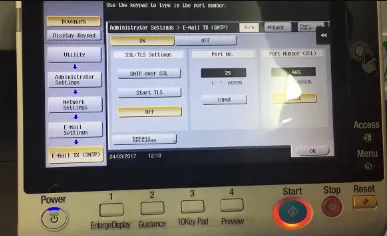
- Select E-mail TX under E-mail Settings (SMTP).
- The page for e-mail TX (SMTP)
Select "SMTP Server Address" Please double-check the hostname field and type the value you noted in step 5.
- acme-com.mail.protection.outlook.com, for eg
- Port Number should remain set at 25.
- Choose Start TLS under Use SSL/TLS.
- Set the value of Port No. (SSL) to 465 or 587.
- Choose OFF in POP before SMTP.
- Uncheck SMTP Authentication if it is selected.
- Choose OK.
- The message Completed displays a short while later.
- Choose OK.
Remember that you must choose Logout before choosing OK to leave the printer's web pages if you want to utilise the touchscreen control panel to log in or print without experiencing problems, including receiving error messages.
E-mail Sender and the Me Button
There is a Me button here on the Konica Minolta E-mail function. To scan it for yourself, choose it. Your e-mail address is instantly prefilled in the To and From fields because you're signed in with Printix.
If the e-mail sender (From field) does not contain a certain value, certain SMTP servers may refuse to send the scanned documents. You may define the E-mail sender as a workaround with the Go setup.
The Me button, though, would not function as expected because the To field will also be set to this email address. In this scenario, you can choose the receiver from the printer's Address Book or type their email address into the printer's control panel.
The following is also another potential workaround to make the Me button functional:
- Enter the web page for the printer, then log in as the administrator.
- The main menu, and then choose Security.
- Choosing Restrict User Access.
- Choose Allow under Registering and updating addresses.
- To prevent the "From" address from changing and use the administrator's address, choose Admin. E-mail Address under "Shifting the "from" address".
Also Read:
- How to Fix Printer Needs User Intervention Error in Windows 10?
- How to Install the Same Printer Twice on One Windows PC?
- How to Fix Printer Redirection is Not Working in Windows 11?
FAQ for Set up Scan to Email on Konica Minolta Printers
- Mick
 Brand: Other
- Last Update: 1 month ago
 Related Articles


Top Searches in Other
How to Fix Printer Spooler Problems on Windows 10?
May 23, 2026
9 Best Printer to Buy for Home Office Use in 2026
May 23, 2026
How to Fix Boot Device Not Found 3f0 Error?
May 23, 2026
How to Fix Print Job Stuck in Queue?
May 23, 2026
How to Make Printer Online in Windows 10?
May 23, 2026
Why is a Printer Printing Blank Pages on Windows 10?
May 23, 2026
How to Troubleshoot Wireless Printer Not Printing?
May 23, 2026
Featured Articles
How to Get Canon Printer Online on MAC?
Jun 4, 2026
How to Fix Printer Printing Horizontal Black Lines?
May 23, 2026
How to Scan from HP Printer to Computer Windows 10?
Jun 13, 2026
Ricoh Printer Stuck on Processing
May 23, 2026
Brother Printer Only Printing in Black and White
Jun 21, 2026
How to Clean Kodak Printhead?
May 23, 2026
How to Install Lexmark Printer to Computer Without CD?
Jun 12, 2026
Why My Samsung Printer is Not Printing Clearly?
May 23, 2026
Top Questions
Why Won't My Canon Printer Print after Changing an Ink Cartridge?
May 23, 2026
How do I Fix a Canon Printer 1403 Error?
May 23, 2026
How do I Connect My Canon MG3050 Printer to WiFi?
May 23, 2026
How to Change Printer from Offline to Online Canon?
May 23, 2026
How to Turn My Ricoh Printer Online from Offline?
May 23, 2026
Brother MFC Printer Won't Print Black Despite Full Ink Cartridges
May 23, 2026
How to Fix Epson Printer Filter Failed or Stopped on Mac Error?
May 23, 2026
How do You Get a Lexmark Printer Back Online?
May 23, 2026