How to Setup Canon Pixma MX490 Printer?
Hi, I bought a canon pixma mx490 printer, But now i am trying to setup this printer but they are not connecting, so please give any suggestion to setup pixma mx490.
 1 Ans
1 Ans- 5 years ago
Canon Pixma MX490 Printer Setup Process :
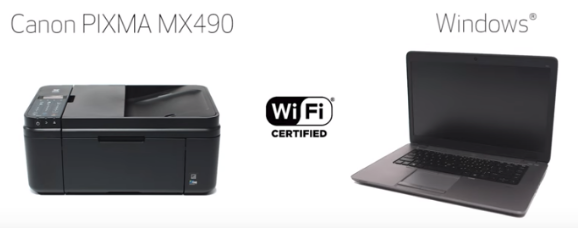
 Canon MX490 printer is one of the trendy printer and has got multipurpose usage. Canon, being one of the finest printer machine giant brand, gives you the option to connect wireless and making a standard setup.
Here, we shall cover the basic steps to cover the wireless setup of Canon Pixma MX490 Printer to your system.
Steps for Cable Setup of Canon MX490 Printer:
Let us discuss the Canon Pixma MX490 setup using standard wireless set up as discussed below:
Step 1 : Before connect Canon mx492 printer to wifi, assure that your router is properly set up and no network issue prevails. Make sure system and network are connected smoothly for further procedure.
Step 2 : Make sure printer is plugged into socket and powered “ON”, green LED light indicates that printer is ON.
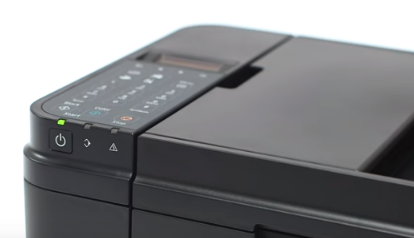
Step 3 : If the screen display is blank after printer is turned ON, press the copy button, followed by the Setup button after screen is ON at touch panel display. Setup button is at bottom right of the four button panel displayed below.
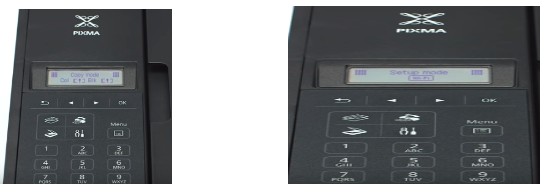
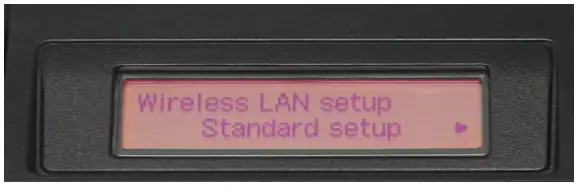
Step 4 : The screen will display wireless LAN setup options on touch panel, press OK button and it will search for various modes. Press stop until below display (Wireless LAN setup>Standard setup) appears on the screen.
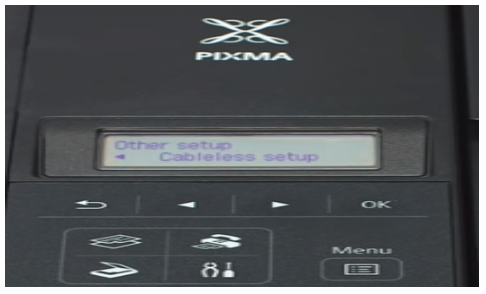
Step 5 : Scroll right for various options and press ok after selecting cable less setup on your Canon Pixma MX490 printer touch display panel.
Step 6 : Now install Canon MX490 Printer software either through the CD rom that comes with your printer or you could also manually download through the canon web site.
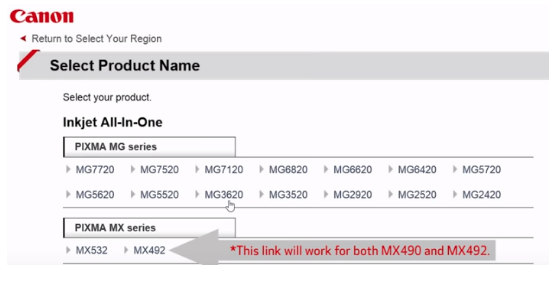
Step 7 : Start with your language, country and select the model of the printer i.e. Canon Pixma MX490 or MX492 as shown below.
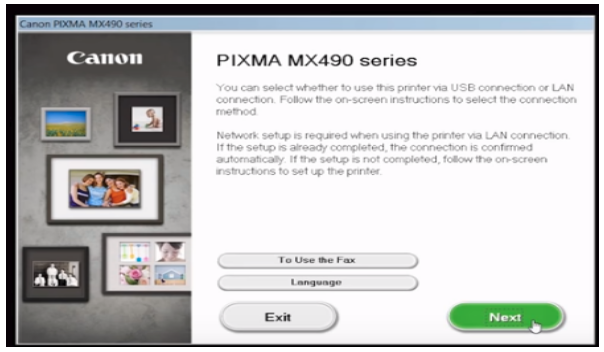
Step 8 : Select the device, operating system (Windows) and select the folder to download the driver file. Run the downloaded file and run the set up by clicking next.
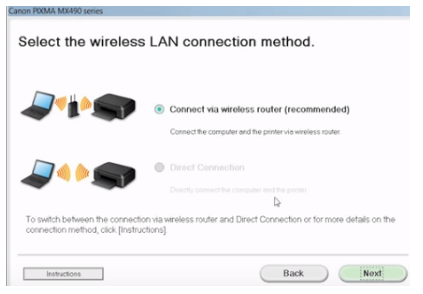
Step 9 : Select wireless LAN connection printer method as Canon Pixma MX490 printer connection method and select connect via wireless router method.
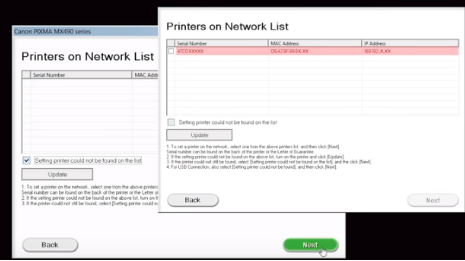
Step 10 : Make sure Canon Pixma MX490 Printer is ON, the software will search for printers already connected to the network, if it is the first time list shall be blank and check inbox setting printer could not be found on list, else click next.
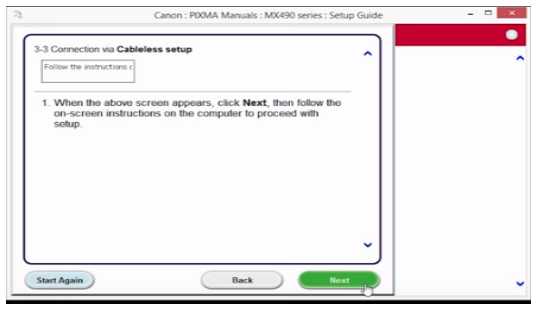
Step 11 : Setup guide shall be installed on your system and click next in cable-less setup submenu. The network connection will disable for a short time and reconnect shortly.
Step 12 : After network has been restored, installation shall start and click on license and agreement to start the process, click on complete tab after the option displayed after setup being installed.
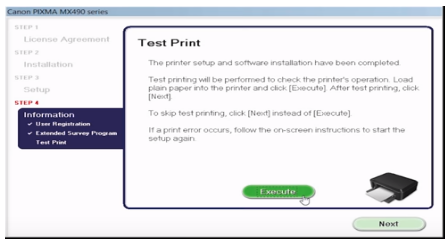
Step 13 : After canon mx490 printer installation, next step is Set up means page alignment and then last point having registration and surveys, if you want to skip the survey and registration you can continue for test page print and click the execute button.
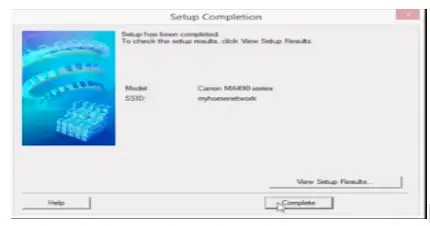
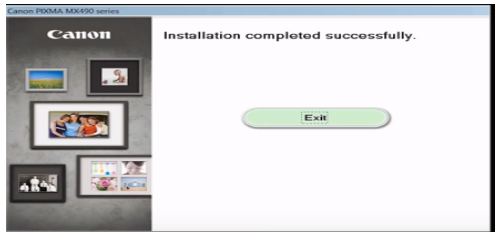
Step 14 : Now you could see installation completed successful display and now you are ready to print or scan using Canon Pixma MX490 printer.
Hope the above steps are helpful in connecting your Canon printer MX490 and carry on smooth operations.
- 2 years ago
 Related Articles


Top Searches in Canon Printer
Why Won't My Canon Printer Print after Changing an Ink Cartridge?
May 23, 2026
How to Get Canon Printer Online on MAC?
Jun 4, 2026
How do I Fix a Canon Printer 1403 Error?
May 23, 2026
How do I Connect My Canon MG3050 Printer to WiFi?
May 23, 2026
How to Change Printer from Offline to Online Canon?
May 23, 2026
How to Connect Canon TS3122 Printer to WiFi?
May 23, 2026
How to Fix Canon Printer Carriage Jam Problem?
May 23, 2026
How to Fix Canon Printer Error Code 1660?
May 23, 2026
How to Resolve OKI Printer Error Code 990?
May 23, 2026
How do I Reset Canon MG2522 Printer?
May 23, 2026
Featured Articles
How to Get Canon Printer Online on MAC?
Jun 4, 2026
How to Fix Printer Printing Horizontal Black Lines?
May 23, 2026
How to Scan from HP Printer to Computer Windows 10?
Jun 13, 2026
Ricoh Printer Stuck on Processing
May 23, 2026
Brother Printer Only Printing in Black and White
Jun 21, 2026
How to Clean Kodak Printhead?
May 23, 2026
How to Install Lexmark Printer to Computer Without CD?
Jun 12, 2026
Why My Samsung Printer is Not Printing Clearly?
May 23, 2026
Top Questions
Why Won't My Canon Printer Print after Changing an Ink Cartridge?
Oct 7, 2020
How do I Fix a Canon Printer 1403 Error?
Dec 30, 2020
How do I Connect My Canon MG3050 Printer to WiFi?
Mar 30, 2021
How to Change Printer from Offline to Online Canon?
Nov 27, 2020
How to Turn My Ricoh Printer Online from Offline?
Feb 20, 2021
Brother MFC Printer Won't Print Black Despite Full Ink Cartridges
Nov 7, 2020
How to Fix Epson Printer Filter Failed or Stopped on Mac Error?
Dec 7, 2021
How do You Get a Lexmark Printer Back Online?
Sep 29, 2020