How to Connect Canon MG3620 Printer to WiFi?
Connect Canon MG3620 Printer to WiFi:
The all-in-one Canon MG3620 printer supports an advanced wireless system which allows you to print and scan conveniently using the mobile devices and built-in cloud services. The simplicity of Canon printers eases in accessing the printer from any corner of your house or office.
And so, this is one great feature which makes it more user-friendly. But sometimes, you are unable to connect Canon mg3620 printer to wifi and enjoy its wireless printing benefits. Well, here you will get a step-by-step answer to resolve the connection issues with your printer.
Over the years, Canon has developed cable free printers which can be operated upon wifi connection. Now, you just have to follow a simple procedure to connect canon mg3620 printer to wifi. Just like the wireless network technology of mg3620 Canon Printer, Canon PIXMA series also offers you this Wifi feature.
By including this wireless printing feature, you can avail a shared printing experience in comparison to the former style of printing. Wi-Fi Printing is an incredible feature and solution for home and large organization. Using the HomeGroup, anyone can experience network printing with Canon. Moreover, with Google Cloud Print, you can print any documents from anywhere.
With Canon printers, you have full ease, convenience and simplicity to print any kind of soft copy information. In fact, you have an app named “Canon PRINT” available in Play store. You can download that app and connect canon mg3620 printer to wifi through your mobile device.
The app has made much easier to print photos, documents and important files from your mobile devices. Additionally, it includes some other features like:
- Easy-photo printing
- Hybrid link system
- Airprint functionality
- Enhanced print resolution
Despite the availability of such amazing features, you sometimes may get troubled in connecting your wireless printer. Well, if this is the issue, not to worry and read ahead to understand the guide to connect canon mg3620 printer to wifi.
This guide brings you an easy and effective method to connect canon mg3620 printer to wifi. All you need to do is follow the step by step instructions in the given sequence.
Quick Steps to Connect Canon MG3620 Printer to WiFi:
If one faces issues in connecting their Canon printer to wifi, then use WPS to establish an automatic connection. Eliminate the process of connecting printers through cables or USBs, and simply switch to network printing.
Here you will get the best possible solution to connect Canon mg3620 printer to Wifi. Just follow the complete process in the exact sequence to experience wireless network printing. You can set up your Canon printer using online remote services from anywhere anytime.
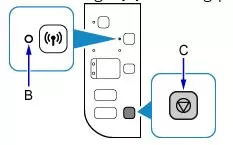
Step 1: Firstly, press the B button on the printer. The Wi-Fi light of the printer starts blinking.
Step 2: Secondly, press and hold down the Wifi Button. Keep pressing the button until and unless the ON light of printer flashes.
Step 3: Now after pressing the color button, press the Wifi button. Ensure whether the Wi-Fi light is flashing or not. Also, check that the ON light of printer is lit or not.
Step 4: Further install the printer driver to proceed with the connection process.
Step 5: In the next step, start the setup program by inserting the CD software and browsing the CD-ROM folder.
Step 6: Run the exe. file in order to begin the printer installation process.
Step 7: Next, you have to click on the Start Setup Button of installation wizard followed by some on-screen instructions.
Step 8: Choose an appropriate LAN Connection under the Select Connection Method tab and click on the Next.
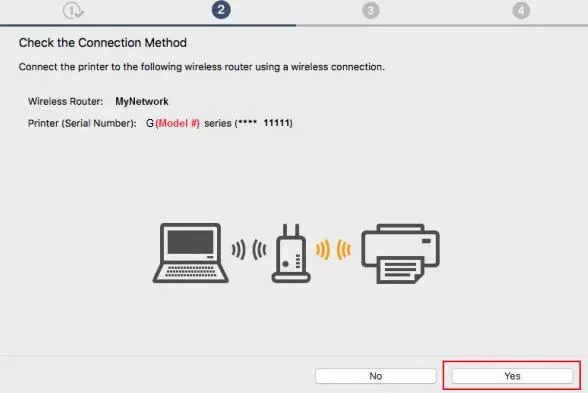
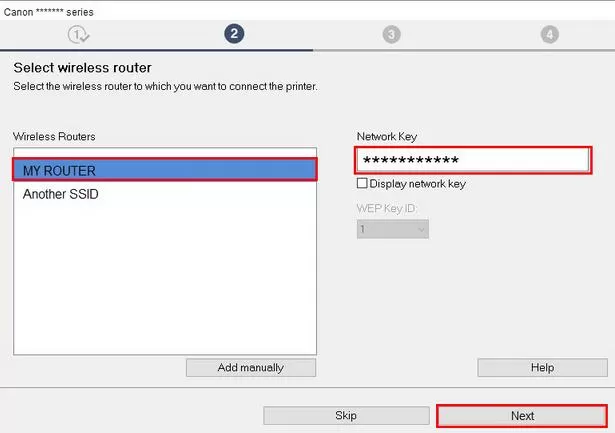
Step 9: A popup window will display on your screen. Choose Connect via Wireless Router and then click on Next button.
Step 10: Click on the Next button showing at the Check Power Screen window.
Step 11: Select your Printer from the Network list shown on the screen and then click on Next button.
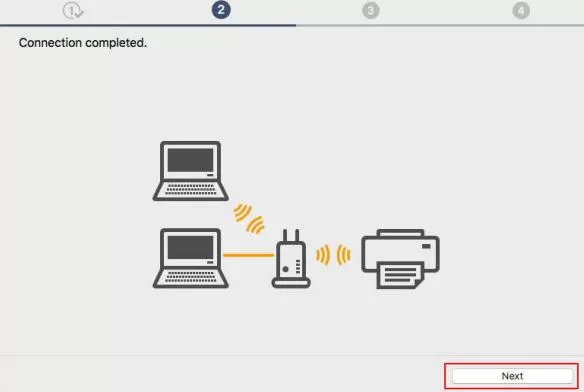
Step 12: The printer connection is now completed and its message will appear on the screen. Click on Next button to proceed.
Step 13: Click Next option on Setup Complete Screen.
Step 14: Now the Software Installation list will be shown. Choose the software and click on the Next button.
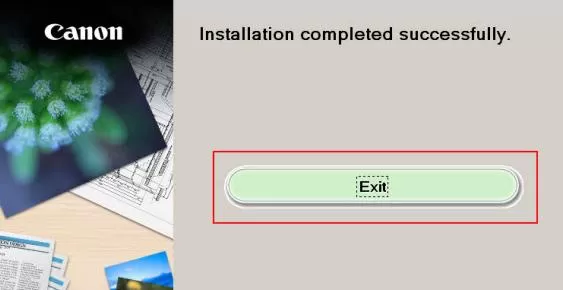
Step 15: Finally click on Exit on Installation Completed Successfully window and complete the setup process.
Connect Canon MG3620 Printer to WiFi:
Whosoever is in your home or office, you can share this printer without the need to install cables separately for every workstation. Simply follow the given procedure and connect canon mg3620 printer to wifi network.
Before initiating Canon mg3620 wifi setup, you should be logged-in as an administrator while all your work applications should be closed.
Connecting Canon MG3620 Printer to WiFi - Using Control Panel
Remember, before starting the setup, if your printer is performing a printing, cleaning, alignment, or any other work, wait until it completes. As you find the wifi light on the printer is flashing, simply press the Stop button to end.
Step 1: Continuously press and hold the Wi-Fi button on your Canon printer panel until the ON light glows.

Step 2: Next, press the Color button and then press the Wi-Fi button.
Step 3: Check when the Wi-Fi light glows and also the ON lamp should remain lit.
Step 4: Install the required printer driver and software on your computer system in order to continue the wireless setup.
Step 5: Insert the installation disc into the CD Drive for printer installation process.
Step 6: The setup wizard starts automatically. If it doesn't start by itself, browse to the CD-ROM folder and run the exe. Alternatively, you can get the genuine Canon MG3620 software from official Canon website.
Note: If some dialogue box prompts by Windows User Account Control or your Antivirus/Firewall appears, allow the installation process.
Now, the Canon 3620 WiFi Setup Installation Starts as Follows:
- Firstly click on the Start Setup button displayed on the first screen.

- With the help of on-screen instructions, choose your country, license agreement, etc. Next, in the Select Connection Method option, choose the Wireless LAN Connection.

- Next, select Connect via wireless router (recommended) radio button and then click on Next.
- A Power screen appears and then click on Next.
- You will see a list of printers that are over network.
- Now, select your Canon PIXMA3620 and click Next. Make sure to verify the serial number from the back side of your printer.
- When you see the Connection Completed screen, click on Next.
- At last, Software Installation List appears where you can select the optional software that you want to install and click Next.
Step 7: As the installation completes, a Success message displays on the screen.
Step 8: Finally, press Exit which finishes the setup and start printing.
Important Tip: In case, if the issue exists with your computer or a laptop/notebook. you can simply some software to scan the repositories and replace corrupt and missing files. Such software are helpful in most cases, when the issue originates because of a system corruption.
Connect Canon MG3620 Printer to WiFi - Canon mg3620 wifi setup
Step 1 : To kickstart the wireless setup process, firstly turn ON the Canon Pixma MG3620 printer. The ON lamp of the printer glows when the device is turned ON.
Now, allow the Canon printer to complete the cleaning, printhead alignment and other ongoing process before initiating setup. Further, step ahead to connect canon mg3620 printer to wifi.
Step 2 : Press the Stop button of the Canon printer to turn off the flashing wifi lamp. Select a connection method to set up the printer via wifi network.
A point to note that cableless setup takes some time so the internet connection should be available during the wireless setup to connect canon mg3620 printer to wifi.
Step 3 : Generally, cableless setup is not available for Windows RT and Chrome operating systems. So, in this case, you can establish wireless router information to the Canon Pixma MG3620 printer using your smartphone without any access point.
You just have to run the installation file for executing a cableless setup on your Windows or MAC system.
Step 4 : You can get the original Windows and Mac software installer from their official websites. Additionally, you can make use of Canon PRINT Inkjet or SELPHY application for a cableless setup on your Android/iOS devices.
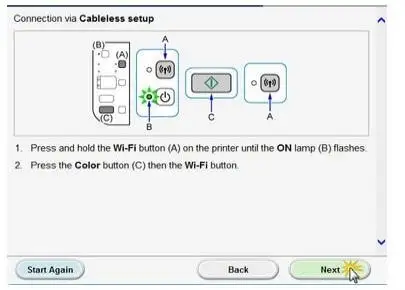
Step 5 : Press and hold the wifi button on the printer until the ON light glows. Now, press the Black button and then tap over the wifi button.
Make sure that the wifi light and the ON lamp glows. This is a must to connect canon mg3620 printer to wifi.
Step 6 : For setting a wireless connection, you may also use the WPS PIN method. For this, hold and press the wifi button until the ON lamp blinks. You can check the wireless connection information page which has the PIN code.
Long press the Stop button on your printer and then wait for the Alarm light to blink at least sixteen times.
Step 7 : Lastly, you can release the Stop button after the 16th blink. Thereafter, follow the instructions shown on the screen of your smartphone and finish the setup.
Set the code that is shown on the Network configuration page to the wireless router. Make sure that the wifi light on the printer glows.
Hope these instructions to connect Canon mg3620 printer to wifi work well for your devices.
Nowadays, the best thing about using printers is that you can use them wirelessly. Isn't that true? But, most users are not well known with the process of connecting wireless printers. So to connect Canon mg3620 printer to wifi, we have a quick and easy guide for you.
Using Canon MG3620 printer, you can connect the device via any wifi network. Once the printer is connected to wifi, you can share this printer with as many users you want in your home or office without the need to use cables. You just need to follow the given procedure to connect Canon mg3620 printer to wifi and further configuring it.
Almost every printer machine from the PIXMA multifunction series supports wifi connection. Like, Canon PIXMA MG3620 allows you to connect to the Wi-Fi wireless network.
- SAM
 Brand: Canon Printer
- Last Update: 3 weeks ago
 Related Articles


Top Searches in Canon Printer
How to Get Canon Printer Online on MAC?
Jun 4, 2026
How do I Fix a Canon Printer 1403 Error?
May 23, 2026
How do I Connect My Canon MG3050 Printer to WiFi?
May 23, 2026
How to Change Printer from Offline to Online Canon?
May 23, 2026
How to Connect Canon TS3122 Printer to WiFi?
May 23, 2026
How to Fix Canon Printer Carriage Jam Problem?
May 23, 2026
How to Fix Canon Printer Error Code 1660?
May 23, 2026
How to Resolve OKI Printer Error Code 990?
May 23, 2026
How do I Reset Canon MG2522 Printer?
May 23, 2026
Featured Articles
How to Get Canon Printer Online on MAC?
Jun 4, 2026
How to Fix Printer Printing Horizontal Black Lines?
May 23, 2026
How to Scan from HP Printer to Computer Windows 10?
Jun 13, 2026
Ricoh Printer Stuck on Processing
May 23, 2026
Brother Printer Only Printing in Black and White
Jun 21, 2026
How to Clean Kodak Printhead?
May 23, 2026
How to Install Lexmark Printer to Computer Without CD?
Jun 12, 2026
Why My Samsung Printer is Not Printing Clearly?
May 23, 2026
Top Questions
Why Won't My Canon Printer Print after Changing an Ink Cartridge?
May 23, 2026
How do I Fix a Canon Printer 1403 Error?
May 23, 2026
How do I Connect My Canon MG3050 Printer to WiFi?
May 23, 2026
How to Change Printer from Offline to Online Canon?
May 23, 2026
How to Turn My Ricoh Printer Online from Offline?
May 23, 2026
Brother MFC Printer Won't Print Black Despite Full Ink Cartridges
May 23, 2026
How to Fix Epson Printer Filter Failed or Stopped on Mac Error?
May 23, 2026
How do You Get a Lexmark Printer Back Online?
May 23, 2026