How to Fix Printer Error Resolution not Supported?
Hello, Please let me know how to fix printer error resolution not supported. I am facing some type of error. I have no idea about ho to fix it. Help me.
 1 Ans
1 Ans- 4 years ago
Fix Printer Error Resolution not Supported:
Are you encountering printer error resolution not supported? If yes, then don't worry as we can provide you with every possible information that you need to know in order to fix this problem. Here, we are available with multiple solutions to fix resolution not supported error.
Solution 1: Reinstall the Printer Drivers
Below is the step by step process that you need to carry out in order to reinstall your printer.
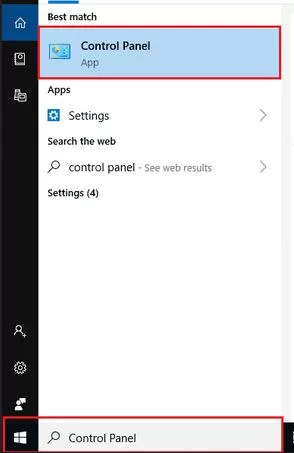
Step 1: Go to the Start menu.
Step 2: After that, search for the Control Panel and then launch it.
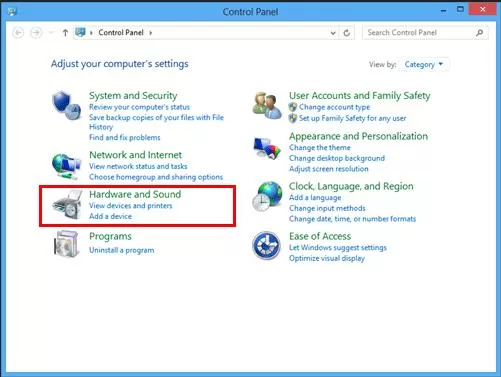
Step 3: Then, go to Hardware and Sound and then go to Printers.
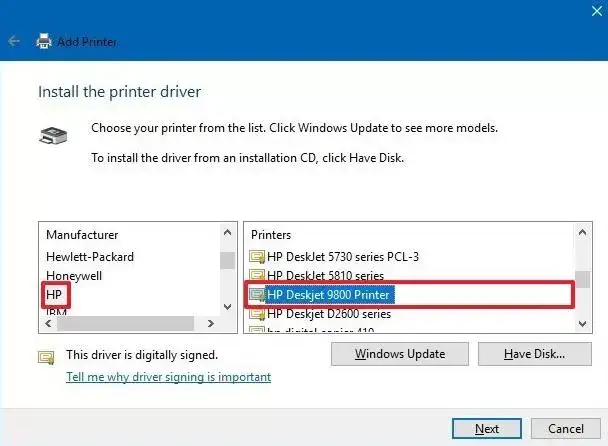
Step 4: Select the printer device whose driver you need to install. After that, choose Run as administrator.
Step 5: Select Properties.
Step 6: Now, select Advanced.
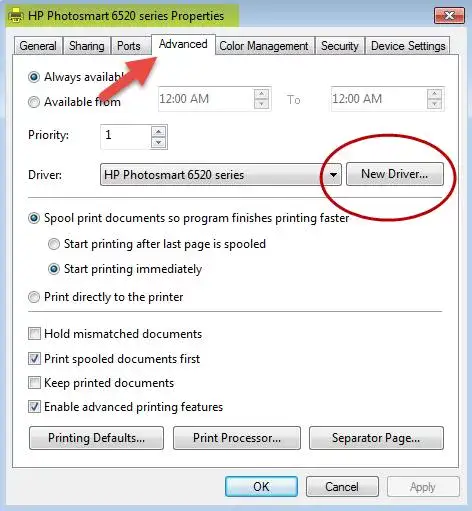
Step 7: After that, click on the new driver tab and carry out the instructions appearing on the screen for installing the driver.
In case it is still displaying resolution not supported error, then this can be because of your drivers. If the printer driver is causing some problems, then you will not be able to print the documents anymore. There is a chance that your printer may not work the way it is supposed to work. To resolve this problem, you need to reinstall the drivers of your printer.
Solution 2: Reset Your Printer
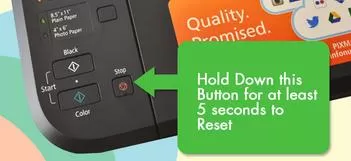
This remedy always works in fixing wireless printing issues. One simple trick of resetting the printer can resolve several issues. In order to perform the reset process, you need to disconnect the power wire without turning off your printer device.
After that, you need to wait for at least 30 seconds prior to reconnecting the power wire to the printer. In case your printer device does not turn on automatically, then press the power button. Once you are done performing these steps on your printer, then you need to do the same thing with your PC.
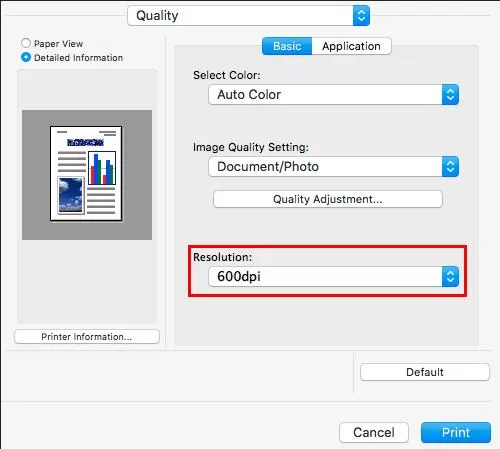
Solution 3: Change the Setting of DPI
Mentioned below are the settings that you need to carry out to change the DPI setting.
Step 1: Select the document that you want to print.
Step 2: Go to the Page Layout tab in the group of Page Setup and then select launcher.
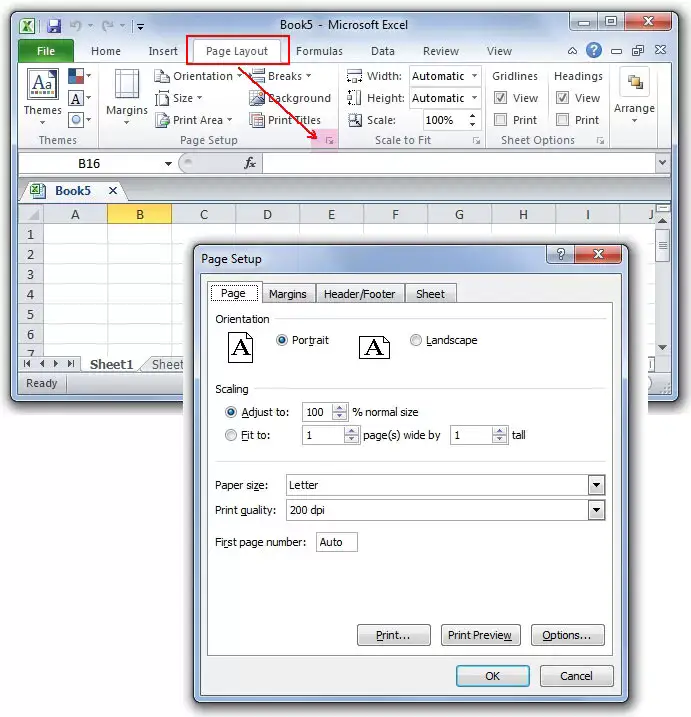
Step 3: On the Page Tab, you will see the Print quality box. There, select the resolution that you wish to use.
Step 4: The DPI settings are based on the printer type which you are using. If you are not sure of the precise value, then select a lower value. This will surely fix your resolution not supported error.
Solution 4: Delete Your Printer and Add it Again
If the issue is still persisting, then you need to go to System and Preferences, then move to printers and scanners.
After that, remove the printer. If you wish to use it in the future, then you need to re-add it to the list of printers by using Printers & Scanners preferences one more time.
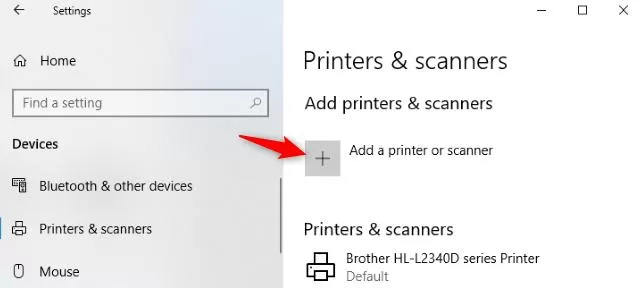
In case the network printer that you wish to use does not appear in the list of available printers, then you need to add it.
Please ensure that your printer has any one of the protocols out of Internet printing protocol, HP Jetdirect, Line printer Daemon, and AirPrint. Once you are done performing all the steps above, the printer error resolution not supported will no longer trouble you.
- 2 years ago
 Related Articles


Top Searches in Canon Printer
Why Won't My Canon Printer Print after Changing an Ink Cartridge?
May 23, 2026
How to Get Canon Printer Online on MAC?
Jun 4, 2026
How do I Fix a Canon Printer 1403 Error?
May 23, 2026
How do I Connect My Canon MG3050 Printer to WiFi?
May 23, 2026
How to Change Printer from Offline to Online Canon?
May 23, 2026
How to Connect Canon TS3122 Printer to WiFi?
May 23, 2026
How to Fix Canon Printer Carriage Jam Problem?
May 23, 2026
How to Fix Canon Printer Error Code 1660?
May 23, 2026
How to Resolve OKI Printer Error Code 990?
May 23, 2026
How do I Reset Canon MG2522 Printer?
May 23, 2026
Featured Articles
How to Get Canon Printer Online on MAC?
Jun 4, 2026
How to Fix Printer Printing Horizontal Black Lines?
May 23, 2026
How to Scan from HP Printer to Computer Windows 10?
Jun 13, 2026
Ricoh Printer Stuck on Processing
May 23, 2026
Brother Printer Only Printing in Black and White
Jun 21, 2026
How to Clean Kodak Printhead?
May 23, 2026
How to Install Lexmark Printer to Computer Without CD?
Jun 12, 2026
Why My Samsung Printer is Not Printing Clearly?
May 23, 2026
Top Questions
Why Won't My Canon Printer Print after Changing an Ink Cartridge?
Oct 7, 2020
How do I Fix a Canon Printer 1403 Error?
Dec 30, 2020
How do I Connect My Canon MG3050 Printer to WiFi?
Mar 30, 2021
How to Change Printer from Offline to Online Canon?
Nov 27, 2020
How to Turn My Ricoh Printer Online from Offline?
Feb 20, 2021
Brother MFC Printer Won't Print Black Despite Full Ink Cartridges
Nov 7, 2020
How to Fix Epson Printer Filter Failed or Stopped on Mac Error?
Dec 7, 2021
How do You Get a Lexmark Printer Back Online?
Sep 29, 2020