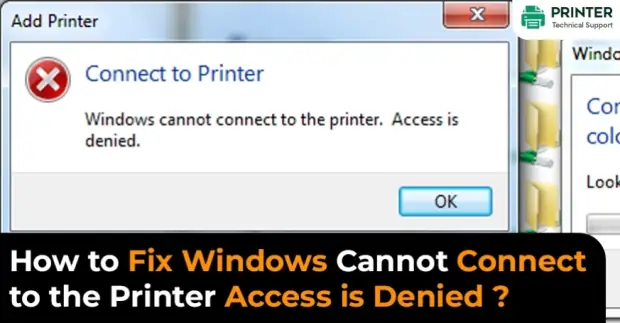
How to Fix Windows Cannot Connect to the Printer Access is Denied?
Fix Windows Cannot Connect to the Printer. Access is Denied
If you are facing the "Windows cannot connect to the printer access denied" error, then it must be because you installed the security update KB5005565 on your Windows 10. The reason behind this error could be many, like printer spooler service being stuck, pending documents being locked, no permission given to the computer, and incorrect installation of the Printer's driver.
You can fix this issue in many ways. Go to the Windows registry and try to edit the providers, eliminate the denied permission from the drivers, try enabling the guest account, and while connecting to a shared printer, try to create a new port.
Why Does This Error Occur?
Below are some of the reasons why you may face the "Windows cannot connect to the printer. Access is denied".
Step 1: Print spooler service is stuck in an error state.
Step 2: Pending documents are locked in the queue.
Step 3: Permissions are not given to the computer. This particularly happens when your network has multiple computers and they are sharing a single printer. Sometimes, the administrator blocks the printing access.
Step 4: Improper or corrupt installation of your printer drivers can also lead to this error message.
How to Fix This Problem?
Before you try any solution, you are required to read the description of the solution as the solutions to fix this problem may vary from case to case. Therefore, it is recommended to read the description first as it will save you from doing something stupid and wasting time.
1) Edit Providers in the Windows Registry
If any method does not work, then you need to delete the registry key in the section of providers in the Windows registry.
Step 1: Press the Windows key and R key simultaneously and then enter Regedit in the dialogue box. After that, press the Enter key.
Step 2: Once you reach the Registry editor navigate to the path
- HKLM\SOFTWARE\Microsoft\Windows NT\CurrentVersion\Print\Providers
Step 3: After that, delete the below key from the registry.
- HKLM\SOFTWARE\Microsoft\Windows NT\CurrentVersion\Print\Providers
Step 4: In the end, you are required to restart the Print Spooler service. Press the Windows key and R key simultaneously and then type "Services.msc" in the dialog box and then press the enter key.
Step 5: Search through your devices until you find the service. Launch the properties and then Stop the service. After a while, start it once again.
Step 6: After that, try to connect to your printer and check if this resolves your issue.
2) Remove the Deny Permission from the Drivers
Another thing that you can try to fix this problem is to remove the Deny permission from the file path mentioned below.
- C:\Windows\System32\spool\drivers
This is a simple solution if the problem is arising from not having enough permissions. This is especially the case after updating Windows to the latest build.
Below is the batch file that you can use to perform the action rather than changing the permissions manually.
- @echo off
- net stop spooler
- takeown /F C:\Windows\System32\Spool\Printers /R
- icacls C:\Windows\System32\Spool\Printers /T /Grant Everyone:F
- del /Q C:\Windows\System32\Spool\Printers\*.*
- net start spooler
3) Enable the Guest Account
If you are using your printer in the computer network, then there is a chance that the administrator has disabled your guest account. Just by enabling the guest account, you will be able to resolve your problem.
Step 1: First of all, right-click on This PC on your computer to which you have attached your printer.
Step 2: After that, select the Manage option on your Computer Management" window.
Step 3: Then, go to the "Local Users and Groups" and then go to the Users folder.
Step 4: After that, you are going to see a Guest account. From there, you need to select the Properties option.
Step 5: Then, restart your system.
Once you are done with the restart, check whether your system has fixed the error message or not.
4) Create a New Port While Connecting to a Shared Printer
If you are still encountering the "Windows cannot connect to the printer. Access is denied" while trying to add the network printer. In case you have already tried basic troubleshooting like checking the security settings of your shared printer. Check the sharing settings to ensure that the file and printer sharing is enabled.
Share your printer from the host laptop
Step 1: Firstly, you are required to share your printer from the laptop to which your computer is attached. After that, go to the Devices and Printers window.
Step 2: After that, right-click on your printer below the 'Printers' section and select the option of "Printer Properties".
Step 3: Then, go to the Sharing tab and enter an easy-to-remember name of your printer. In our case, we have used the name 'EpsonR200'.
Step 4: Now, go to your other computer and then we will run the printer wizard. After that, go to the Control Panel again and select the "View devices and printers" option given below the "Hardware and Sound" section.
Step 5: Then, select the "Add a printer" option in the new window.
Step 6: After that, windows is going to run a scan to find the printer attached to your device. Then, select "The printer I want is not listed" option.
Step 7: Now, another window will open up. Therefore, choose the option of "Add a local printer or network printer with manual settings" and then select the Next button.
Step 8: Then, choose the "Create a new port" option. After that, keep the "Type of port" as a "Local Port". After that, select the Next button.
Step 9: In the port name format, enter '//computername/printername'.
Step 10: Click on the OK button.
Also Read:
- How to Fix Undefined Offending Command Printer Error?
- Konica Minolta Printer Error Code List With Solutions
- How to Fix Printer Not Printing Whole Page?
FAQ for Fix Windows Cannot Connect to the Printer Access is Denied
- Mick
 Brand: Other
- Last Update: 1 month ago
 Related Articles


Top Searches in Other
How to Fix Printer Spooler Problems on Windows 10?
May 23, 2026
9 Best Printer to Buy for Home Office Use in 2026
May 23, 2026
How to Fix Boot Device Not Found 3f0 Error?
May 23, 2026
How to Fix Print Job Stuck in Queue?
May 23, 2026
How to Make Printer Online in Windows 10?
May 23, 2026
Why is a Printer Printing Blank Pages on Windows 10?
May 23, 2026
How to Troubleshoot Wireless Printer Not Printing?
May 23, 2026
Featured Articles
How to Get Canon Printer Online on MAC?
Jun 4, 2026
How to Fix Printer Printing Horizontal Black Lines?
May 23, 2026
How to Scan from HP Printer to Computer Windows 10?
Jun 13, 2026
Ricoh Printer Stuck on Processing
May 23, 2026
Brother Printer Only Printing in Black and White
Jun 21, 2026
How to Clean Kodak Printhead?
May 23, 2026
How to Install Lexmark Printer to Computer Without CD?
Jun 12, 2026
Why My Samsung Printer is Not Printing Clearly?
May 23, 2026
Top Questions
Why Won't My Canon Printer Print after Changing an Ink Cartridge?
May 23, 2026
How do I Fix a Canon Printer 1403 Error?
May 23, 2026
How do I Connect My Canon MG3050 Printer to WiFi?
May 23, 2026
How to Change Printer from Offline to Online Canon?
May 23, 2026
How to Turn My Ricoh Printer Online from Offline?
May 23, 2026
Brother MFC Printer Won't Print Black Despite Full Ink Cartridges
May 23, 2026
How to Fix Epson Printer Filter Failed or Stopped on Mac Error?
May 23, 2026
How do You Get a Lexmark Printer Back Online?
May 23, 2026