How to Setup Canon MX712 Printer?
Hello, Please let me know that how to setup Canon mx712 printer. I bought this new Canon printer mx712 printer but don't know about how to setup.
 1 Ans
1 Ans- 5 years ago
Setup Canon MX712 Printer:
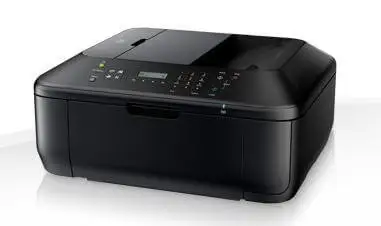
Canon PIXMA MX712 all-in-one is a wireless inkjet printer offering high printing speed, quality, and increased productivity for home and office. Further adding to user convenience, the MX712 is equipped with built-in Wi-Fi feature so that users can easily print virtually anywhere from their home or office using a compatible computer or mobile device. Some great features like AirPrint allow an option to print documents, photos, email, web pages, wirelessly via any compatible iPod touch, iPad or iPhone device.
The Canon MX712 All-in-One printer is integrated with additional features like 35 Duplex Auto Document Feeder, Auto Duplex Printing, and Dual Function Panel to ease multitasking which brings professional efficiency and reduced printed costs.
Steps to Setup Canon MX712 Printer for Windows:
To open the printer driver setup window, you can use the application software or the Start menu of the Windows.
Open Printer Driver Setup Window using Application Software
Follow the Given Steps to Configure the Printing Profile.
- Select the command to print using the application software
- Click on Print option in the File menu which opens the Print dialog box.
- Choose your model name and click over its preferences.
- The printer driver setup window is displayed on the screen.
Note: The command names or menu names may be different depending upon the application software you use.
Open Printer Driver Setup Window Using Start Menu:
Follow the given instructions to perform machine maintenance operations such as print head cleaning, or to configure a printing profile.
- Select options from the Start menu based on your installed OS version:
- For Windows 7, select Start menu >> Devices and Printers.
- For Windows Vista, select Start menu >> Control Panel >> Hardware and Sound >> Printers.
- For Windows XP, select Start menu >> Control Panel >> Printers and Other Hardware >> Printers and Faxes.
- Now select Printing preferences from the right click options displayed for the selected printer model.
Steps to Setup Canon MX712 Printer for Mac:

Follow the Given Steps to Install Canon Printer on Your Mac OS X.
Step 1 : If you have already attempted driver installation, remove it from the printers and fax system preferences/system preferences pane. Open Library >> Printer and delete the Canon folder.
Delete any other related installation files for Canon printer. If you have other Canon printer installed and working on your Mac, ensure right selections before trashing the new installation files.
Step 2 : Empty the trash folder before proceeding to the next steps.
Step 3 : Unplug the printer machine.
Step 4 : Download the latest driver version and run the installer package.
Step 5 : As the package has been installed successfully, select system preferences by clicking the Apple icon at the top right of the screen.
Step 6 : Plug in the printer again and turn on.
Step 7 : Open the Print and Fax preferences under “Print and Fax” pane.
Step 8 : To add a printer, click on the plus (“+”) on the left side of the window. Now the newly installed printer should be appearing in the list. Select your printer. Ensure that you have installed the latest version of Canon printer on your latest version of Mac OS.
Step 9 : Click on the Canon printer model you have installed and then click Choose a Driver or Printer Model >> Select Printer Software. Now choose your printer from the shown list.
Step 10 : Click OK.
Now your printer should now be successfully installed and working.
Steps to Set Up Wireless Connection For Canon PIXMA MX712:
Step 1 : Press the Menu button present on your Canon PIXMA MX712 printer.
 Step 2 : Select Settings and press OK button.
Step 3 : Select Device Settings and press OK button.
Step 4 : Select LAN settings and press OK button.
Step 5 : Select Change wireless / wired option and press OK button.
Step 6 : Select Wireless LAN active and press OK button.
Step 7 : Select Wireless LAN settings and press OK button.
Step 8 : Select WPS configuration option and press OK button.
Step 9 : Now, select the Push button method and then press OK button.
Step 10 : As the access point is ready to function, press the OK button on the machine, followed by pressing the WPS button on the access point within two minutes.
Step 11 : Once after the completion screen appears on the device LCD, press the OK button. The LAN settings screen will be displayed to you.
Step 12 : A timeout error will be shown in case the setup is not completed within two minutes.
Step 13 : The WPS button may have a different name depending upon the type of access point.
Once all these steps are finished, you can use PIXMA MX712 to print your office or home jobs using a wireless connection.
- 2 years ago
 Related Articles


Top Searches in Canon Printer
Why Won't My Canon Printer Print after Changing an Ink Cartridge?
May 23, 2026
How to Get Canon Printer Online on MAC?
Jun 4, 2026
How do I Fix a Canon Printer 1403 Error?
May 23, 2026
How do I Connect My Canon MG3050 Printer to WiFi?
May 23, 2026
How to Change Printer from Offline to Online Canon?
May 23, 2026
How to Connect Canon TS3122 Printer to WiFi?
May 23, 2026
How to Fix Canon Printer Carriage Jam Problem?
May 23, 2026
How to Fix Canon Printer Error Code 1660?
May 23, 2026
How to Resolve OKI Printer Error Code 990?
May 23, 2026
How do I Reset Canon MG2522 Printer?
May 23, 2026
Featured Articles
How to Get Canon Printer Online on MAC?
Jun 4, 2026
How to Fix Printer Printing Horizontal Black Lines?
May 23, 2026
How to Scan from HP Printer to Computer Windows 10?
Jun 13, 2026
Ricoh Printer Stuck on Processing
May 23, 2026
Brother Printer Only Printing in Black and White
Jun 21, 2026
How to Clean Kodak Printhead?
May 23, 2026
How to Install Lexmark Printer to Computer Without CD?
Jun 12, 2026
Why My Samsung Printer is Not Printing Clearly?
May 23, 2026
Top Questions
Why Won't My Canon Printer Print after Changing an Ink Cartridge?
Oct 7, 2020
How do I Fix a Canon Printer 1403 Error?
Dec 30, 2020
How do I Connect My Canon MG3050 Printer to WiFi?
Mar 30, 2021
How to Change Printer from Offline to Online Canon?
Nov 27, 2020
How to Turn My Ricoh Printer Online from Offline?
Feb 20, 2021
Brother MFC Printer Won't Print Black Despite Full Ink Cartridges
Nov 7, 2020
How to Fix Epson Printer Filter Failed or Stopped on Mac Error?
Dec 7, 2021
How do You Get a Lexmark Printer Back Online?
Sep 29, 2020