How to Setup Canon Pixma MX474 Wireless Printer?
Hello, Please let me know that how to setup Canon Pixma MX474 wireless printer. I bought this Canon Pixma MX474 wireless printer. But don't have knowledge to setup it. Give me any idea.
 2 Ans
2 Ans- 5 years ago
Setup Canon Pixma MX474 Wireless Printer:

If you are looking for instructions on how to setup Canon Pixma MX474 wireless printer, then read below. Here you will learn how to bring your printer back to the factory reset settings. There are certain access points, which have a WPS button placed on them. WPS stands for Wi-Fi protected setup.
This enables allowed devices such as PIXMA MX474 to link to the network without the need of putting in the password and also provides you with an easy way to connect the devices. This procedure is the easiest method to connect. In case your access point does not have a WPS button, then you can use the standard connection method that is given below.
Canon mx474 WPS Connection Method:
Prior to going forward, there are certain conditions that you need to follow to use the WPS push button method.
The access point needs to have WPS button on itself. Please take a look at the user guide details of the device. In case the wi-fi protected setup button is not available, then you must follow the instructions given in the standard protection setup.
It is important for your network to use Wi-Fi protected access or some other security protocol such as WPA2.
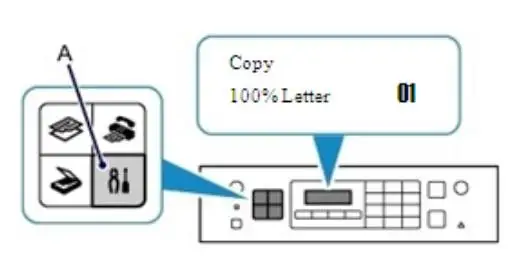
Step 1: On your printer, press the setup button to setup Canon MX474 wireless printer.
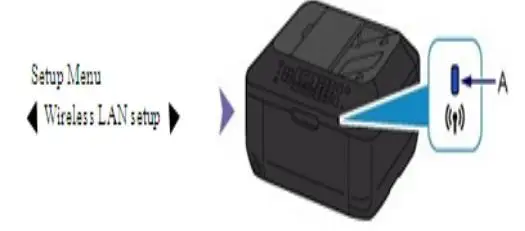
Step 2: Use the wireless LAN setup and then select ok.
Step 3: After that, your printer will display about WPS setup. After reading this message, press WPS button for the next 3 seconds.

Step 4: Now, keep on holding the WPS button on your router. In order to get full details on how to use WPS on your router, carefully read the guide that came with your router.
Step 5: Press the button of OK on your printer after two minutes.
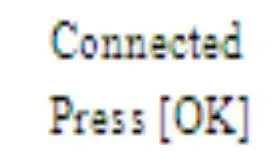
When your printer will start looking for an internet connection, then LED light will flash in blue color. When the connection will be established, then connection is going to show up on the screen. After that, click on OK.
If another screen opens up, then go to troubleshooting in the user guide. So, this was all about the WPS procedure. Now, start installing the software to use your Canon PIXMA MX474 printer.
You can go to the manuals and software if you do not have the installation disc that came together with the printer.
If you are facing certain issues after following the WPS guide, then you must get in touch with the Canon team to obtain all the assistance. So, this is how you setup Canon MX474 wireless printer.
Standard Connection Procedure:Press the button of setup on your printer.
- Choose the wireless LAN setup and then press the button of OK.
- Now, press the reset or stop button.
- After that to setup Canon MX474 wireless printer, the standard setup screen will show up. Click on ok. Now, printer will look for all the wireless networks available in the nearby location.
- Make use of your arrow keys for selecting the name of your network and select the ok button two times in a row.
- If you are not sure of the Wi-Fi network, then you can see your access point by checking the network name on the PC or system that is connected to.
- If you are having difficulty locating the network, then you should use the arrow keys for selecting the network that you are looking for. After that in the process of setup Canon MX474 wireless printer, select the OK button.
- When the screen opens up, then you should use the numeric buttons on the screen for entering the password on your wireless network.
- The printing machine has a total of three modes, which includes the lower case, upper case, and numeric mode.
- Press the:A for uppercase mode, a for the lowercase mode, and for the numeric mode:1 mentioned on top of the screen.
- After you are done entering the password, then press ok. Then, a screen is going to open up, which will show up connecting.
- So, this was all about the Wi-Fi procedure. Now, move forward with installing the software for using the PIXMA MX474.
- 2 years ago
Setup Canon MX474 Wireless Printer:
There are several wi-fi printing possibilities and applications available with Canon MX474 Wireless Printer. With every PIXMA printer comes wifi printing choices and other connection options for the users. But how to setup Canon MX474 wireless printer? Well, here is a complete answer to this.
Have you noticed that some access points (also referred to as routers or hubs) have an automatic connection button labeled as “WPS” which refers to Wi-Fi Protected Setup? If your router features this WPS button, you can easily and quickly connect devices like PIXMA MX474 with the wifi network without entering any password. This method is a fast means to connect your devices with the wireless network.
So let's proceed with this easiest way to connect Canon MX474 to wifi only if your access point has a WPS button. If yes, follow the given instructions for connecting using the WPS method.
In case if your router is not compatible with WPS method, you can connect your Canon PIXMA MX474 using the Standard Connection method as discussed below.
Canon mx922 WPS Connection Method
- Before you start, let's quickly revise some points before using the WPS push button method.
- Your wireless router should have a physical WPS push button available.
- You should have the user guide of the Canon printer for detailed information.
- For cases for the WPS push button is not available, refer the manual instructions discussed for the Standard Connection Method.
Your wifi network should be supporting the WPA (Wi-Fi Protected Access) or WPA2 security protocol. If your router is WPS enabled, they are likely to support WPA security protocols.
1. Press the Setup button on the Canon printer.
2. Select the Wireless LAN setup option and press the OK button. The blue Wi-Fi button will light up as soon as the wireless connection is activated. Now your printer will automatically search for available access point networks supporting the WPS feature. Now a message will be shown on the printer display which read as Press WPS button about 5 sec. and then press OK button on the device.
3. Press and hold the WPS button provided on the access point/router. You can check the manual instructions to start with WPS on your access point.
4. Press on the OK button on the printer within 2 minutes. Now the blue LED light on the printer will glow searching to connect to the access point.
5. Once connected you can press on the OK button. If another screen appears, check the guidelines referring to troubleshooting steps.
6. Now you can proceed with the software installation process for Canon MX474.
In case you don't have the CD to install the printer software for the Canon product, download the manuals and software.
Canon MX474 Printer Standard Connection Method
- Press the Setup button provided on the printer.
- Choose the Wireless LAN Setup option and press the OK button.
- Press the Stop/Reset button and you will see that the Wireless LAN setup standard setup procedure starts.
- Click OK button. Now your printer will search for all available wireless networks.
- You can use the arrow keys to select your network name (SSID name) and press OK button twice.
- If you are unaware of your wireless network name (SSID), you can check it on the printed label attached to your access point. If you are unable to see your network in the list, click on the Search option and press OK button.
- Enter the security passphrase of your wireless network using the numeric buttons on the machine.
The printer machine offers three input modes as uppercase, lowercase, and numeric mode. Press the corresponding buttons to switch the uppercase mode(:A), lowercase mode(:a), or numeric mode(:1) displayed at the top right of the screen.
Pressing the button once gives you "A", pressing the same button twice will give you "B" etc. Use arrow keys to advance to the next character. To delete mistakenly written characters press the key. After completing passphrase, press OK button.
Finally, proceed by installing the software for PIXMA MX474.
How to Restore the Default Wireless Settings for Canon PIXMA MX474?
If you want to restore the original version of your wireless router, you want to reset your network settings back to factory default. Follow the given instructions, to restore the default router settings.
1. Press and hold the RESUME/CANCEL button until the alarm lamp glows 17 times.
2. Once done, release the RESUME/CANCEL button.
3. The process may take some time to complete. This way you can reset the network settings back to default for your Canon router.
- 2 years ago
 Related Articles


Top Searches in Canon Printer
Why Won't My Canon Printer Print after Changing an Ink Cartridge?
May 23, 2026
How to Get Canon Printer Online on MAC?
Jun 4, 2026
How do I Fix a Canon Printer 1403 Error?
May 23, 2026
How do I Connect My Canon MG3050 Printer to WiFi?
May 23, 2026
How to Change Printer from Offline to Online Canon?
May 23, 2026
How to Connect Canon TS3122 Printer to WiFi?
May 23, 2026
How to Fix Canon Printer Carriage Jam Problem?
May 23, 2026
How to Fix Canon Printer Error Code 1660?
May 23, 2026
How to Resolve OKI Printer Error Code 990?
May 23, 2026
How do I Reset Canon MG2522 Printer?
May 23, 2026
Featured Articles
How to Get Canon Printer Online on MAC?
Jun 4, 2026
How to Fix Printer Printing Horizontal Black Lines?
May 23, 2026
How to Scan from HP Printer to Computer Windows 10?
Jun 13, 2026
Ricoh Printer Stuck on Processing
May 23, 2026
Brother Printer Only Printing in Black and White
Jun 21, 2026
How to Clean Kodak Printhead?
May 23, 2026
How to Install Lexmark Printer to Computer Without CD?
Jun 12, 2026
Why My Samsung Printer is Not Printing Clearly?
May 23, 2026
Top Questions
Why Won't My Canon Printer Print after Changing an Ink Cartridge?
Oct 7, 2020
How do I Fix a Canon Printer 1403 Error?
Dec 30, 2020
How do I Connect My Canon MG3050 Printer to WiFi?
Mar 30, 2021
How to Change Printer from Offline to Online Canon?
Nov 27, 2020
How to Turn My Ricoh Printer Online from Offline?
Feb 20, 2021
Brother MFC Printer Won't Print Black Despite Full Ink Cartridges
Nov 7, 2020
How to Fix Epson Printer Filter Failed or Stopped on Mac Error?
Dec 7, 2021
How do You Get a Lexmark Printer Back Online?
Sep 29, 2020