How to Share Files and Printers without HomeGroup on Windows 10?
Hello, how to share files and printers without homegroup on windows 10. I am facing some issues with this. Help me.
 2 Ans
2 Ans- 4 years ago
Share Files and Printers without HomeGroup on Windows 10:
Sharing Printer on Windows 10
In earlier versions, the easy method to share a printer was HomeGroup. Now also we have different features that you can use to share a printer with others on the network.
Steps to share printer on Windows 10 using the share feature. Below are the steps that you need to carry out in order to share a printer on Windows 10.
Step 1: Launch Settings.
Step 2: Select Devices.
Step 3: Now select Printers and Scanners.
Step 4: After that, go to the section of "Printers and Scanners" and then choose the printer that you wish to share.
Step 5: Now, select the button of Manage.
Step 6: Select the option of Printer Properties.
Step 7: Select the "Sharing" tab.
Step 8: Check the option of Share this printer.
Step 9: In the field of "Share Name". Give a short and descriptive name.
Step 10: Click on the button of "Apply".
Step 11: Click on the button Ok.
This is how you share files and printers without HomeGroup on Windows 10.
- 2 years ago
Share Files and Printers without HomeGroup on Windows 10:
The HomeGroup feature of Windows 10 makes the process of sharing files and other resources easier. Presently, this feature has been removed from Windows 10. Now you will have to use some other method to share printers, folders, and files.
Some of the sharing options are OneDrive, Share, and Nearby sharing. There are some advanced sharing options as well that provide the same experience but for that, you need to follow different guidelines. Here in this guide, we will help you learn how to share files and printers within a local network.
Sharing Files on Windows 10 -
There are various ways that you can use to share files and folders with others. Two of them are OneDrive and Share feature.
Send files using Share features
If there is one or more than one file that you wish to share with another person inside the office or home network or around the globe at once, then you should use the share feature. This feature is inbuilt in modern apps and file explorer.
Mentioned below are the steps that you need to follow to share files using the Share feature.
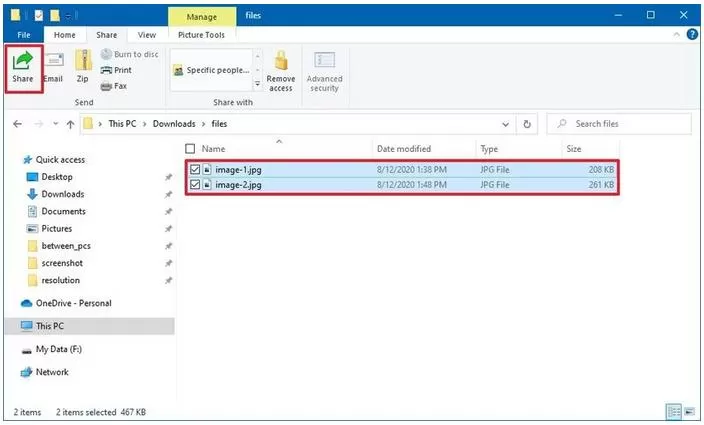
Step 1: Launch File Explorer.
Step 2: Search for the location of the browser with files.
Step 3: Now, select the files.
Step 4: Select the Share tab. You can also right-click on the selected files and then click on the option of Share. You can also see the option of Share on various files that you get from the Microsoft Store.
Step 5: Now, select the button of Share.
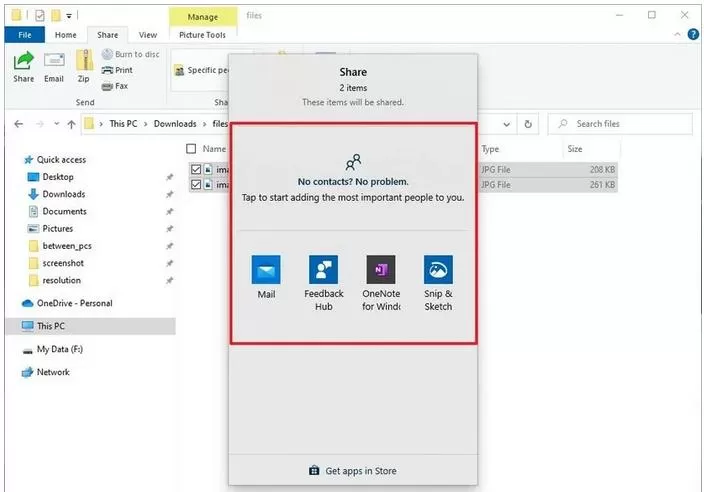
Step 6: Select the content that you wish to share.
Step 7: Now, carry out the instructions appearing on the screen to share the content appearing on the screen.
Use OneDrive to Share Files
You can use OneDrive for sharing folders and files with your family and friends. Using OneDrive you can share any file by creating a safe link. This will enable the user to have access to the content. Plus, you will have the authority to revoke the access at any point in time.
Mentioned below are the steps that you need to follow to share files on OneDrive.
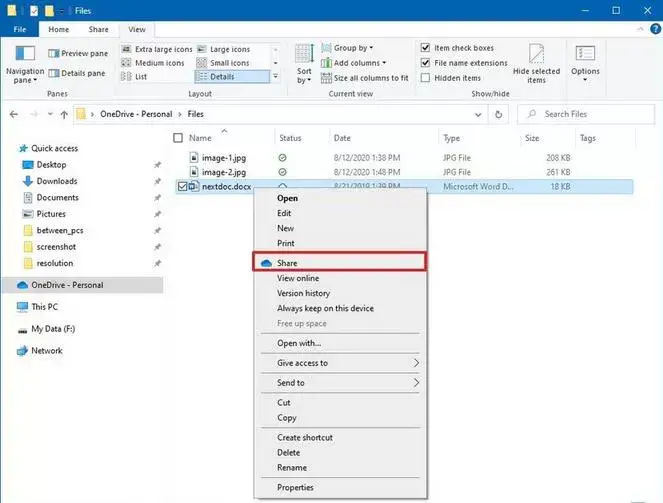
Step 1: Launch File Explorer.
Step 2: Select the folder of OneDrive on the left pane.
Step 3: Open the folder that has all the files that you want to share.
Step 4: Click on the file and then right-click on it. After that, select the option of Share.
Step 5: Select the option of Anyone with the link can edit.
Step 6: Clear the option of Allow Editing if you want someone else to open and edit the file.
Step 7: Click on Apply.
Step 8: Confirm the email ID of the person that you wish to share the file with. Select the option of Copy Link for copying the link on the clipboard.
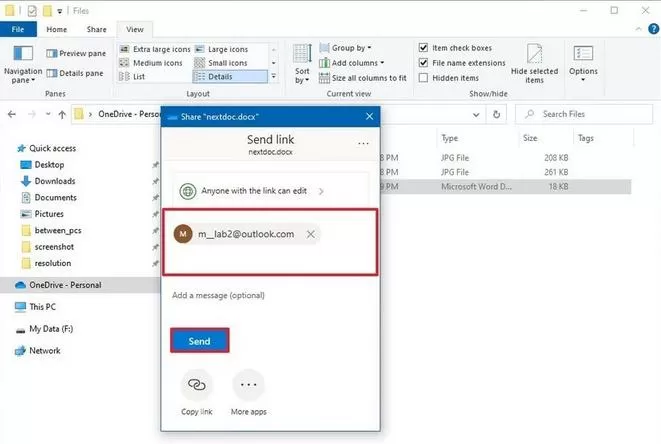
Step 9: Add a message for Share.
Step 10: Click on Send.
- 2 years ago
 Related Articles


Top Searches in Canon Printer
Why Won't My Canon Printer Print after Changing an Ink Cartridge?
May 23, 2026
How to Get Canon Printer Online on MAC?
Jun 4, 2026
How do I Fix a Canon Printer 1403 Error?
May 23, 2026
How do I Connect My Canon MG3050 Printer to WiFi?
May 23, 2026
How to Change Printer from Offline to Online Canon?
May 23, 2026
How to Connect Canon TS3122 Printer to WiFi?
May 23, 2026
How to Fix Canon Printer Carriage Jam Problem?
May 23, 2026
How to Fix Canon Printer Error Code 1660?
May 23, 2026
How to Resolve OKI Printer Error Code 990?
May 23, 2026
How do I Reset Canon MG2522 Printer?
May 23, 2026
Featured Articles
How to Get Canon Printer Online on MAC?
Jun 4, 2026
How to Fix Printer Printing Horizontal Black Lines?
May 23, 2026
How to Scan from HP Printer to Computer Windows 10?
Jun 13, 2026
Ricoh Printer Stuck on Processing
May 23, 2026
Brother Printer Only Printing in Black and White
Jun 21, 2026
How to Clean Kodak Printhead?
May 23, 2026
How to Install Lexmark Printer to Computer Without CD?
Jun 12, 2026
Why My Samsung Printer is Not Printing Clearly?
May 23, 2026
Top Questions
Why Won't My Canon Printer Print after Changing an Ink Cartridge?
Oct 7, 2020
How do I Fix a Canon Printer 1403 Error?
Dec 30, 2020
How do I Connect My Canon MG3050 Printer to WiFi?
Mar 30, 2021
How to Change Printer from Offline to Online Canon?
Nov 27, 2020
How to Turn My Ricoh Printer Online from Offline?
Feb 20, 2021
Brother MFC Printer Won't Print Black Despite Full Ink Cartridges
Nov 7, 2020
How to Fix Epson Printer Filter Failed or Stopped on Mac Error?
Dec 7, 2021
How do You Get a Lexmark Printer Back Online?
Sep 29, 2020