Epson Stylus NX-125 Installation Problem
Epson NX125 Driver Download -
If your Epson Printer is not connecting to the laptop then you have to download and re-install Epson stylus nx125 driver.
In order to Resolve Epson Stylus NX125 Software Installation Problem, You have to Follow These Points -
Step 1 – First of all, you have to download Epson NX125 driver from Epson Printer official website. Once the driver gets downloaded, check the connection between your printer and system is OK or not. After checking everything, the driver needs to be unpacked and before running installer.
Step 2 – After downloading Epson NX125 driver installer, press double click on it to open “Install Shield Wizard for Epson Printer”. Hit Next button and you are redirected to next screen.
Step 3 – On the next screen, locate Add button and tap on it to add Epson NX125 printer to your system. Hit Next button.
Step 4 – Now, you have to choose the driver, printer name and port type from the drop-down menu. Also, don’t forget to click on the checkbox that is next to “Set as Default Printer”.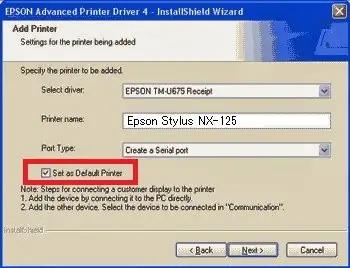
Step 5 – Epson Printer installer will summarize the driver and port type that you have chosen. If you want to change driver then you can change it without any problem.
Step 6 – At this time, Epson printer driver will be installed with port and model selected.
Step 7 – Just wait for a couple of moments until installer Epson Stylus NX-125 driver will finish.
Enable Epson Connect –
To enable Epson Connect, just have a look at these points -
- Navigate to Epson Support main page and choose your product. Next, choose Manuals, and then tap on Start here.
- After downloading and installing “Epson Connect Printer Setup Utility”, just press a click on radio box that is next to “I accept the terms of the License Agreement”.

- Next, tap on Install and then to Finish.
- Choose your product and hit Next button.
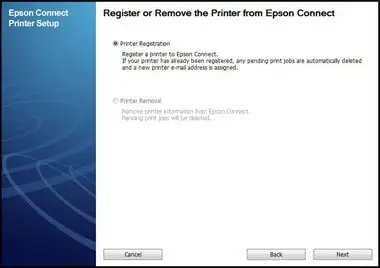
- Now, you are redirected to a next window where you have to click on radio box that is next to Printer Registration. Again, hit Next key.
- Select Agree and hit Next button. Now you will see a message i.e., “Register a printer to Epson Connect”, just click on OK.
- Do these things -
- If you are creating a new account then you need to fill “Create Epson Connect Account” form.
- If you are registering a new product and already have an account then you have to fill “Add a printer” form.
- At last, click on Close.
Note: Download Epson Printer Software free
Follow all steps carefully and if you have any query regarding Epson nx125 driver download then drop a message here, I will definitely provide you a positive response.
- SAM
 Brand: Epson Printer
- Last Update: 1 week ago
 Related Articles


Top Searches in Epson Printer
How to Fix Epson Printer Error 0XF3?
May 23, 2026
How to Fix Epson Printer Error Code 000041?
May 23, 2026
How do I Connect My Epson l3060 to WiFi?
May 23, 2026
Epson Printer Printing Double Letters
May 23, 2026
Fix Epson Workforce Pro WF-3720 Scanner Problem - Thin Vertical Stripes on Complete Scan
May 23, 2026
How to Find WPS Pin on Epson Printer?
May 23, 2026
How to Fix Epson Printer Error Code 0x98?
May 23, 2026
How to Reset the Epson Stylus C88?
May 23, 2026
Featured Articles
How to Get Canon Printer Online on MAC?
Jun 4, 2026
How to Fix Printer Printing Horizontal Black Lines?
May 23, 2026
How to Scan from HP Printer to Computer Windows 10?
Jun 13, 2026
Ricoh Printer Stuck on Processing
May 23, 2026
Brother Printer Only Printing in Black and White
Jun 21, 2026
How to Clean Kodak Printhead?
May 23, 2026
How to Install Lexmark Printer to Computer Without CD?
Jun 12, 2026
Why My Samsung Printer is Not Printing Clearly?
May 23, 2026
Top Questions
Why Won't My Canon Printer Print after Changing an Ink Cartridge?
May 23, 2026
How do I Fix a Canon Printer 1403 Error?
May 23, 2026
How do I Connect My Canon MG3050 Printer to WiFi?
May 23, 2026
How to Change Printer from Offline to Online Canon?
May 23, 2026
How to Turn My Ricoh Printer Online from Offline?
May 23, 2026
Brother MFC Printer Won't Print Black Despite Full Ink Cartridges
May 23, 2026
How to Fix Epson Printer Filter Failed or Stopped on Mac Error?
May 23, 2026
How do You Get a Lexmark Printer Back Online?
May 23, 2026