How to Change Ink on Epson XP-320 Printer?
Hello, Please tell about how to change ink on Epson xp-320 printer. I have bought this Epson XP-320 printer and don't know how to operate this printer for printing.Also Read:
- How to Install Epson Expression XP 640 XL Printer Ink?
- How to Fix Epson WF-4630 Wireless Printer Not Printing?
- How to Fix Epson WF 7720 Printing Blank Pages?
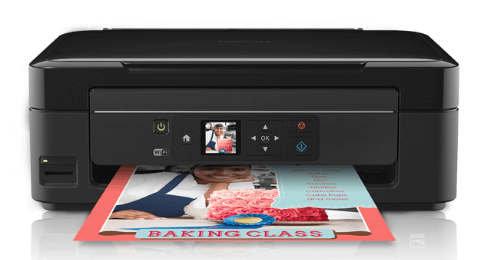
Change Ink on Epson XP-320 Printer:
Ensure that you have your replacement cartridges in shape before you start. You must position new cartridges immediately after getting rid the old ones.
Warning: Leave your old cartridges in the printer until you are ready to replace them for preventing the print head nozzles to dry out. Do not open ink cartridge packets until you are ready to fill the ink. Cartridges are vacuum packed to maintain reliability & dependability.
Step 1 : Switch on your Epson Printer
- If an ink cartridge is exhausted, a message will appear on the LCD screen. Observe which cartridges need to be replaced and press the OK button, then select Replace now.
- If you are changing a cartridge before you view a message on the LCD screen, select the home button if necessary, and click Setup. Click on Maintenance, then press Ink Cartridge Replacement and select the OK button.
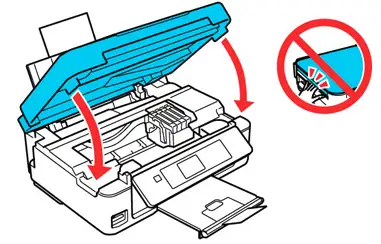
Step 2 : Lift up the scanner unit.
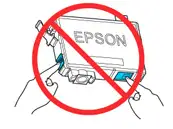
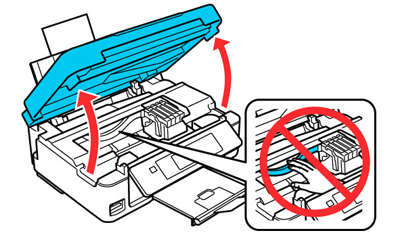 Warning: Do not move the print head by hand; else, you may end up damaging the product. Do not touch the flat white cable which is present in the body of the printer.
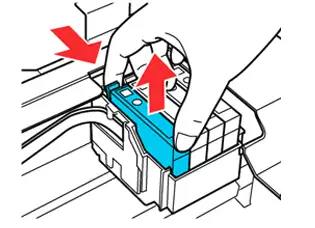
Step 3 : Forcefully press the tab on the cartridge and lift the cartridge straight up to replace it.
Warning: Get rid of used cartridges with caution. Do not break the used cartridge apart or try to refill it.
Warning: If ink spills on your skin, wash it rigorously with soap and water. If ink gets into your eyes, wash them immediately with water. If ink gets into your mouth, throw it out out and see a doctor right away. Keep ink cartridges away from children.
Step 4 : Before you open the new cartridge packate, shake it gently four or five times.

Warning: Do not shake up the cartridges after opening the packages, or it may lead to leakage of ink.
Step 5 : Get Rid of the cartridge from the packet.
Warning: Avoid touching the green chip on the cartridge. After replacing the old cartridge immediately after removing the old one; if you do not, the print head may dry out and be unable to print.
Step 6 : Uncover the yellow tape from the cartridge.
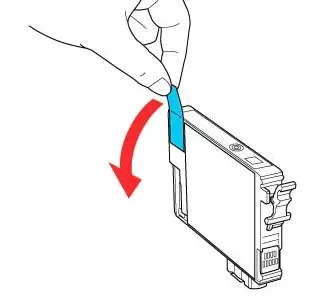
Warning: Do not remove any other labels or seals, or ink will spill.
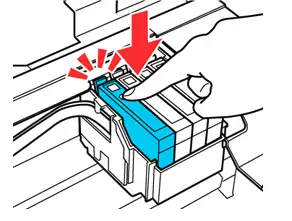
Step 7 : Embed the new cartridge into the holder and push it down until it gets into place.
Step 8 : Lower down the scanner unit and push the start button.
The print head moves to its default position and the printer starts releasing the ink. This takes about 1 and a half minutes. When you view a confirmation message on the screen, ink charging is over.
Warning: Never switch off the product while the power light is glowing or you will waste ink.
If you see an error message on the screen saying that an Epson 320 printer ink cartridge is installed incorrectly, lift up the scanner unit and push the ink cartridge down until it falls into place. When you're done, press the OK button.
If you replace a low or expended ink cartridge, you cannot re-install and use the cartridge.
Warning: If you remove an Epson 320 printer ink cartridge for use in future, protect the ink supply area from dirt and dust and store it in the room as the printer. The valve in the ink supply port is constructed to contain any excess ink, but do not touch the ink supply port or surrounding area. Always store ink cartridges with the label facing up; do not store cartridges in an inverted position.
- James
 Brand: Epson Printer
- Last Update: 3 weeks ago
 Related Articles


Top Searches in Epson Printer
How to Fix Epson Printer Error 0XF3?
May 23, 2026
How to Fix Epson Printer Error Code 000041?
May 23, 2026
How do I Connect My Epson l3060 to WiFi?
May 23, 2026
Epson Printer Printing Double Letters
May 23, 2026
Fix Epson Workforce Pro WF-3720 Scanner Problem - Thin Vertical Stripes on Complete Scan
May 23, 2026
How to Find WPS Pin on Epson Printer?
May 23, 2026
How to Fix Epson Printer Error Code 0x98?
May 23, 2026
How to Reset the Epson Stylus C88?
May 23, 2026
Featured Articles
How to Get Canon Printer Online on MAC?
Jun 4, 2026
How to Fix Printer Printing Horizontal Black Lines?
May 23, 2026
How to Scan from HP Printer to Computer Windows 10?
Jun 13, 2026
Ricoh Printer Stuck on Processing
May 23, 2026
Brother Printer Only Printing in Black and White
Jun 21, 2026
How to Clean Kodak Printhead?
May 23, 2026
How to Install Lexmark Printer to Computer Without CD?
Jun 12, 2026
Why My Samsung Printer is Not Printing Clearly?
May 23, 2026
Top Questions
Why Won't My Canon Printer Print after Changing an Ink Cartridge?
May 23, 2026
How do I Fix a Canon Printer 1403 Error?
May 23, 2026
How do I Connect My Canon MG3050 Printer to WiFi?
May 23, 2026
How to Change Printer from Offline to Online Canon?
May 23, 2026
How to Turn My Ricoh Printer Online from Offline?
May 23, 2026
Brother MFC Printer Won't Print Black Despite Full Ink Cartridges
May 23, 2026
How to Fix Epson Printer Filter Failed or Stopped on Mac Error?
May 23, 2026
How do You Get a Lexmark Printer Back Online?
May 23, 2026