How to Connect Canon Pixma Pro 100 Printer to WiFi?
Hello, I have bought a new Canon pixma pro 100 printer. Now i am trying to connect my Canon Pixma pro 100 printer to wifi then it's not connecting. please give me any idea.
 1 Ans
1 Ans- 5 years ago
Canon Pro 100 WiFi Setup:
If you are a user who is having trouble connecting his or her Canon printer pro 100 to WiFi, then we have come up with a solution for you. There are certain access points on your router that have a button of automatic connection called WPS(Wi-Fi protected setup).
Out of all the available methods to connect Canon Pro 100 Printer to WiFi, this is the easiest method. So, if there is a WPS button on your access point, then you must use the WPS connection method. In case your router does not have WPS settings, then you can do Canon Pixma Pro 100 wireless setup to wifi by using the standard connection method.
Method 1: WPS Connection Method
There are certain conditions that you need to meet before you actually start with the process. It is necessary for the access point to have a physical button of WPS. If you are not able to see it, then you must read the manual to see the details.
Here are some of the steps that you need to follow in order to connect Canon Pixma Pro 100 Printer to WiFi.
Step 1: First of all, you need to ensure that the printer is turned on.
Step 2: Press the button of Wi-Fi that is placed on the top of the printer. Keep on holding that button until the power lamp starts flashing in front of you. Once the power light starts flashing, then you must release the button.
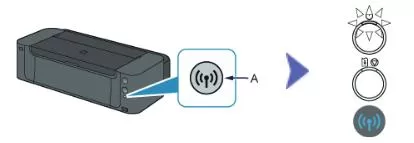
Step 3: Also to connect Canon Pixma Pro 100 Printer to WiFi, you need to ensure that the Wi-Fi button starts flashing the blue light. Now, go to the access button and press it in the next two minutes. If you need to know the exact details regarding how to press the WPS button, then read the manual.
Step 4: The Wi-Fi light will continue to flash when you are searching for the access point. When you will start the setup process, the power lamp of white color will start blinking.
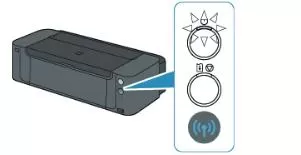
Step 5: Once a successful connection has been established with your wireless network, the blue as well as the white light will keep on flashing and will remain light up.
Method 2: Standard Connection Method for Windows Users
Step 1: Insert the CD that came together with the printer and start the setup process. In case, the CD run setup does not autorun, then go to the option of ‘this PC’ or My computer. Now, select MSETUP4.EXE.
In case you do not have a CD for the installation, then in that case you must download the software and manuals.
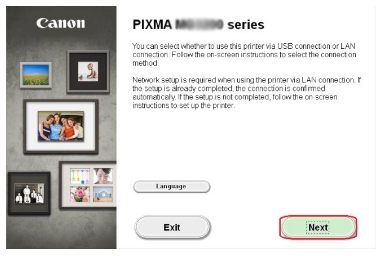
Step 2: When the first screen appears in front of you, select next.
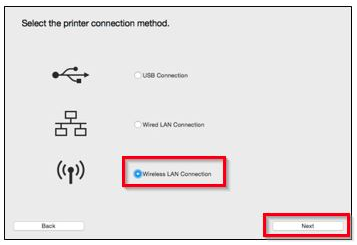
Step 3: Now to connect Canon Pro 100 Printer to WiFi, choose wireless LAN connection as the method of connection, then click on Next.
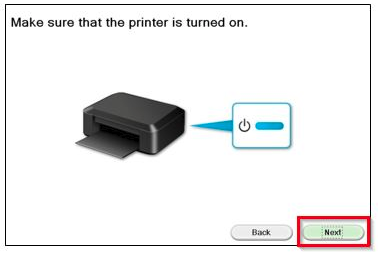
Step 4: Please make sure that the printer is turned on. Also, check that the white power light is also on. After that, click on Next.
Step 5: Then, the software will start looking at whether any printer device is already connected to the network or not. In case, you are setting up the printer for the very first time, then you will not be able to detect a connected device.
So, you need to make sure that the option of setting a printer cannot be found on the list. Again, click on Next.
Step 6: After that to connect Canon Pixma Pro 100 Printer to WiFi, the setup guide installation will begin. Hit Next.

Step 7: Now, choose the wireless setup.

Step 8: When the wireless setup screen is displayed in front of you. Select the button of Wi-Fi and keep on holding it until the power light starts flashing in front of you twice. Then, release the button and select.

Step 9: Please ensure that the blue Wi-Fi light flashes fast so that the white light turns on. After that, click on Next. Then, the message of the network connection is disabled temporarily will be displayed in front of you.

Step 10: If you see that a connection has been established between the access point and the printer. Then, click on Next.
Step 11: If a screen appears in front of you that says, select a residence. Then, you must choose a region and then click on next. After that, you need to choose a preferred language and select next.

Step 12: Now, choose the software that you want to install and then select. If you can’t decide the software that you want to install, then there is nothing to worry about as the software can be uninstalled at a later point of time.

Step 13: If the screen displaying License agreement Canon products appears in front of you, then agree by clicking on yes.
Step 14: After that, the screen of allowing install wizard processes will be displayed. Click on Next.
Step 15: Now to connect Canon Pixma Pro 100 Printer to WiFi, the software will begin to install. If the option of redetect shows up at the time of installation, then click on redetect. Then, the software will start looking for your printer again.
Step 16: The software is not going to take more than a minute to detect the printer. If it does, then it is dependent on network configuration. It may also require you to click on redetect a lot of times.
Step 17: When you are done with the wireless setup. A screen will show up displaying the printer’s model number as well as the name of your wireless network. At last, click on complete.
Step 18: In case, you are setting up a printer for the very first time, then you need to click on execute when the print head alignment screen is displayed. If not, then click on next.
Step 19: If setup complete screen comes up, then click on next. In case, you want to register your printer, then click on Next. Alternatively, you can navigate to the quick menu software. Now, click on Cancel.
Step 20: If you want to take part in the extended survey program, then go to agree and click on it. If not, then select do not agree.
Step 21: Go to the exit and finish the installation in the process to connect Canon Pixma Pro 100 Printer to WiFi.

This is how you complete the wireless setup by using the standard connection method. If you require any further support, you can contact the Canon team.
Confirmation of the Network Settings
To check that your printer is connected to the wireless network or not, you can take a print out of the network settings page.
- Please ensure that your printer is turned on.
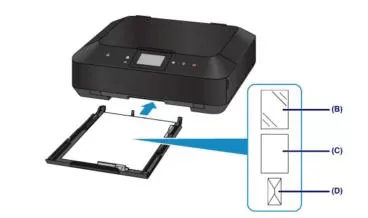
- Secondly, you need to load the A-4 size sheets.
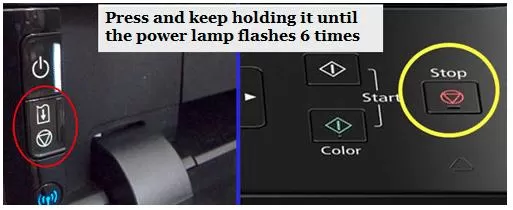
- After that, press and hold the button of cancel or resume. Keep on pressing it until the white light starts flashing 6 times. After that, the information of the printer will start printing. At the time of taking out the print, you must confirm that the connection is indicating the active sign.
- Also, make sure that the SSID is showing up the right name of the Wi-Fi network.
So, this is how you do Canon Pixma Pro 100 Printer wireless setup by using the WPS connection method.
This enables you to link devices such as a printer to a network without the requirement of entering the password. It is a very easy and simple method of connecting your devices.
 In case the WPS button is not available in that case, you must follow the instructions that are given in the standard connection method. The network you use must have Wi-Fi protected access. Many of the access points that are Wi-Fi enabled to make use of this protocol.
- 2 years ago
 Related Articles


Top Searches in Canon Printer
Why Won't My Canon Printer Print after Changing an Ink Cartridge?
May 23, 2026
How to Get Canon Printer Online on MAC?
Jun 4, 2026
How do I Fix a Canon Printer 1403 Error?
May 23, 2026
How do I Connect My Canon MG3050 Printer to WiFi?
May 23, 2026
How to Change Printer from Offline to Online Canon?
May 23, 2026
How to Connect Canon TS3122 Printer to WiFi?
May 23, 2026
How to Fix Canon Printer Carriage Jam Problem?
May 23, 2026
How to Fix Canon Printer Error Code 1660?
May 23, 2026
How to Resolve OKI Printer Error Code 990?
May 23, 2026
How do I Reset Canon MG2522 Printer?
May 23, 2026
Featured Articles
How to Get Canon Printer Online on MAC?
Jun 4, 2026
How to Fix Printer Printing Horizontal Black Lines?
May 23, 2026
How to Scan from HP Printer to Computer Windows 10?
Jun 13, 2026
Ricoh Printer Stuck on Processing
May 23, 2026
Brother Printer Only Printing in Black and White
Jun 21, 2026
How to Clean Kodak Printhead?
May 23, 2026
How to Install Lexmark Printer to Computer Without CD?
Jun 12, 2026
Why My Samsung Printer is Not Printing Clearly?
May 23, 2026
Top Questions
Why Won't My Canon Printer Print after Changing an Ink Cartridge?
Oct 7, 2020
How do I Fix a Canon Printer 1403 Error?
Dec 30, 2020
How do I Connect My Canon MG3050 Printer to WiFi?
Mar 30, 2021
How to Change Printer from Offline to Online Canon?
Nov 27, 2020
How to Turn My Ricoh Printer Online from Offline?
Feb 20, 2021
Brother MFC Printer Won't Print Black Despite Full Ink Cartridges
Nov 7, 2020
How to Fix Epson Printer Filter Failed or Stopped on Mac Error?
Dec 7, 2021
How do You Get a Lexmark Printer Back Online?
Sep 29, 2020