How to Fix Epson Error Code 0xf1?
Fix Epson Error Code 0xf1:
Printing documents can become pretty challenging when you have a lot on your plate. Things become even worse when an error code displays on your screen.
There can be several causes that can lead to this error code issue. Stated out below are some of the solutions that you can try out in order to fix Epson error code 0Xf1.
Different Methods to Fix Epson Printer Error Code 0xf1:
Here we are available with 4 different solutions that can help you get rid of Epson error 0xf1. Keep on trying these solutions one by one and stop at the very moment when your issue gets resolved. So, here is the list of solutions that you need to apply to eliminate this error code.
Fix 1 : Reinstall Your Epson Printer Device
You may see error code 0xf1 popping up on your screen if your printer device is not installed properly. Therefore, it is advisable to reinstall the printer device you are using to fix the issue that you are encountering.
Below are the steps that you need to perform in order to reinstall Epson printer.
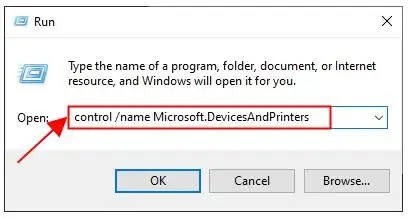
Step 1 : Press the Windows key and R key simultaneously. After that, you need to type the control/name Microsoft.DevicesAndPrinters. Then, hit the Enter key. This will launch the window of Devices and Printers.
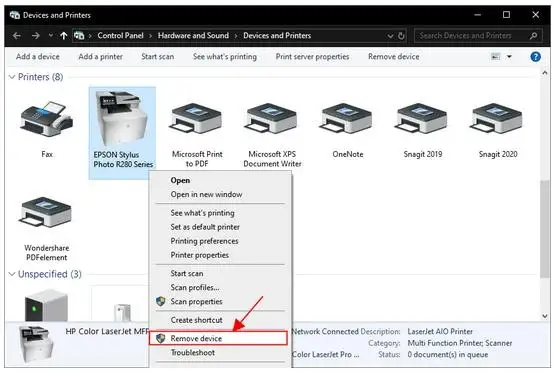
Step 2 : Select your Epson Printer file and then select the option of Remove device.
Step 3 : Reboot your PC in order to make the changes applicable.
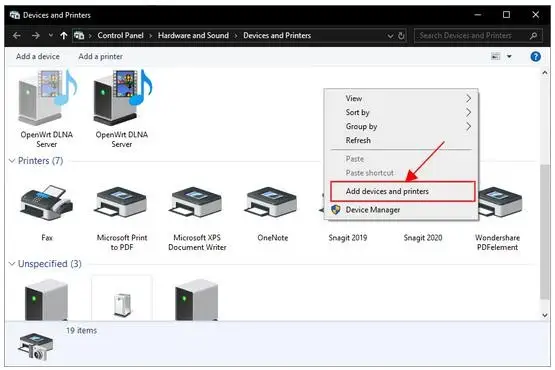
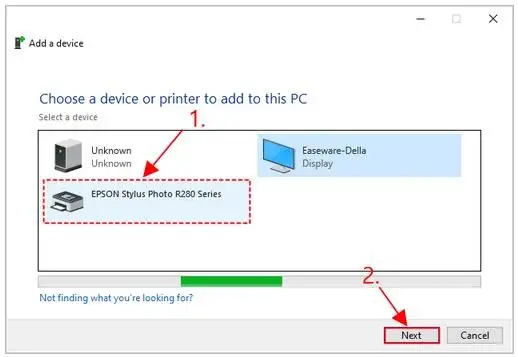
Step 4 : Launch the Window of Devices and Printers once again. Now, move your cursor to the empty area and then right click there. After that, click on the option of Add Devices and Printers.
Step 5 : Wait for the printer to display on the screen. After that, you need to select the option of your printer. After that, click on Next. Then, you need to carry out the instructions appearing on the screen to add your Epson printer to your PC.
Step 6 : Now, see if the error code is still appearing or not? If it is not appearing, then that means the problem has been resolved. If the error is still persisting, then there is nothing for you to be apprehensive about as you can try out other solutions to solve your problem.
Fix 2 : Check Hardware Issues on Your Epson Printer
Another troubleshooting method to resolve this problem is to check if there are any hardware problems. If indeed hardware troubles are leading to this error,
Then below mentioned are the steps that you need to follow.
Step 1: First of all, power off your printer device.
Step 2: Check the feed roller or paper tray in your printer and then check if there is any dirt or debris in the feed roller area.
Also, check if there is any paper stuck inside the feed roller. If you find that paper is actually jammed in the printer machine, then open the output cover and remove the paper. After that, close the cover.
Step 3: After that, you need to check if the printhead is faulty. If that;’s the case, then take out the printhead and then clean it using a piece of dry cloth.
Step 4: Now, power on your printer machine.
Step 5: Try to print one more time and check if the error is appearing. If the error does not appear, then that means your issue is resolved. In case the problem remains, then try out the next solution to solve your problem.
Fix 3 : Update the Epson Printer Driver
One of the reasons why one encounters this problem is the use of oytdated or incompatible drivers. You can fix the problem by updating the printer driver. If you don’t wish to go through the hassle of updating the driver manually, then go for an automatic update.
The steps that you need to carry out in order to perform an automatic update.
Step 1: First of all, you need to download and install the automatic update software.
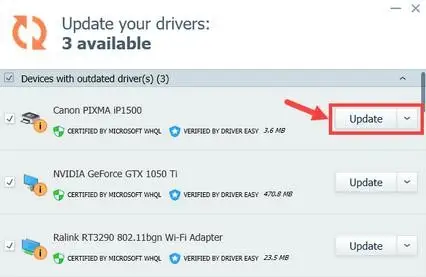
Step 2: Run the program that you just downloaded and click on the button of Scan Now. After that, the software will start scanning your system and start searching for outdated or corrupt drivers.

Step 3: Select the option of Update All to install and download the right version automatically.This will install all the outdated and missing drivers on your system.
Step 4: Reboot your computer system so that the modifications you made can actually come into effect.
Step 5: Now, see if the error code issue is fixed or not. In case it gets fixed, then that means your effort has finally paid off.
In case the error code is still showing up on the screen, then try one last troubleshooting solution to fix Epson error code 0xf1.
Fix 4 : Launch Windows Troubleshooter
There are some inbuilt troubleshooters in the Windows Operating System as well, which run a scan on hardware on your system so that you can get rid of errors. Therefore, you can run a Windows troubleshooter on your laptop or computer system to diagnose the problem and then eliminate it.
So, the steps that you need to follow are given below.
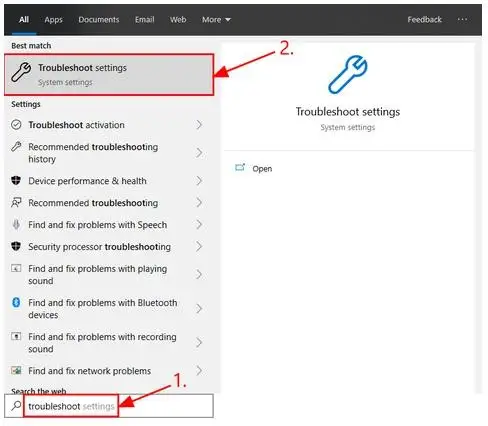
Step 1: Press the Windows key and then enter troubleshoot on your computer system and then select the option of troubleshoot settings when you see it appearing in the search results.
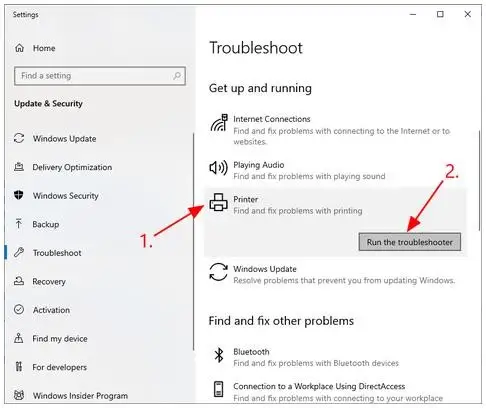
Step 2: After that, the troubleshooting window will open up before you. Go down to the section of getting Up and Running. Select the Printer and then run the Windows troubleshooter.
Step 3: Wait for your Windows computer to detect the issue and then carry out the instructions appearing on the screen to get rid of the Epson Printer Error Code 0xf1.
- SAM
 Brand: Epson Printer
- Last Update: 1 month ago
 Related Articles


Top Searches in Epson Printer
How to Fix Epson Printer Error 0XF3?
May 23, 2026
How to Fix Epson Printer Error Code 000041?
May 23, 2026
How do I Connect My Epson l3060 to WiFi?
May 23, 2026
Epson Printer Printing Double Letters
May 23, 2026
Fix Epson Workforce Pro WF-3720 Scanner Problem - Thin Vertical Stripes on Complete Scan
May 23, 2026
How to Find WPS Pin on Epson Printer?
May 23, 2026
How to Fix Epson Printer Error Code 0x98?
May 23, 2026
How to Reset the Epson Stylus C88?
May 23, 2026
Featured Articles
How to Get Canon Printer Online on MAC?
Jun 4, 2026
How to Fix Printer Printing Horizontal Black Lines?
May 23, 2026
How to Scan from HP Printer to Computer Windows 10?
Jun 13, 2026
Ricoh Printer Stuck on Processing
May 23, 2026
Brother Printer Only Printing in Black and White
Jun 21, 2026
How to Clean Kodak Printhead?
May 23, 2026
How to Install Lexmark Printer to Computer Without CD?
Jun 12, 2026
Why My Samsung Printer is Not Printing Clearly?
May 23, 2026
Top Questions
Why Won't My Canon Printer Print after Changing an Ink Cartridge?
May 23, 2026
How do I Fix a Canon Printer 1403 Error?
May 23, 2026
How do I Connect My Canon MG3050 Printer to WiFi?
May 23, 2026
How to Change Printer from Offline to Online Canon?
May 23, 2026
How to Turn My Ricoh Printer Online from Offline?
May 23, 2026
Brother MFC Printer Won't Print Black Despite Full Ink Cartridges
May 23, 2026
How to Fix Epson Printer Filter Failed or Stopped on Mac Error?
May 23, 2026
How do You Get a Lexmark Printer Back Online?
May 23, 2026