How to Fix Microsoft Excel Prints Blank Pages?
Fix Microsoft Excel Prints Blank Pages:
Are you experiencing the problem of Microsoft Excel printing blank pages? If yes, then worry not as here we are available with different solutions that can help you with Microsoft Excel printing blank pages issue. A lot of reasons can be responsible for Microsoft Excel printing blank pages issue.
There is a chance that you overlooked the formatting of your spreadsheet document or you ended up printing the entire worksheet file, which includes the blank pages at the end. In case you don't want the blank pages to get printed, the below-mentioned are the methods that you must perform.
How to Fix the Problem of Microsoft Excel Prints Blank Pages?
This issue often arises while printing an MS Excel spreadsheet. To fix this problem, apply the troubleshooting methods stated below.
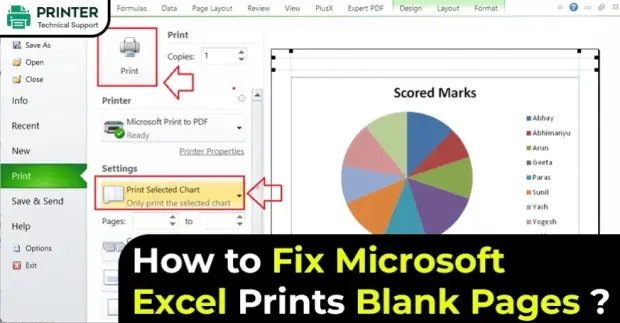
Solution 1: Print Your Spreadsheet by Page
Rather than printing your whole Excel spreadsheet in a single go, try to print one page at a time.
Step 1: Open your Excel document and then go to the File tab.
Step 2: Select the Print option.
Step 3: Go to Settings.
Step 4: After that, move to the pages section and enter the page that you wish to print. If you want, you can print the current page as well.
Step 5: Then, select the Print button.
Step 6: Once you are done printing one page, you need to do the same with other pages.
Solution 2: Fit Your MS Excel Document in a Page
In case there are some items in your MS Excel document that you need to print, then you must try to fit everything on a single page. This way, there won't be any blank cells or pages.
Step 1: Open the menu section and then go to the Page Layout tab.
Step 2: Select a small launcher given at the end of the Page Layout section for opening the dialog box.
Step 3: After that, you need to go to the Page tab.
Step 4: Then, navigate to scaling and then click on the Fit To option.
Step 5: Select the width and height of the page to fit each entry.
Step 6: After selecting the height and width, select OK.
Step 7: Then, you will see what the document looks like once it gets printed. If you find that everything is good, then go ahead and print it.
Solution 3: Please Ensure that There is a Zero in 0 Value Cells
Step 1: Select the File tab.
Step 2: After that, choose options.
Step 3: Then, you need to go to the Advanced tab.
Step 4: Search for the Display Options in the worksheet.
Step 5: Select the box given next to show a zero in cells that have zero value.
Solution 4: Print the Worksheet in High Quality
Step 1: Go to the Page Layout tab and then select the small launcher.
Step 2: After that, go to the sheet tab in the Page Layout window.
Step 3: Go to the print section.
Step 4: Uncheck the boxes next to Draft and Black & White quality.
Step 5: Then, navigate to the page tab.
Step 6: Search for the print quality option and then select the drop-down arrow.
Step 7: Then, click on High and then select Ok.
Solution 5: Unhide Hidden Cells
First of all, you need to check the location of the hidden cells in your MS Excel worksheet.
Step 1: Go to the Home tab in the menu section.
Step 2: After that, navigate to the editing section.
Step 3: Navigate to Find and Select.
Step 4: Then, go to special.
Step 5: Select Visible cells Only.
Step 6: Click on the Ok button.
Step 7: After that, you are going to see the selected visible cells in the spreadsheet. Unselected cells are the hidden cells that you need to unhide. Go to the column, row, or cell, and then select unhide.
So, these are the different methods that you need to follow to fix the problem of Microsoft Excel printing blank pages.
Also Read:
- How do I Allow for Printer Sharing on AVG Internet Security?
- How to Check Printing History in Windows 10?
- How Long Can I Store a Printer Cartridge?
FAQ for Fix Microsoft Excel Prints Blank Pages
- Mick
 Brand: Other
- Last Update: 1 month ago
 Related Articles
Top Searches in Other
How to Fix Printer Spooler Problems on Windows 10?
May 23, 2026
9 Best Printer to Buy for Home Office Use in 2026
May 23, 2026
How to Fix Boot Device Not Found 3f0 Error?
May 23, 2026
How to Fix Print Job Stuck in Queue?
May 23, 2026
How to Make Printer Online in Windows 10?
May 23, 2026
Why is a Printer Printing Blank Pages on Windows 10?
May 23, 2026
How to Troubleshoot Wireless Printer Not Printing?
May 23, 2026
Featured Articles
How to Get Canon Printer Online on MAC?
Jun 4, 2026
How to Fix Printer Printing Horizontal Black Lines?
May 23, 2026
How to Scan from HP Printer to Computer Windows 10?
Jun 13, 2026
Ricoh Printer Stuck on Processing
May 23, 2026
Brother Printer Only Printing in Black and White
Jun 21, 2026
How to Clean Kodak Printhead?
May 23, 2026
How to Install Lexmark Printer to Computer Without CD?
Jun 12, 2026
Why My Samsung Printer is Not Printing Clearly?
May 23, 2026
Top Questions
Why Won't My Canon Printer Print after Changing an Ink Cartridge?
May 23, 2026
How do I Fix a Canon Printer 1403 Error?
May 23, 2026
How do I Connect My Canon MG3050 Printer to WiFi?
May 23, 2026
How to Change Printer from Offline to Online Canon?
May 23, 2026
How to Turn My Ricoh Printer Online from Offline?
May 23, 2026
Brother MFC Printer Won't Print Black Despite Full Ink Cartridges
May 23, 2026
How to Fix Epson Printer Filter Failed or Stopped on Mac Error?
May 23, 2026
How do You Get a Lexmark Printer Back Online?
May 23, 2026