How to Setup Wifi on Epson WF-3640?
Hello, Please let me know that how to setup wifi on Epson WF-3640. I am facing some issue in this while connecting it. Help me.
 1 Ans
1 Ans- 4 years ago
Setup Wifi on Epson WF-3640:

The fact can't be denied that Wi-Fi is speedily replacing the wired LAN connection in homes and workplaces. In fact, this is the reason why the majority of high-end printers offer inbuilt Wi-Fi functionality. This means that you can print documents wirelessly without connecting any sorts of cables.
Epson WF-3640 is listed as one of those all-in-one printing solutions. In order to setup Wifi on Epson WF-3640, follow the given steps below.
Important Note: Before you start to setup Wifi on Epson WF-3640, make sure that you have the correct wireless network name and the network key details.
Steps to Setup Wifi on Epson WF-3640 - Using Printer’s Control Panel
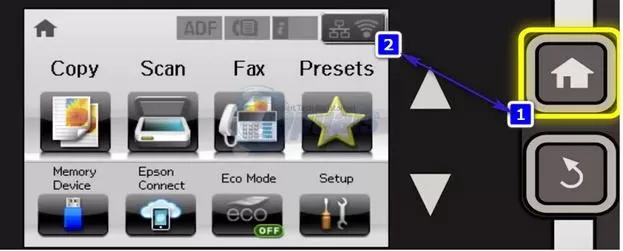
You can setup wifi functionality on your WF - 3640 through the Epson printer’s control panel. Simply press the Home Icon and then tap on the Wi-Fi icon shown at the upper-right corner of the printer’s interface.
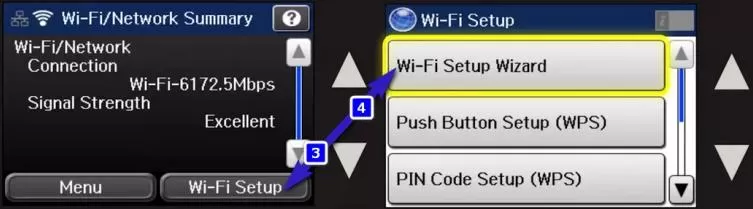
Step 1: Firstly, choose the Wi-Fi setup option and then select the Wi-Fi setup wizard.
Pro Tip: In case you are facing issues with your computer or a laptop/notebook, you must try some Repair tool that will help you to scan the repositories which then further replaces the inspected corrupted or missing files.
However, in most of the cases, the issue is caused because of system corruption. Download an apt tool for scanning and fixing the repositories issue.
Step 2: Next, you can check the list of available wireless networks on your screen. From here, you can choose the wireless network you want to connect to. Make use of the down or up arrow key and search for the wireless network if required.
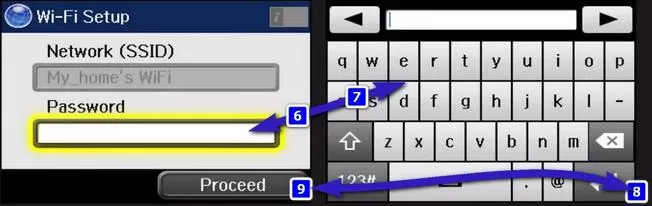
Step 3: Enter the correct password into the Password field. With the help of an on-screen keyboard, you can conveniently enter lowercase, uppercase, numeric, and special characters. At last, when you are done, then tap the return arrow. Further, tap the Proceed button, and then tap OK.
Step 4: Now, your printer automatically starts to configure itself and prints wirelessly. As the setup process gets completed, you will note a Setup complete message on your screen. Next, you may either press the Done button on the screen and finish the setup. Optionally, you can click the Start button on the printer’s panel and then print a network status report.
Step 5: So, you are now ready to run the printer’s setup on your computer that came with the CD to install the printer on the computer. In case you do not have a disc or if your computer doesn't have a CD ROM, then you can directly download the software from the Epson site.
Note: If some cases require you to connect more computers to this printer, then insert the CD in each of them and initiate the setup process. However, after reaching to step 5, you can select Setup Option, and then choose The printer is already on my wireless network. Finally, you can follow the given on-screen instructions to setup Wifi on Epson WF-3640 completely.
Best Tip: Above all, if no method is useful to resolve the issue for you, then we recommend you to use a Repair Tool which can automatically scan the repositories to replace corrupt and missing files.
Well, such tools are helpful in most of the cases where the issue is caused due to a system corruption. These tools also optimize your system performance to the maximum levels.
But remember, before you start to print that you must connect and configure your printer in order to print over a Wi-Fi connection. So, for allowing the wifi to work, your printer and your computer should be necessarily connected to the same wifi router or to a suitable access point/repeater/extender that is connected to the same router.
Hope this guide to setup Wifi on Epson WF-3640 is helpful to the users.
- 2 years ago
 Related Articles


Top Searches in Epson Printer
How to Fix Epson Printer Filter Failed or Stopped on Mac Error?
May 23, 2026
How to Fix Epson Printer Error 0XF3?
May 23, 2026
How to Fix Epson Printer Error Code 000041?
May 23, 2026
How to Fix Problem Regarding Color of Epson L380 Printer?
May 23, 2026
How do I Connect My Epson l3060 to WiFi?
May 23, 2026
Epson Printer Printing Double Letters
May 23, 2026
Fix Epson Workforce Pro WF-3720 Scanner Problem - Thin Vertical Stripes on Complete Scan
May 23, 2026
How to Find WPS Pin on Epson Printer?
May 23, 2026
How to Fix Epson Printer Error Code 0x98?
May 23, 2026
How to Reset the Epson Stylus C88?
May 23, 2026
Featured Articles
How to Get Canon Printer Online on MAC?
Jun 4, 2026
How to Fix Printer Printing Horizontal Black Lines?
May 23, 2026
How to Scan from HP Printer to Computer Windows 10?
Jun 13, 2026
Ricoh Printer Stuck on Processing
May 23, 2026
Brother Printer Only Printing in Black and White
Jun 21, 2026
How to Clean Kodak Printhead?
May 23, 2026
How to Install Lexmark Printer to Computer Without CD?
Jun 12, 2026
Why My Samsung Printer is Not Printing Clearly?
May 23, 2026
Top Questions
Why Won't My Canon Printer Print after Changing an Ink Cartridge?
Oct 7, 2020
How do I Fix a Canon Printer 1403 Error?
Dec 30, 2020
How do I Connect My Canon MG3050 Printer to WiFi?
Mar 30, 2021
How to Change Printer from Offline to Online Canon?
Nov 27, 2020
How to Turn My Ricoh Printer Online from Offline?
Feb 20, 2021
Brother MFC Printer Won't Print Black Despite Full Ink Cartridges
Nov 7, 2020
How to Fix Epson Printer Filter Failed or Stopped on Mac Error?
Dec 7, 2021
How do You Get a Lexmark Printer Back Online?
Sep 29, 2020