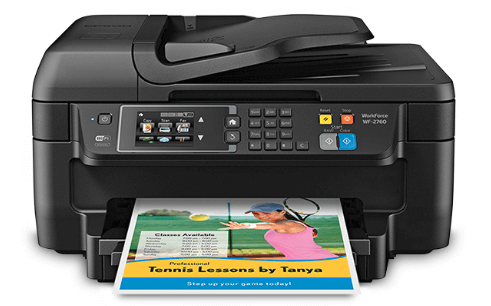
Manual Multiple Page Document Scanning on Epson WF 2760
I am trying to scan some double-sided documents that will not run through the document feeder on my Epson Workforce 2760. How do I do this and have them end up in the same pdf document rather than one pdf doc for each page? Thanks!
 1 Ans
1 Ans- 5 years ago
Epson et 2760 Scan Multiple Pages:
Document Scanning on Epson WF 2760-
If there is a requirement of printing multiple pages of a newspaper, magazine, document and you wish to compile and save them into a single PDF file on your computer system, then you can do so by using document scanning on Epson WF 2760 . Epson scan shows an editing page, which allows you to take a look at the pages as you delete, rotate, reorder, or scan them whenever necessary.
Step 1: Keep your original document or photograph in your scanner. Check the booklets for getting more details.
Step 2: For document scanning on Epson WF 2760 start the scanning process on your Epson printer. Take a look at these sections for getting more instructions.
- Let us begin with scanning using Epson scan
- Beginning a scan with Epson creativity suite
- Begin scanning using another scanning program
Step 3: Choose the basic settings for the kind of originals that you are scanning and choose the destination setting in order to decide the manner in which you are going to use your image.
Step 4: Click on the button of preview to take a preview of the images, then select the scan area by selecting the option of previewing and adjusting the scan area.
Step 5: In case you are using an Automatic document feeder, it will start loading the first page of the document. After that, it will prescan it and shows it in the window of preview. The ADF will start ejecting the first page. Keep the first page of the document on top of the remaining papers.
Step 6: For document scanning on Epson WF 2760, and click the button of scan. The settings of ‘file save’ will appear in front of you. After that, you need to choose PDF as the typesetting. The present compression level, margin, orientation, paper size settings will be shown right below it.
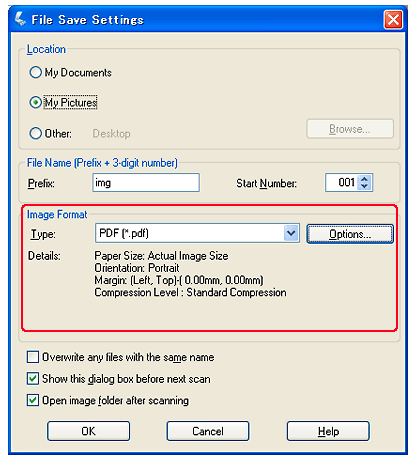
Step 7: If you wish to make any changes in the present PDF settings and then click on the button of “Options’. You will be able to see the plug-in settings window of Epson. Choose the settings that perfectly matches with your document. After that for document scanning on Epson WF 2760, you will come back to the window where you saved the file.

Step 8: Once you are done selecting the settings of the file, click on Ok and then the Epson scan will begin scanning your document and an Epson scan window will pop up in front of you. In case you are scanning several pages using ADF that is Automatic Document Feeder, then every page of ADF will get scanned automatically.
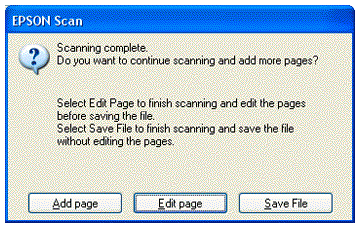
Step 9: In case you are only scanning one page of the document or you don’t want to edit your pages, then you can click on the button of save file and move ahead with the 12th step.
In case you wish to scan other pages as well, then go to Add Page and then reset your documents by going to the ADF or document table and then select scan. Repeat the same step once again if needed and when you are done, click on edit page.
Step 10: Editing page window will show up in front of you, which will show you the image of every scanned page.

The window of editing page will show up the thumbnails of every scanned page. You can use the tools that are given after the page of editing to delete, reorder, rotate, and select pages in the document. Click on the button of help to gain more details.
Step 11: Once you are done editing the pages of your document, then you need to click on ok. After that, your document will be saved as PDF file in the folder of my pictures and then you go back to the Epson scan Window.
Step 12: Close the Epson Scan.
This is how Epson et 2760 scan multiple pages.
- 2 years ago
 Related Articles


Top Searches in Epson Printer
How to Fix Epson Printer Filter Failed or Stopped on Mac Error?
May 23, 2026
How to Fix Epson Printer Error 0XF3?
May 23, 2026
How to Fix Epson Printer Error Code 000041?
May 23, 2026
How to Fix Problem Regarding Color of Epson L380 Printer?
May 23, 2026
How do I Connect My Epson l3060 to WiFi?
May 23, 2026
Epson Printer Printing Double Letters
May 23, 2026
Fix Epson Workforce Pro WF-3720 Scanner Problem - Thin Vertical Stripes on Complete Scan
May 23, 2026
How to Find WPS Pin on Epson Printer?
May 23, 2026
How to Fix Epson Printer Error Code 0x98?
May 23, 2026
How to Reset the Epson Stylus C88?
May 23, 2026
Featured Articles
How to Get Canon Printer Online on MAC?
Jun 4, 2026
How to Fix Printer Printing Horizontal Black Lines?
May 23, 2026
How to Scan from HP Printer to Computer Windows 10?
Jun 13, 2026
Ricoh Printer Stuck on Processing
May 23, 2026
Brother Printer Only Printing in Black and White
Jun 21, 2026
How to Clean Kodak Printhead?
May 23, 2026
How to Install Lexmark Printer to Computer Without CD?
Jun 12, 2026
Why My Samsung Printer is Not Printing Clearly?
May 23, 2026
Top Questions
Why Won't My Canon Printer Print after Changing an Ink Cartridge?
Oct 7, 2020
How do I Fix a Canon Printer 1403 Error?
Dec 30, 2020
How do I Connect My Canon MG3050 Printer to WiFi?
Mar 30, 2021
How to Change Printer from Offline to Online Canon?
Nov 27, 2020
How to Turn My Ricoh Printer Online from Offline?
Feb 20, 2021
Brother MFC Printer Won't Print Black Despite Full Ink Cartridges
Nov 7, 2020
How to Fix Epson Printer Filter Failed or Stopped on Mac Error?
Dec 7, 2021
How do You Get a Lexmark Printer Back Online?
Sep 29, 2020