Printer not Printing Actual Size: Why & How to Fix it
Printer not Printing Actual Size:
When you need to print a document exactly at its original size, but the output from your office printer appears too large or too small, determining the cause of the disparity between real and printed size can entail combing through a plethora of settings and preferences.
To make matters more difficult, you'll need to determine what size your source material actually measures, which can vary depending on how you've set up your document and its contents.

Check all of your drivers in three simple steps right now if your printer not Printing Actual Size :
- Install DriverFix (verified download file).
- To locate all problematic drivers, click the Start Scan button.
- To obtain new versions of drivers and avoid system malfunctions, select Update Drivers.
Your printer supports printing documents in various sizes. In the printing interface, users can specify the size of the print. However, the printer occasionally fails to print the document in the proper size. This appears to be a widespread problem with the HP printer.
How can Someone Get a Printer to Print Full-Size?
1. Configure Printing Preferences

Step 1: To open Run, press Windows Key + R.
Step 2: Form control and press OK to access the Control Panel.
Step 3: Select Hardware and Sounds.
Step 4: Select Devices and Printers.
Step 5: From the right-click menu, choose Printer Preferences.
Step 6: Next, select Paper Source and configure as desired.
Step 7: Next, choose Paper Size and adjust as needed.
Step 8: Choose Media and configure it as desired.
Step 9: To save the changes, click OK.
Step 10: Try printing the document or image you were trying to print and see if the printer prints the correct size.
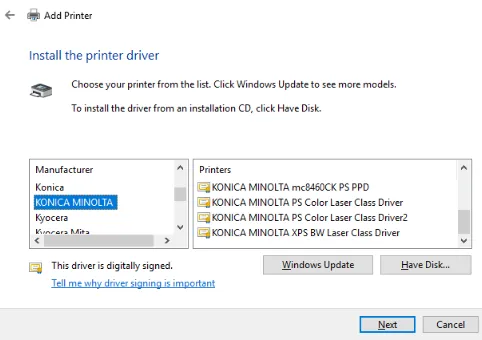
2. Install the Latest Printer Driver and Firmware.
Step 1: To open the run dialogue, press Windows Key + R.
Step 2: To launch the Device Manager, type devmgmt.msc and press OK.
Step 3: Expand the Printers section of the Device Manager.
Step 4: Select Update Driver from the context menu of your printer.
Step 5: Select the "Search for updated driver software automatically" option.
Step 6: Device Manager Driver Update Windows will look for a new version of the printer driver. If it finds the driver, it will download and install it.
Step 7: Reboot the system to see if anything has changed.
Step 8: You can also uninstall the driver and the system should install it automatically if the device is connected. Alternatively, go to the official support website to download drivers.
It’s the most beneficial step to solve when your printer not Printing the Actual Size.
3. Run HP Print as Well as Scan Doctor.

Step 1: HP Printer Diagnostic Software
Step 2: Open the HP Print as well as Scan Doctor page.
Step 3: To download HP Print and Scan Doctor to your computer, click the download now button.
Step 4: Start the program and enter any terms and conditions you want.
Step 5: In the HP Print as well as Scan Doctor window, press the Start button.
Step 6: It will now check your system and the printer to see if there are any problems. Before running the program, ensure that the printer is connected to the computer.
Step 7: To resolve the issue, follow the on-screen instructions and apply any recommended fixes.
Also Read:
- How to Fix Printer has Run Out Paper Error?
- How to Use the WiFi Printer Driver for Chromebooks?
- How to Fix Error 740 While Adding Printer on Windows 10/11?
FAQ for Printer not Printing Actual Size
- Mick
 Brand: Other
- Last Update: 2 months ago
 Related Articles


Top Searches in Other
How to Fix Printer Spooler Problems on Windows 10?
May 23, 2026
9 Best Printer to Buy for Home Office Use in 2026
May 23, 2026
How to Fix Boot Device Not Found 3f0 Error?
May 23, 2026
How to Fix Print Job Stuck in Queue?
May 23, 2026
How to Make Printer Online in Windows 10?
May 23, 2026
Why is a Printer Printing Blank Pages on Windows 10?
May 23, 2026
How to Troubleshoot Wireless Printer Not Printing?
May 23, 2026
Featured Articles
How to Get Canon Printer Online on MAC?
Jun 4, 2026
How to Fix Printer Printing Horizontal Black Lines?
May 23, 2026
How to Scan from HP Printer to Computer Windows 10?
Jun 13, 2026
Ricoh Printer Stuck on Processing
May 23, 2026
Brother Printer Only Printing in Black and White
Jun 21, 2026
How to Clean Kodak Printhead?
May 23, 2026
How to Install Lexmark Printer to Computer Without CD?
Jun 12, 2026
Why My Samsung Printer is Not Printing Clearly?
May 23, 2026
Top Questions
Why Won't My Canon Printer Print after Changing an Ink Cartridge?
May 23, 2026
How do I Fix a Canon Printer 1403 Error?
May 23, 2026
How do I Connect My Canon MG3050 Printer to WiFi?
May 23, 2026
How to Change Printer from Offline to Online Canon?
May 23, 2026
How to Turn My Ricoh Printer Online from Offline?
May 23, 2026
Brother MFC Printer Won't Print Black Despite Full Ink Cartridges
May 23, 2026
How to Fix Epson Printer Filter Failed or Stopped on Mac Error?
May 23, 2026
How do You Get a Lexmark Printer Back Online?
May 23, 2026