How to Fix a Failed Dell Printer Installation?
Hey, I bought a Dell Printer from Amazon. The package was neat and everything look perfect. Yesterday I sat down to install the Printer to my computer using the CD I got along with the printer but for some reason the installation collapsed a couple of times. I took out the CD, cleaned it and then again tried but the issue is same. I use a Windows 7 PC. Can anyone tell me what is wrong or is there something I am doing wrong?
 1 Ans
1 Ans- 5 years ago
Check the Process of Installing Dell Printer Drivers on Windows 7 -
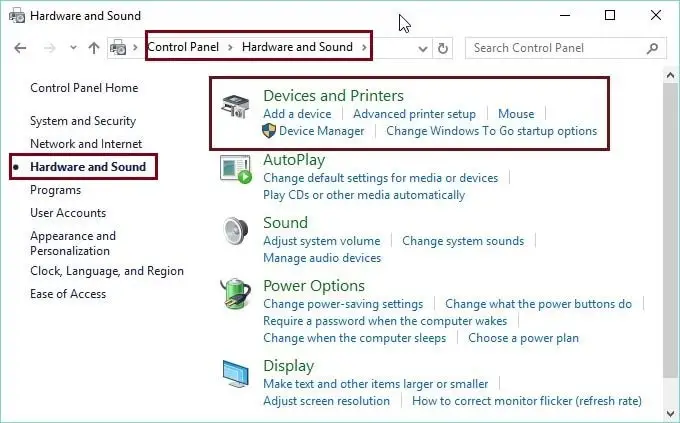
Step 1 : First of all, go to Start > Control Panel and then tap on Hardware & Sound> Devices&Printers.
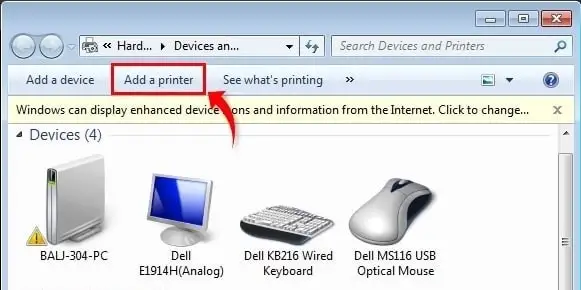
Step 2 : You can add your Dell printer as a network printer, wireless printer or Bluetooth printer. For adding your printer, you just need to tap on “Add a printer”.
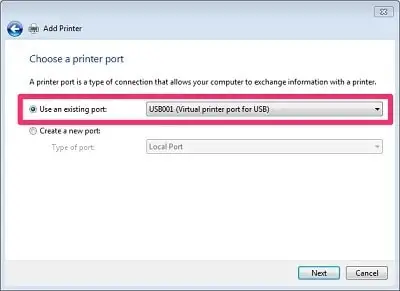
Step 3 : After this, tap on the option “Add a local printer” for moving into next interface i.e., “Choose a printer port”. And then, you have to select a local printer port. Then hit Next. On the Add Printer wizard, click on radio box that is next to “Use an existing port” and then hit Next.
Step 4 : On the next screen, you have to select “Manufacturer” and “printers”. Then hit Next key. If your Dell printer’s name is not available in the list then tap on “Have disk” to install the Dell printer driver from the installation CD. Although you can also click on “Windows Update” to see extra models.
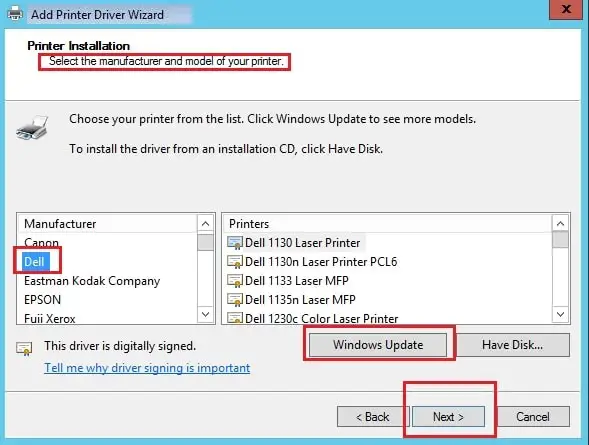
Note: If you don't have Dell Printer Driver CD then you can install printer drivers from official Dell printer website - https://www.dell.com and in case you don't know that how to install Dell Printer Driver without CD then Click Here..!!
- Next, confirm that your printer’s name is displaying in the interface is correct or not. If everything is OK then click on Next to install the driver.
- Once the Dell printer installation gets complete, just choose the option “Do not share this printer”. On the other hand, if you want to share Dell printer then you have to provide a "share name".
- To finish the settings, just click on Next. Now your newly add Dell printer is visible in the “Devices & Printers” list. To check if your Dell printer is working properly or not, you have to click on “Print a test paper” option. From this process, you can also determine that if your printer has successfully installed on your Windows 7 operating system.
Note - If you want to install two printers on the same operating system then your system will redirect you to set Dell printer as the default printer when the installation of the second printer gets finished. Also, to set your Dell printer as the default one, simply press right click on Dell printer and then choose the option “Set as the default printer”.
- 2 years ago
 Related Articles

Top Searches in Dell Printer
Featured Articles
How to Get Canon Printer Online on MAC?
Jul 31, 2026
How to Fix Printer Printing Horizontal Black Lines?
Jul 31, 2026
How to Scan from HP Printer to Computer Windows 10?
Jul 31, 2026
Ricoh Printer Stuck on Processing
Jul 31, 2026
Brother Printer Only Printing in Black and White
Jul 31, 2026
How to Clean Kodak Printhead?
Jul 31, 2026
How to Install Lexmark Printer to Computer Without CD?
Jul 31, 2026
Why My Samsung Printer is Not Printing Clearly?
Jul 31, 2026
Top Questions
Why Won't My Canon Printer Print after Changing an Ink Cartridge?
Oct 7, 2020
How do I Fix a Canon Printer 1403 Error?
Dec 30, 2020
How do I Connect My Canon MG3050 Printer to WiFi?
Mar 30, 2021
How to Change Printer from Offline to Online Canon?
Nov 27, 2020
How to Turn My Ricoh Printer Online from Offline?
Feb 20, 2021
Brother MFC Printer Won't Print Black Despite Full Ink Cartridges
Nov 7, 2020
How to Fix Epson Printer Filter Failed or Stopped on Mac Error?
Dec 7, 2021
How do You Get a Lexmark Printer Back Online?
Sep 29, 2020