How do I Scan on My Brother MFC l2750dw?
Hello, Please let me know that how do i scan on my Brother MFC l2750dw. I am facing some issue in this. Help me.
 1 Ans
1 Ans- 4 years ago
Scan on Brother MFC l2750dw Printer:
Here are some solutions for you to scan on my Brother MFC l2750dw printer. Also here you will learn why your Brother printer won’t scan. Follow the instructions below.
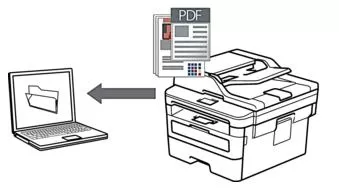
Step 1: Load your document.
Step 2: Press Scan>to PC>to File option and then click ‘OK’.
Step 3: If the machine is connected with the network, click or to display the computer where you want to send data, and then press the computer name.
Note: If the LCD prompts you to enter a PIN for the computer, enter the four-digit PIN on the LCD and then press ‘OK’.
Step 4: Do one of the following:
- To change the scan settings, press, and after that go to the next step.
- To use the default scan settings, press ‘Start’.
- The machine starts scanning. If you are using the machine's scanner glass, then follow the LCD guidelines to complete the scanning job.
- To change scan settings, Brother's ControlCenter software must be installed on a computer connected to the machine.
Step 5: To scan both sides of the document (MFC-L2750DW/MFC-L2750DWXL):
Press 2-sided Scan, and after that select the document type.
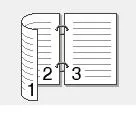
- 2-sided Scan: Long Edge
- 2-sided Scan: Short Edge
Step 6: Select the scan settings you want to change:
- Resolution
- File Type
- Scan Type
- Document Size
- Scan Settings
- ADF Auto Deskew
- Remove Background Color
(available only for the Color and Gray options.)
Step 7: Press ‘OK’.
Step 8: Press ‘Start’.
Step 9: The machine starts scanning.
That’s it!! Now you will be able to scan on my Brother MFC l2750dw.
FIX: Brother Printer won’t scan Windows 10
Step 1: Ensure that the machine is powered on and without errors
When you turn on the Brother Printer and find that the LCD display is blank, then it means it is either off or in sleep mode.
So, you can press a button on the printer and see if it will wake it up from sleep mode, then check whether the printer power cable is plugged into a power outlet and all power switches are turned to ON.
Take a look at the LCD display if there are any error messages like paper jam, ink/toner empty, and if there’s a specific error message, troubleshoot to clear it.
Step 2: Check your connection
Setup your Brother printer if you want to use the network scanning tool, via the peer-to-peer network environment, because it works from a server computer, not client PCs.
Step 3: Ensure that the printer is ready to print
For this, you need to open Printer Properties where you will find options on how to operate the printer such as configuring ports and hardware related customizations.
- Click Start and select Control Panel
- Click Hardware and Sound
- Click Devices and Printers
- Right press on your Brother printer and choose Printer Properties
Tap on the Print Test page to check if your printer is available to print
Step 4: Check the Brother printer’s scanner driver
- Go to the scanner list by clicking Start and select Control Panel
- The search box on Control Panel, type the ‘scanner’
- Click view scanners and cameras
- Take a look at whether the scanner icon of your Brother printer exists
- If it doesn’t exist, install the scanner driver
- Go to the Downloads section in the Brother website
Install the Full Driver & Software package and follow the guidelines available
Step 5: Verify the IP address of your Brother printer
In case, Brother Printer won’t scan, receive its IP address by printing a network configuration list, which prints a report of all current network configuration including the network print server settings.
- To print the network setup list, do the following:
- Press Menu on your Brother Printer
- Select Print Reports
- Select Network Config and press OK
- Click Black (Mono) Start or Color Start or Start
- Press Stop/Exit
Step 6: Place the IP address on the scanner driver
To do this:
- Go to the Scanner Properties by clicking Start and select Control Panel. Then type the word ‘scanner’ in the search box and click View scanners and cameras
- Choose your scanner
- Click Properties button
- If you get the UAC (User Account Control) screen, click Continue or Yes (for admin), or enter the admin password and click OK or Yes
- Click Network Setting tab
- Select Specify your machine by address
- Type the IP address you confirmed in the previous step and click OK.
- 2 years ago
 Top Related Question
Related Articles
Top Searches in Brother Printer
Brother MFC Printer Won't Print Black Despite Full Ink Cartridges
May 23, 2026
How to Connect Brother Wireless Printer to MAC?
May 23, 2026
Brother Printer Only Printing in Black and White
Jun 21, 2026
How to Fix Brother Printer Error 50?
May 23, 2026
How do I Get My Brother Printer to Print Double Sided?
May 23, 2026
How to Fix Brother Printer Printing Blank Pages?
May 23, 2026
Not Able to Print any PDF Files from Brother Printer
May 23, 2026
Brother Printer Connected But Not Printing
May 23, 2026
How Can I Make Homemade Printer Ink?
May 23, 2026
How to Fix Brother Printer Head Alignment Not Working?
May 23, 2026
Featured Articles
How to Get Canon Printer Online on MAC?
Jun 4, 2026
How to Fix Printer Printing Horizontal Black Lines?
May 23, 2026
How to Scan from HP Printer to Computer Windows 10?
Jun 13, 2026
Ricoh Printer Stuck on Processing
May 23, 2026
Brother Printer Only Printing in Black and White
Jun 21, 2026
How to Clean Kodak Printhead?
May 23, 2026
How to Install Lexmark Printer to Computer Without CD?
Jun 12, 2026
Why My Samsung Printer is Not Printing Clearly?
May 23, 2026
Top Questions
Why Won't My Canon Printer Print after Changing an Ink Cartridge?
Oct 7, 2020
How do I Fix a Canon Printer 1403 Error?
Dec 30, 2020
How do I Connect My Canon MG3050 Printer to WiFi?
Mar 30, 2021
How to Change Printer from Offline to Online Canon?
Nov 27, 2020
How to Turn My Ricoh Printer Online from Offline?
Feb 20, 2021
Brother MFC Printer Won't Print Black Despite Full Ink Cartridges
Nov 7, 2020
How to Fix Epson Printer Filter Failed or Stopped on Mac Error?
Dec 7, 2021
How do You Get a Lexmark Printer Back Online?
Sep 29, 2020