How to Connect Brother Wireless Printer to MAC?
Hello, Please let me know that how can i connect Brother wireless printer to mac system. I am able to connect Brother printer to MAC. Please help me.
 1 Ans
1 Ans- 5 years ago
Connect Brother Wireless Printer to MAC
If you are looking for a method to connect your Brother printer to a Mac, then here is a guide that will help you set up your Brother printer wirelessly on a map. Firstly, you will have to check your network name and security password. Go to the settings or menu options from the display panel, click on the settings option, and then choose the network settings option.
You have to click on the wireless network option. Your brother's printer will now start searching for all the available wireless networks. From the final list displayed, you can choose your home network and connect by entering the correct password. Choose the "okay" option to connect the printer to the Mac. 
How to Connect Brother Wireless Printer to MAC?
Step 1: First of all, note down the SSID and the security password of your network.
Step 2 : Check out the option, settings, or menu button by going to the display panel or the printer control panel.
Step 3: Press the settings button and move to the network settings.
Step 4: Select the wireless network.
Step 5 : Now, your printer will start looking for the available wireless network and a list will appear in front of you.
Step 6: Choose the home wireless network and then enter the password.
Step 7: Now, select ok to connect the Brother wireless printer to MAC.
Once the connection has been established, then you need to move forward with the steps of setting up the printer. In case you printer does not have display panels or control buttons, then in that case you connect your printer using a USB wire.
Process to Connect Brother Wireless Printer to MAC?
Step 1 : In the first step, you need to install and download Brother printer driver on your Mac computer system. You can also go to the official website of the Brother company to download the drivers.
Step 2 : When you are done with installing the driver click the installation file of the driver + control.
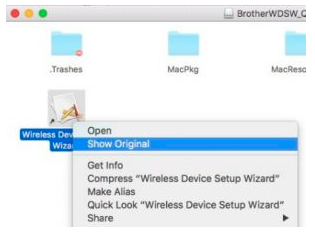
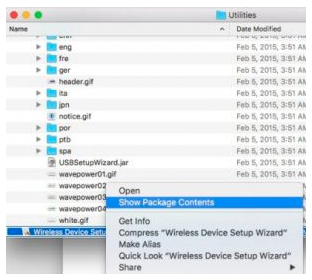
Step 3 : Now to connect Brother wireless printer to MAC, go to show package contents and then select that option. Now, choose the wireless device setup wizard.
Step 4: If any security warning message or confirmation message opens up after opening up the file, either click on open or yes to confirm.
Step 5: Now, click on Yes, I have a USB wire. Use it on a temporary basis for installing the printer.
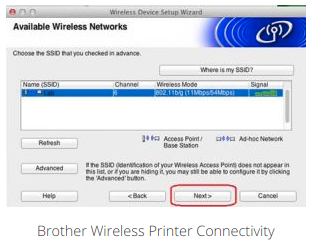
Step 6 : Wireless network settings will be shown by the wizard that your Mac is connected to.
Step 7 : Confirm the network name and security password and then select Next.
Step 8 : Now to connect Brother wireless printer to MAC, take a USB wire and connect its one end to the computer system and the other one to your printer device.
Step 9: If a list of available wireless networks comes up in front of you, then select your network and enter the password.
Step 10 : Once the network settings have been configured by the printer, you will be required to disconnect the USB wire from the computer system.
Step 11: After taking out the wire, go to next. Select the machine from the list appearing in front of you and select it.
The driver will get installed on the Wizard and the printer will be added to your Mac computer. This is how you connect a Brother wireless printer to a MAC. Now, you can give commands on your Mac computer and print using your Brother wireless printer.
If the List of Printers Does not Show your Machine's Name
- Go to the Apple menu and then click on system preferences.
- After that, select print&scan, and print&fax under the option of printers and scanners.
- Now, see the list of printers available on the left side. If your printer does not show up in the list, then click on the icon of plus in the bottom and choose your printer from the list.

- Then, select the right printer machine which is given under the use or print using option. After that, click on the button of add.
- Now, a printer is going to be added to the list. Then, you will be able to print using your Brother printer.
- In case your printer is showing up printing errors, then troubleshoot your printer by performing the troubleshooting steps.
So, these are some of the steps that you are required to follow in order to connect Brother wireless printer to Mac.
- 2 years ago
 Top Related Question
Related Articles

Top Searches in Brother Printer
Brother MFC Printer Won't Print Black Despite Full Ink Cartridges
May 23, 2026
How to Connect Brother Wireless Printer to MAC?
May 23, 2026
Brother Printer Only Printing in Black and White
Jun 21, 2026
How to Fix Brother Printer Error 50?
May 23, 2026
How do I Get My Brother Printer to Print Double Sided?
May 23, 2026
How to Fix Brother Printer Printing Blank Pages?
May 23, 2026
Not Able to Print any PDF Files from Brother Printer
May 23, 2026
Brother Printer Connected But Not Printing
May 23, 2026
How Can I Make Homemade Printer Ink?
May 23, 2026
How to Fix Brother Printer Head Alignment Not Working?
May 23, 2026
Featured Articles
How to Get Canon Printer Online on MAC?
Jun 4, 2026
How to Fix Printer Printing Horizontal Black Lines?
May 23, 2026
How to Scan from HP Printer to Computer Windows 10?
Jun 13, 2026
Ricoh Printer Stuck on Processing
May 23, 2026
Brother Printer Only Printing in Black and White
Jun 21, 2026
How to Clean Kodak Printhead?
May 23, 2026
How to Install Lexmark Printer to Computer Without CD?
Jun 12, 2026
Why My Samsung Printer is Not Printing Clearly?
May 23, 2026
Top Questions
Why Won't My Canon Printer Print after Changing an Ink Cartridge?
Oct 7, 2020
How do I Fix a Canon Printer 1403 Error?
Dec 30, 2020
How do I Connect My Canon MG3050 Printer to WiFi?
Mar 30, 2021
How to Change Printer from Offline to Online Canon?
Nov 27, 2020
How to Turn My Ricoh Printer Online from Offline?
Feb 20, 2021
Brother MFC Printer Won't Print Black Despite Full Ink Cartridges
Nov 7, 2020
How to Fix Epson Printer Filter Failed or Stopped on Mac Error?
Dec 7, 2021
How do You Get a Lexmark Printer Back Online?
Sep 29, 2020