How do I Setup My Brother HL 2170w Wireless Printer?
Hello, Please let me know that how do i setup my Brother HL 2170w wireless printer. I bought this new printer and now i am trying to print then its not working. Help me.
 1 Ans
1 Ans- 5 years ago
Setup My Brother HL 2170w Wireless:
Brother HL 2170w wireless printer is a network printer which comes with some advance features like it prints 23 pages per minutes and it support monochrome printing. Brother printer prints pages under 2400*600 dpi resolutions and it comes with wired and wireless networking.
Brother printer is ideal for printer sharing. It connects with network wirelessly or with standard Ethernet cable. It contains 32 MB internal memory for printing job. Suppose if you have purchase new brother HL 2170w wireless printer, so you are required to set it up for printing process through network.
Here we are explaining step by step procedure to setup printer wirelessly and which things are required to setup process.
You Need to Follow Below Steps to Setup My Brother HL 2170w Wireless-
Step 1 : First you need to connect AC power cord with your brother wireless printer and then connect it with power outlet(Electrical socket) then turn on your brother machine.
Step 2 : Then you need to turn on your computer( before turning on computer, you must make sure that computer should be open up with administrator right only).
Step 3 : Insert the CD-ROM into the CD-ROM drive.
- Suppose if you do not have CD-ROM in your computer, so in this case first you need to visit brother device website, then find the download section, and download wireless setup wizard for windows. Then follow installation instruction on the download page. Once you got wireless setup wizard screen, follow on screen instruction to continue.
- After configuration, go into download section of the website and download the full driver and software packages .
- For window user the opening screen will be appear automatically. If prompt to choose your model name, select the appropriate model name.
Step 4 : Now you will get the CD-ROM main menu where you need to choose install printer driver option.
- For window user account, you need to choose install printer driver icon for your region.
- When you will get user account screen, click on yes to allow.
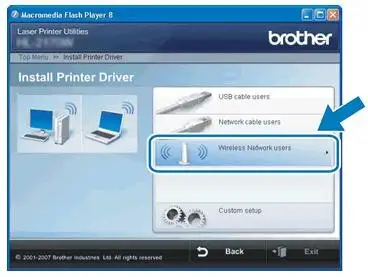
Step 5 : Here you need to choose wireless network user and click on it.
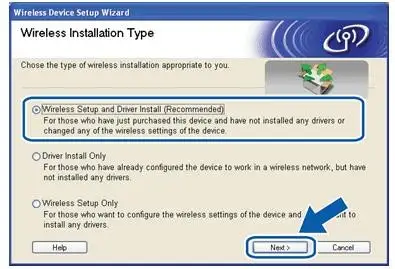
Step 6 : Now you need to choose wireless setup and driver install option and click on next to continue.
Step 7 : Here you need to choose method for configuring the wireless settings, if message appears for step by step install.
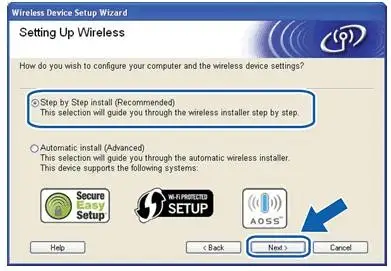
- Choose step by step install option and click on next.
- Select with cable (recommended) and then click on next to continue.
- If you are getting automatic(recommended) appears.
- Choose automatic recommended and click on next button.
- Now you need to select option ‘ I am able to temporarily connect my device to my access point with a network cable’ and then click on next option and continue.
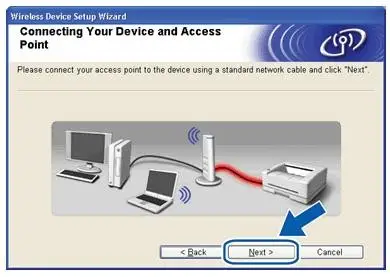
Step 8 : Now you need to connect your brother printer with access point or router with network cable and click on next button.
Step 9 : Here you need to select printer which you wish to configure and click on next button. If you are not able to see printer in the list, you need to check that router or access point and printer is turn on or not. If any one of the device is not turn on, then first you need to turn on both the device to getting printer in the list. You need to refresh the window to viewing the printer list.
Note: One of most important thing is if you are using any kind of firewall, first you need to disable it for proper functioning and configuration. Some time firewall might because of absurd functioning. After the installation and configuration of brother printer, you can restart your personal firewall software to run firewall on your machine or router.
Step 10 : In this wizard search the wireless network available for printer, now you need to choose router which you want to attach with printer click next.
Step 11 : In this section, you need to look out network security setting like authentication method, encryption mode, network key, confirm network key and click on next.
Step 12 : Here you need to confirm setting and next to send setting to brother machine. Here if you want to change the IP address, change it manually and you can click on cancel button to disable settings.
Step 13 : Here you need to check machine wireless status like cover is not open, press go button three times in 2 seconds then the printer will print the current printer setting page.

Step 14 : If the status page is Link OK then disconnect network cable between your printer and router else status page is not link then reset the printer with factory default settings.
Step 15 : Now the printer driver installation starts and follows on screen instructions to install the printer driver for network connection and finish the setup.
- 2 years ago
 Top Related Question
Related Articles

Top Searches in Brother Printer
Brother MFC Printer Won't Print Black Despite Full Ink Cartridges
May 23, 2026
How to Connect Brother Wireless Printer to MAC?
May 23, 2026
Brother Printer Only Printing in Black and White
May 23, 2026
How to Fix Brother Printer Error 50?
May 23, 2026
How do I Get My Brother Printer to Print Double Sided?
May 23, 2026
How to Fix Brother Printer Printing Blank Pages?
May 23, 2026
Not Able to Print any PDF Files from Brother Printer
May 23, 2026
Brother Printer Connected But Not Printing
May 23, 2026
How Can I Make Homemade Printer Ink?
May 23, 2026
How to Fix Brother Printer Head Alignment Not Working?
May 23, 2026
Featured Articles
How to Get Canon Printer Online on MAC?
Jun 4, 2026
How to Fix Printer Printing Horizontal Black Lines?
May 23, 2026
How to Scan from HP Printer to Computer Windows 10?
Jun 13, 2026
Ricoh Printer Stuck on Processing
May 23, 2026
Brother Printer Only Printing in Black and White
May 23, 2026
How to Clean Kodak Printhead?
May 23, 2026
How to Install Lexmark Printer to Computer Without CD?
Jun 12, 2026
Why My Samsung Printer is Not Printing Clearly?
May 23, 2026
Top Questions
Why Won't My Canon Printer Print after Changing an Ink Cartridge?
Oct 7, 2020
How do I Fix a Canon Printer 1403 Error?
Dec 30, 2020
How do I Connect My Canon MG3050 Printer to WiFi?
Mar 30, 2021
How to Change Printer from Offline to Online Canon?
Nov 27, 2020
How to Turn My Ricoh Printer Online from Offline?
Feb 20, 2021
Brother MFC Printer Won't Print Black Despite Full Ink Cartridges
Nov 7, 2020
How to Fix Epson Printer Filter Failed or Stopped on Mac Error?
Dec 7, 2021
How do You Get a Lexmark Printer Back Online?
Sep 29, 2020