How to Connect Brother HL-l2300d Printer to WiFi?
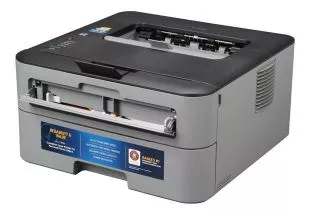
Connect Brother HL-l2300d Printer to WiFi
While connecting the brother HL-12300D printer to Wi-Fi, you have to gather network information like the network name, SSID, and network password. First, connect your printer to a power source and turn on the machine. You will have to use the arrow keys to manage the menu, go to the settings or menu, choose a network option and click "o," select the WLAN option and click "O," now you have to choose a "setup wizard" and tap on the "OK" button.
Enable the wireless network by choosing the "yes" option, and now the printer will search for all the networks available and display a list. Choose the desired network, enter the correct password, and confirm the connection by clicking on the "yes" option.
Points to Check Before Arranging the Wireless Settings
- First of all, ensure that at present, your router and computer are already established; in case they have not yet been launched, start your network.
- Check your network settings.
- You should have knowledge of your wireless network settings of the WLAN access point/router.
- Examine and write down the Network Name (SSID: Service Set ID, ESSID: Extended Service Set ID).
- Click FAQs & Troubleshooting to understand how to get hold of SSID from your computer.
Brother hl-l2300d Wireless Setup For Windows users:
Step 1: You can follow the steps using video clips.
Step 2: The clip is being streamed from YouTube. (Opens in a new window.)
Step 3: Your machine can modify what is shown in this video.
Step 4: The installation screen will become visible without human intervention.
Step 5: When prodded, point out your model and language.
Step 6: Click Install Printer Driver.
Step 7: Be informed that when the User Account Control screen comes into sight, click Allow or Yes.
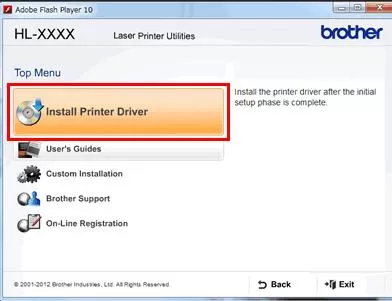
Step 8: Click Install Printer Driver.
Step 9: The minute the License Agreement window becomes visible, click Yes if you approve of the License Agreement.
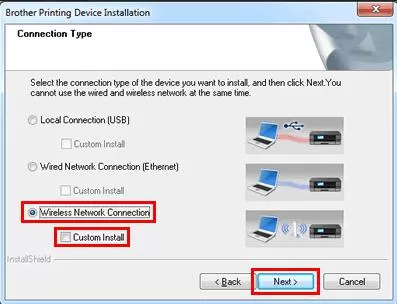
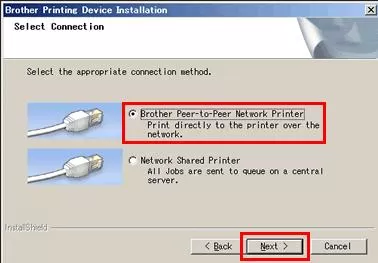
Step 10: Select Wireless Network Connection without verifying Custom Install. Click Next.
Step 11: Opt for Brother Peer-to-Peer Network Printer and after that click Next.
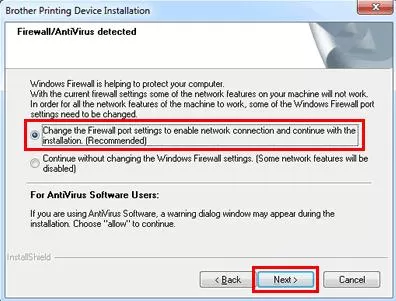
Step 12: As soon as the Firewall/Anti-Virus detected screen emerges, pick Change the Firewall port settings to achieve the network connection and persist with the installation (Recommended) and afterwards click Next. Go on doing it until you reach STEP 5.
Brother hl-l2300d Wireless Setup For Macintosh users:
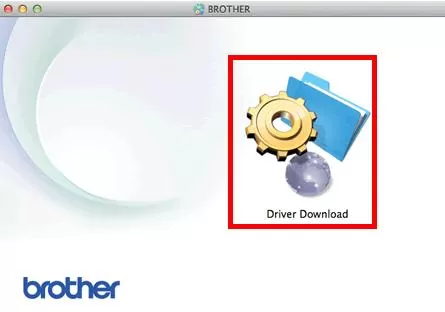
Step 1: Double-click the BROTHER icon on your desktop.
Step 2: Double-click the Driver Download icon.
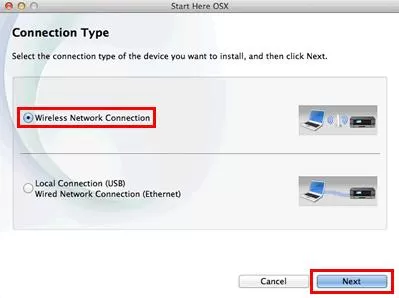
Step 3: Select Wireless Network Connection, and click Next.
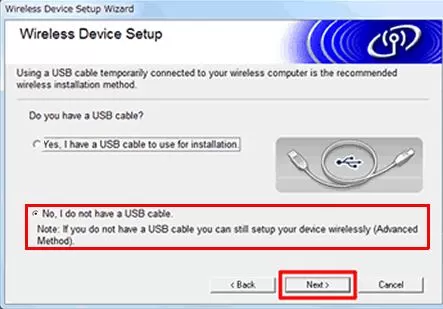
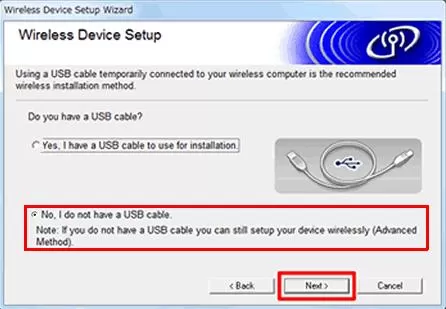
Step 4: After the Wireless Device Setup screen emerges, go for No, I don't have a USB cable, and after that, click Next.
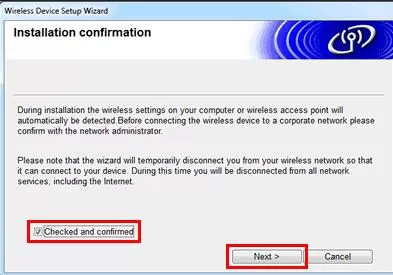
Step 5: Verify the message on the Wireless Device Setup screen.
Step 6 : Check the Checked and confirmed box before clicking Next.
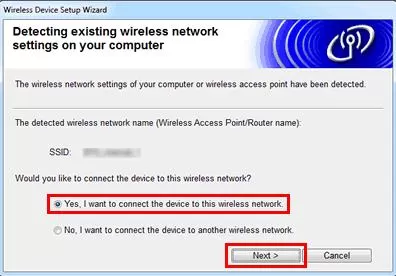
Step 7: Your Network Name (SSID, ESSID) will be shown; choose Yes and later, click Next.
Step 8: The moment the Enable Wireless screen crops up, enable wireless networking on the device with its control panel.
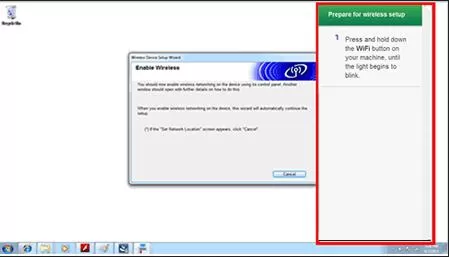
Step 9: Stick to the steps on the right-hand side of the monitor.
Step 10: Push and grip the Wi-Fi button on your machine for nearly two seconds till the light starts to flicker.
Step 11: The Wi-Fi button will brighten once it is linked.
Step 12: You have accomplished the wireless setup on your Brother machine.
Step 13: Return to your PC.
Step 14: Point out Connection: OK and click Next.
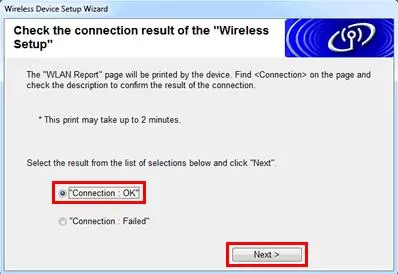
Step 15: Verify the connection result of the wireless setup.
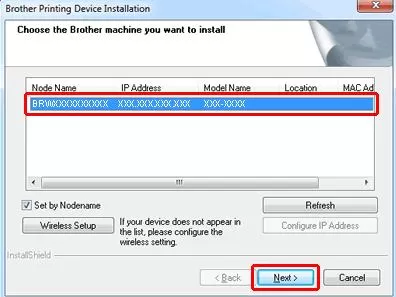
Step 16: Decide on the Brother machine you want to install.
Step 17: At that time, click Next and comply with the on-screen instructions to install the printer driver for network connection.
Step 18: Though you have printed with a USB connection, you must install the printer driver for network connection.
Step 19: Point out the Brother machine you want to install.
Step 20: The drivers and software installation begins.
Step 21: Obey the on-screen instructions to wrap up the installation.
Configure the Wireless Settings:
 Go along with the steps given below:
At this point, be aware that the screens may be governed by the operating system that is being employed and your Brother machine.
- Position the Brother machine near the network access point/router with nominal barriers.
- Ensure that your Brother machine is switched on.
- Confirm that your computer is switched on and you are logged on with Administrator rights.
- Insert the given CD-ROM (Windows/ Macintosh) into your CD-ROM drive.
- In case you do not have the CD-ROM:
5a-For Windows Users:
- Visit the Downloads section of this website and download the Full Driver & Software Package.
- To start with, abide by the installation instructions on the download page.
- When the installation screen comes into view, obey the steps from STEP c for Windows users below.
5b-For Macintosh Users:
- Visit the Downloads section of this website and download the Full Driver & Software Package.
- To start with, abide by the installation instructions on the download page.
- When the installation screen comes into view, obey the steps from STEP c for Macintosh users below.
Also Read:
- How to Replace Toner in Brother Printer?
- How to Fix Brother Printer Touch Screen not Working Error?
- How Should one Address Errors in the Windows Event Log?
FAQ for Connect Brother HL-l2300d Printer to WiFi
- Mick
 Brand: Brother Printer
- Last Update: 2 months ago
 Top Related Question
Related Articles


Top Searches in Brother Printer
How to Connect Brother Wireless Printer to MAC?
May 23, 2026
Brother Printer Only Printing in Black and White
Jun 21, 2026
How to Fix Brother Printer Error 50?
May 23, 2026
How to Fix Brother Printer Printing Blank Pages?
May 23, 2026
Not Able to Print any PDF Files from Brother Printer
May 23, 2026
Brother Printer Connected But Not Printing
May 23, 2026
How Can I Make Homemade Printer Ink?
May 23, 2026
Featured Articles
How to Get Canon Printer Online on MAC?
Jun 4, 2026
How to Fix Printer Printing Horizontal Black Lines?
May 23, 2026
How to Scan from HP Printer to Computer Windows 10?
Jun 13, 2026
Ricoh Printer Stuck on Processing
May 23, 2026
Brother Printer Only Printing in Black and White
Jun 21, 2026
How to Clean Kodak Printhead?
May 23, 2026
How to Install Lexmark Printer to Computer Without CD?
Jun 12, 2026
Why My Samsung Printer is Not Printing Clearly?
May 23, 2026
Top Questions
Why Won't My Canon Printer Print after Changing an Ink Cartridge?
May 23, 2026
How do I Fix a Canon Printer 1403 Error?
May 23, 2026
How do I Connect My Canon MG3050 Printer to WiFi?
May 23, 2026
How to Change Printer from Offline to Online Canon?
May 23, 2026
How to Turn My Ricoh Printer Online from Offline?
May 23, 2026
Brother MFC Printer Won't Print Black Despite Full Ink Cartridges
May 23, 2026
How to Fix Epson Printer Filter Failed or Stopped on Mac Error?
May 23, 2026
How do You Get a Lexmark Printer Back Online?
May 23, 2026