How to Connect HP Deskjet 2600 to WiFi?
Method - 1
Connect HP Deskjet 2600 to WiFi
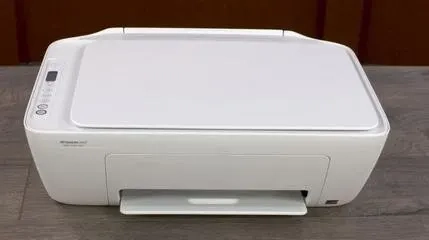
The HP Deskjet 2600 wireless printer has a wireless network connection which provides fitness scanning and printing of documents. The most important step to connect your printer to Wi-Fi is to install the right printer driver.
First, you have to turn on your printer, present hold the wireless button on the control panel along with the resume button for a few seconds, now the Wi-Fi direct option will turn on, you have to install the HP smart app on your computer which will guide you with the setup process, go to the wifi settings section on your computer, former connection with HP setup network, open the HP smart app, select your Wi-Fi network and enter the password of the Wi-Fi. The setup process is completed by the app.
How Do I Connect the HP Deskjet 2600 to WiFi?
Step 1: Initiate Setup for Driver Installation
Before starting with the installation procedure, you should first check and ensure the installation requirements for a given printer. Quickly turn on your computer system, printer, and wireless router device.
To Connect the HP Deskjet 2600 to the WiFi Network and Use Your Printer Wirelessly, You have to Perform and Remember the Following Instructions.
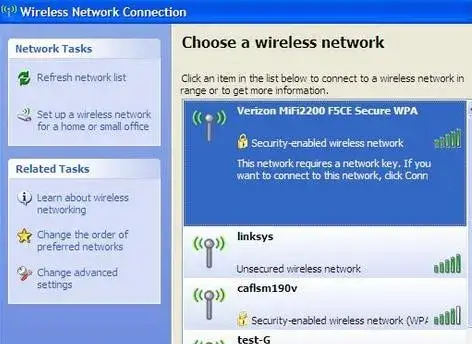
- Your computer should be connected to the wireless network connection.
- Before beginning any connection, make sure that you are using a high speed internet connection. It is always recommended by HP to use a broadband internet connection while downloading any software, web services or installing printer updates.
- Ensure that the computer and router device are ON for any kind of function.
- Your computer system and the wireless printer should be connected to the same wireless network.
- For further printer setup, load the printing paper into the paper input tray along with the installation of ink cartridges.
- Turn ON the Deskjet printer and place it within the range of the router network during setup and installation.
Step 2: Install HP deskjet 2600 Printer Drivers
- For any printer to work from simple to professional, you will have to install the required software and drivers for it. Begin with HP printer software installation.
- Simply download and install the HP full-feature print driver for your system. The printer software includes wireless print drivers and HP Printer Assistant.
- Software for wireless scanning, printing and several other printer management functions.
- In case USB cables are connected to the printer, disconnect them.
- Go to 123.hp.com/dj2600, and then click on the Download link button to download and run HP Easy Start.
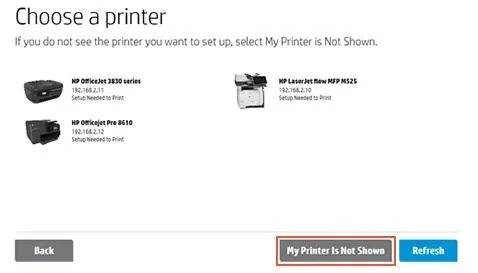
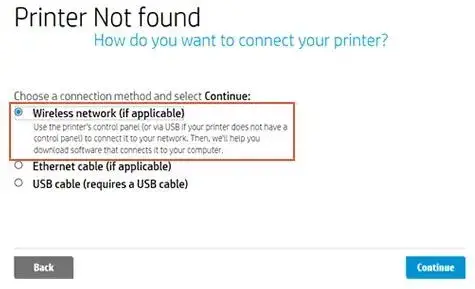
- A dialogue window of HP Easy Start wizard will be shown on the screen which will ask you to select your printer. Then click on My Printer Is Not Shown option. This will display A Printer Not Found screen on your system. This wizard will ask you to choose a network or connection method for your printer.
- Select the Wireless network (if applicable) option and click on the Continue button.
- Further, follow the on-screen instruction prompts to complete HP easy smart setup on your computer.
NOTE: In case if the driver download fails, go to HP Customer Support >> Software and Driver Downloads >> click Printer >> type your printer model number >> click Submit button. Ensure that the version of your Windows is correctly taken. Now, under the Driver-Product Installation Software tab, click on Download for the full software package option or click Basic Drivers for other driver options.
Method - 2
Steps to Reset HP Deskjet 2600 WiFi Connection-
Step 1: Plug the printer electric cord to the wall outlet and not to any spike suppressor.
Step 2: Confirm if the printer is placed inside the vary of the router.
Step 3: Use the ON button to change on the H.P. Deskjet 2540 printer.
Step 4: Check whether or not the wireless light is blinking on your printer board.
Step 5: Hold the ability button for a few time to perform a Wi-Fi reset. Simultaneously press begin Copy Black button for regarding twice.
Step 6: Again attempt to press the Cancel button for a minimum of thrice.
Step 7: Release the ON button to finish the reset method.
Step 8: Wait till the wireless light-weight blinks close to the wireless button.
Step 9: If the wireless light doesn't blink, repeat an equivalent method and end a way to connect H.P. Deskjet 2600 to Wi-Fi.
Now to use it on a wireless network, you must install print drivers on the devices you want to connect your printer to and look at the steps on hp deskjet 2600 wireless setup.
Step 1: A computer must be connected to your wireless network and make sure that the router as well as computer is turned on.
Step 2: Check if both computer as well printer is connected to the same wireless network
Step 3: Set the printer up by loading paper into the tray and install the ink cartridges
Step 4: Switch the printer on and move it within the range of router while the setting up procedure
Start the software installation by downloading and installing the HP full feature print driver. It consists of the wireless print drivers as well other functions.
Step 1: Check if there is no USB cable connected
Step 2: Go to 123.hp.com/dj2600 and click on download to download and run HP easy start
Step 3: Click on my printer is not shown
Step 4: A screen displays reads as printer not found
Step 5: Click on continue and then press wireless network (if applicable)
Step 6: Click on continue and then start following the on screen instructions to complete the set up
Check that that the computer is connected to the network. make sure that the printer is placed on the brink of the computer. make sure that the printer and also the computer square measure on.
Click on the Wireless menu on the printer’s panel. Press Wireless Setup Wizard and connect the printer and continue the hp deskjet 2600 wireless setup
Connect Power Unit Deskjet 2600 To WiFi Network-
- Check if the system is turned on and connected to the Wi-Fi network.
- Use a similar router for connecting the printer.
- Ensure that the printer is loaded with paper and put in with ink cartridges.
- On your computer browser, choose transfer.
- Wait until the pc finishes the installation method while not clicking the Continue button.
- Check if the printer is turned on and press the Wireless and Cancel button along to reset the network settings.
- Release the buttons and acquire back to the power unit Installation Connect window.
- Click Continue and do the directions on the screen.
- Choose the Wireless choice underneath the association choice window.
- Choose affirmative on the power unit machine Wireless Connect screen and select Next to complete the installation and the way to attach power unit Deskjet 2600 to WLAN.
Also Read:
- How to Install HP Laserjet 1200 Printer on Windows 10?
- How to Connect My HP Envy 4520 Printer to My Computer?
- How to Setup HP Deskjet 2722 Printer Using HP Smart App?
FAQ for Connect HP Deskjet 2600 to WiFi
- Mick
 Brand: Hp Printer
- Last Update: 4 weeks ago
 Related Articles


Top Searches in Hp Printer
How to Fix Printer Printing Horizontal Black Lines?
May 23, 2026
How to Scan from HP Printer to Computer Windows 10?
Jun 13, 2026
How do I Get My HP Printer to Print PDF Files?
May 23, 2026
How do I Connect HP Laserjet Pro M118dW to WiFi?
May 23, 2026
How to Fix PCL XL Error on HP Printer?
May 23, 2026
Why is My HP OfficeJet Pro 8610 Printer Offline?
May 23, 2026
How do I Get My HP Printer Back Online?
May 23, 2026
Featured Articles
How to Get Canon Printer Online on MAC?
Jun 4, 2026
How to Fix Printer Printing Horizontal Black Lines?
May 23, 2026
How to Scan from HP Printer to Computer Windows 10?
Jun 13, 2026
Ricoh Printer Stuck on Processing
May 23, 2026
Brother Printer Only Printing in Black and White
May 23, 2026
How to Clean Kodak Printhead?
May 23, 2026
How to Install Lexmark Printer to Computer Without CD?
Jun 12, 2026
Why My Samsung Printer is Not Printing Clearly?
May 23, 2026
Top Questions
Why Won't My Canon Printer Print after Changing an Ink Cartridge?
May 23, 2026
How do I Fix a Canon Printer 1403 Error?
May 23, 2026
How do I Connect My Canon MG3050 Printer to WiFi?
May 23, 2026
How to Change Printer from Offline to Online Canon?
May 23, 2026
How to Turn My Ricoh Printer Online from Offline?
May 23, 2026
Brother MFC Printer Won't Print Black Despite Full Ink Cartridges
May 23, 2026
How to Fix Epson Printer Filter Failed or Stopped on Mac Error?
May 23, 2026
How do You Get a Lexmark Printer Back Online?
May 23, 2026