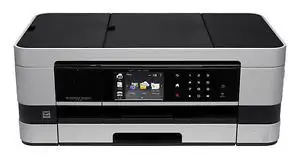
How to Set up Brother MFC-J4510dw Printer?
Hello, I have bought a new brother mfc-j4510dw printer. Now i am trying to setup brother mfc-j4510dw printer. But fail in setup. Please give any solution so that i can setup brother mfc-j4510 dw printer easily.
 1 Ans
1 Ans- 5 years ago
Setup Brother MFC-J4510dw Printer:
If you are looking forward to know how you can setup your Brother printer, then here is a guide that can help you in the Brother mfc-j4510dw printer setup. For a proper setup, these are some of the steps that you need to perform.
Step 1: Unpack All the Components Along with the Machine
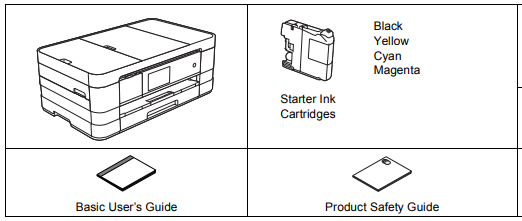
- Some of the components that you will find in the box together with the printer are setup guide, CD-ROM, telephone line cord, product safety cord, user’s guide, and starter ink cartridges.
- To set up Brother mfc-j4510dw printer, take out the film covering and protective tape from the touchscreen as well as from the machine.
- Please ensure that you have all components.
Step 2: Load A-4 Size in the Sheet
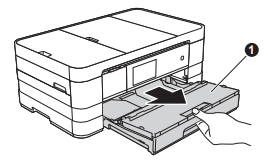
- Take out the paper tray. Please ensure that it is completely pulled out of the machine.
- Now, take out the cover of output paper tray.
- Now, hold the paper and slide it gently. Do this, in order to fit the size of the paper. Please ensure that the triangular mark on your paper matches with the one on the guide.
- To avoid any paper jams, fan the paper. Also, ensure that the paper is not wrinkled or curled.
- Now for Brother mfc-j4510dw printer setup, place the sheet in the paper tray. Print top edge and side down first.

- After that, adjust the sides of the paper for fitting it in the tray. Please ensure that the guide touches the corners of the paper.
- Also, ensure that the paper that is placed in tray is flat. Now, close the cover of output tray.
- Now, push the tray back into the machine.
- Take out the support at the time of holding the paper tray. Before it clicks, unfold the support flap of paper.
Step 3: Connect the Power Wire as Well as the Telephone Line
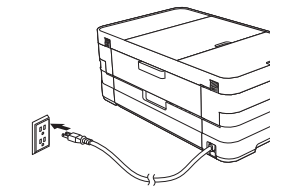
- Connect the power wire of the printer to the wall outlet.
- Now to set up Brother mfc-j4510dw printer, lift the cover of your scanner before it gets locked in a secure way in an open position.
- After that, link one end of your telephone line to the jack of machine LINE.
- Carefully, link the telephone line to the cable channel. Now, link the other side of the telephone line to the modular wall jack.
- Now, for releasing the lock, push down the support of scanner cover. Use your hands to shut the scanner cover.
Step 4: Installation of Ink Tanks
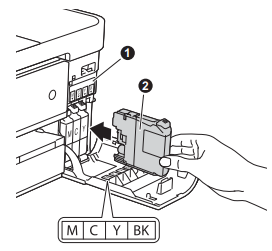
- Please ensure that the power switch is turned on. On your screen, no ink cartridge sign will appear.
- Now to set up Brother mfc-j4510dw printer, open the cover where ink cartridges are placed.
- After that, take out the protective part.
- Remove the tanks and release the lever of green color that is placed over the orange packing. Start moving it in the clockwise direction for releasing the vacuum seal. After that, remove the orange packing.
- You need to ensure that the cartridge color matches with the sticker color. Install the ink cartridges one by one in your arrow’s direction.
- After that, for Brother mfc-j4510dw printer setup, push the back of your ink cartridges, so that it latches. Once you have installed all the ink tanks, close the cover of ink cartridge.
Step 5: Test the Print Quality
- Once the process of preparation gets completed, the screen will display set paper and click on OK.
- Now, it is time for you to test the print quality of all the color blocks on the A-4 size sheet. The different colored ink tanks installed are magenta, Cyan, yellow, and black.

- If you see that all the lines are clearly visible,then select Yes for finishing the quality check.
Step 6: Paper Settings
In order for your printer to deliver a remarkable print quality and for placing the right size of the paper, you need to make sure that it matches the paper in the tray. If you wish to know the details of the size and type of paper, then you must carefully read the chapter-2 of the guide.
- For choosing the right type and size of the paper just go to the tray settings on your screen.
- If you wish to select the paper type, then press Tray #1. If you wish to choose the paper size, then select Tray #2.
- Press the type and size of the paper, which you are using.
- Now to set up Brother mfc-j4510dw printer, select ok.
Step 7: Review Display
The screen shows all the information pertaining to the screen operation. You need to move forward to the next step in order to review the details. To see the details, you need to open the basic user guide.
Step 8: Select Language
- Go to settings and then select all settings.
- Swipe up and down to view the initial setup. Now, select initial setup.
- Go up and down to view the local language.
- Now to set up Brother mfc-j4510dw printer, choose the language that you want.
Step 9: Select the Receive Mode
The right type of receive mode can be determined by the telephone subscriber services and external devices you are going to use on the same telephone line as your Brother printer.
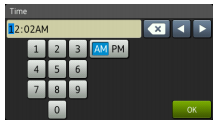
Step 10: Date and Time Settings
Your printer machine will always display the date and time. If you connect it with the station ID, then it will get added to every fax that you send.
- Go to settings.
- Then, select date and time settings.
- Now, set the date
- Select the final 2 digits of the year on the screen and then select ok.
- Enter the two digits of the month that is going on. For instance, if it is September, then you need to enter 09.
- Now to set up Brother mfc-j4510dw printer, select the clock type. You can select 24 hour or 12 hour clock according to your preference.
- Select the time.
- Enter it on the screen. Now, select ok.
Step 11: Set Station ID
You must enter the fax number and name to be printed on the Fax pages, which you sent. These are some of the steps that you need to follow for setting your station ID.
- Select settings
- Now, go to all settings.
- Then select the initial setup.
- Select station ID.
- From there, go to the option of fax and select it.
- Enter the 20 digit fax number on the screen and then select ok. Now, press the option of name.
Step 12: Report of Fax Transmission
There is a transmission verification report system that your Brother machine uses to give you a confirmation when a fax is sent. This report has information pertaining to the receiving party such as the fax number and name. It also includes information such as duration, time, date, the number of pages transmitted, and whether the transmission was successful or not. In case you wish to make use of fax transmission report feature, then you must read the chapter 4 of the user’s guide.
Step 13: Set Pulse Dialling Mode( for Canadian Users Only)
- There is also a setting of tone dalling service on the machine. In case you have a service of pulse dialling, then you need to make changes in the dialing mode.
- Select settings and then select all settings.
- Go up and down to display the initial setup.
- Now, select pulse or tone.
Step 14: Set the Compatibility of the Telephone Line
- Go to settings and then go to all settings.
- Go up and down to view the initial setup. While going up and down, go to the option of display compatibility.
- Now, choose basic for VOIP.
Step 15: Select the Connection Type
The instruction for installation mentioned-above are for XP professional x 64 edition, Windows Vista, and Windows 7. Here in this step, you need to select the connection type.
Step 16: Installation for USB Users
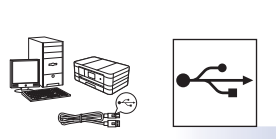
Please ensure that your computer system is turned on and you using administrator lights for logging.
- Do not link the USB wire.
- If any programs are running in the background, then you must close them.
Step 17: MFL-PRO Suite Installation
- Insert the installation CD that came along with your printer into the CD-ROM drive. Select your machine when the model name appears. After that, choose the language of your choice.
- Now to set up Brother mfc-j4510dw printer, the top menu of CD-ROM will be displayed in front of you. Select yes if you agree with the license agreements. Now, follow the instructions appearing on the screen.
- Select local connection and then select Next. After that, the installation will continue.
- Go to next, when plug-in the USB option comes up.
Step 18: Link Your USB Wire
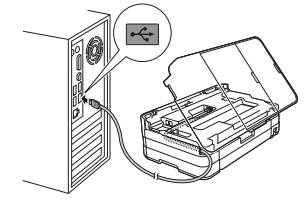
- Carefully lift the cover of your scanner, so that it gets locked securely in an open position.
- Connect the USB wire to the machine’s USB port.
- Now, link the cable to your computer system.
- After that to set up Brother mfc-j4510dw printer, lift the cover for releasing the lock. Now, close the scanner cover.
- Now, the installation will automatically continue.
- On-line registration screen will be displayed in front of you. Follow the instructions on the screen and click on next.
Step 19: Restart After Finishing
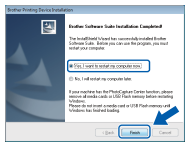
- Now, click on the option of finish and restart your system. Go to the administrator settings after turning on the computer.
- Click on OK to select the software update you want, if software updating screen comes up.
Now, the process of installation is complete.
- 2 years ago
 Top Related Question
Related Articles
Top Searches in Brother Printer
Brother MFC Printer Won't Print Black Despite Full Ink Cartridges
May 23, 2026
How to Connect Brother Wireless Printer to MAC?
May 23, 2026
Brother Printer Only Printing in Black and White
Jun 21, 2026
How to Fix Brother Printer Error 50?
May 23, 2026
How do I Get My Brother Printer to Print Double Sided?
May 23, 2026
How to Fix Brother Printer Printing Blank Pages?
May 23, 2026
Not Able to Print any PDF Files from Brother Printer
May 23, 2026
Brother Printer Connected But Not Printing
May 23, 2026
How Can I Make Homemade Printer Ink?
May 23, 2026
How to Fix Brother Printer Head Alignment Not Working?
May 23, 2026
Featured Articles
How to Get Canon Printer Online on MAC?
Jun 4, 2026
How to Fix Printer Printing Horizontal Black Lines?
May 23, 2026
How to Scan from HP Printer to Computer Windows 10?
Jun 13, 2026
Ricoh Printer Stuck on Processing
May 23, 2026
Brother Printer Only Printing in Black and White
Jun 21, 2026
How to Clean Kodak Printhead?
May 23, 2026
How to Install Lexmark Printer to Computer Without CD?
Jun 12, 2026
Why My Samsung Printer is Not Printing Clearly?
May 23, 2026
Top Questions
Why Won't My Canon Printer Print after Changing an Ink Cartridge?
Oct 7, 2020
How do I Fix a Canon Printer 1403 Error?
Dec 30, 2020
How do I Connect My Canon MG3050 Printer to WiFi?
Mar 30, 2021
How to Change Printer from Offline to Online Canon?
Nov 27, 2020
How to Turn My Ricoh Printer Online from Offline?
Feb 20, 2021
Brother MFC Printer Won't Print Black Despite Full Ink Cartridges
Nov 7, 2020
How to Fix Epson Printer Filter Failed or Stopped on Mac Error?
Dec 7, 2021
How do You Get a Lexmark Printer Back Online?
Sep 29, 2020