How to Wind a Bobbin in Brother Printer?
Let me know that how to wind a bobbin in Brother printer. I have no idea about that if you know then give us any solution.
 1 Ans
1 Ans- 4 years ago
Wind a Bobbin in Brother Printer:
There is a broken line on the sewing machine that indicates the direction in which the machine must be threaded to wind the bobbin. You should only use the bobbin, which is particularly designed for the sewing machine.
If you use a bobbin that is not meant for your machine, then it can cause damage to your machine. The bobbin that comes along with the machine is meant for the machine. If some other bobbin model is used, then you can experience operational issues while using the machine.
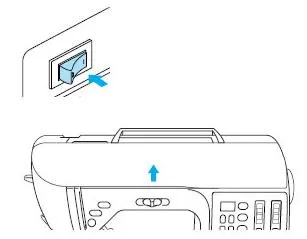
Step 1: Power on your machine and then take off your top cover.
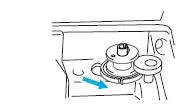
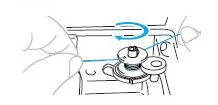
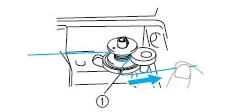
Step 2: Keep the bobbin on the winder shaft so that the shaft's spring fits into the bobbin's notch. Press the bobbin until it snaps.
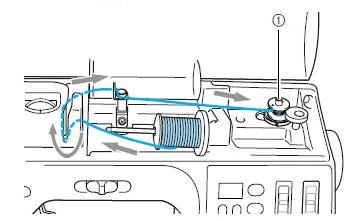
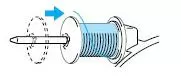
Step 3: Take off the spool cap, which is inserted on the pin of the spool. Keep the spool thread on the spool pin. Slide the spool and then make sure it is horizontal and you see the thread unwinding at the front.
If the spool isn't positioned rightly, then the thread may not unwind properly. This can further lead to the problem of thread getting tangled around the spool pin. Slide the spool cap on the spool pin. Slide it to the right and slide it as far as possible.
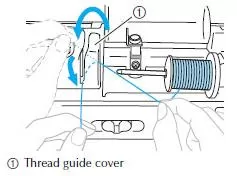
Step 4: When you are holding the thread, pull it using your left hand and then pass it behind the guide cover.
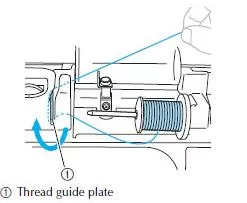
Step 5: Pass the thread below the guide plate placed at the right.
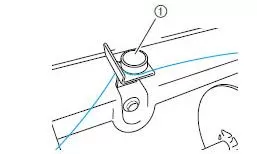
Step 6: Pass the thread from the hook on the thread guide and then tie it anticlockwise below the pretension disk. You must make sure that the thread passes through the pretension disk.
Step 7: When you are holding the thread using your left hand, wind the thread that was pulled clockwise 5 or 6 times around the bobbin using your right hand. Please ensure that the thread you are pulling between bobbin and spool is pulled tightly.
Please ensure that you wind the thread clockwise around the bobbin or else you will notice that the thread is getting wrapped around the winder shaft of the bobbin.
Step 8: In the last step, you are required to pass the thread through the guide slot and then pull the thread towards the right.
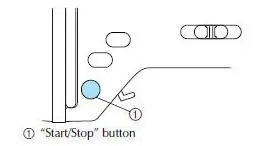
Step 9: Hold the sewing speed controller and slide it towards the right for increasing the winding speed and move it towards the left for decreasing the winding speed.
In case you find that the winding speed is very slow, then press the Start or Stop button for stopping the machine. It is important to stop the machine so it doesn't get damaged.
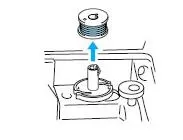
Step 10: Take a pair of scissors and use them to cut the tread wound. Slide the winder shaft towards the left and then take the bobbin out from the shaft.
So, these are all the steps that one needs to carry out in order to wind a bobbin in Brother printer. We hope you find all these steps useful.
- 2 years ago
 Top Related Question
Related Articles
Top Searches in Brother Printer
Brother MFC Printer Won't Print Black Despite Full Ink Cartridges
May 23, 2026
How to Connect Brother Wireless Printer to MAC?
May 23, 2026
Brother Printer Only Printing in Black and White
Jun 21, 2026
How to Fix Brother Printer Error 50?
May 23, 2026
How do I Get My Brother Printer to Print Double Sided?
May 23, 2026
How to Fix Brother Printer Printing Blank Pages?
May 23, 2026
Not Able to Print any PDF Files from Brother Printer
May 23, 2026
Brother Printer Connected But Not Printing
May 23, 2026
How Can I Make Homemade Printer Ink?
May 23, 2026
How to Fix Brother Printer Head Alignment Not Working?
May 23, 2026
Featured Articles
How to Get Canon Printer Online on MAC?
Jun 4, 2026
How to Fix Printer Printing Horizontal Black Lines?
May 23, 2026
How to Scan from HP Printer to Computer Windows 10?
Jun 13, 2026
Ricoh Printer Stuck on Processing
May 23, 2026
Brother Printer Only Printing in Black and White
Jun 21, 2026
How to Clean Kodak Printhead?
May 23, 2026
How to Install Lexmark Printer to Computer Without CD?
Jun 12, 2026
Why My Samsung Printer is Not Printing Clearly?
May 23, 2026
Top Questions
Why Won't My Canon Printer Print after Changing an Ink Cartridge?
Oct 7, 2020
How do I Fix a Canon Printer 1403 Error?
Dec 30, 2020
How do I Connect My Canon MG3050 Printer to WiFi?
Mar 30, 2021
How to Change Printer from Offline to Online Canon?
Nov 27, 2020
How to Turn My Ricoh Printer Online from Offline?
Feb 20, 2021
Brother MFC Printer Won't Print Black Despite Full Ink Cartridges
Nov 7, 2020
How to Fix Epson Printer Filter Failed or Stopped on Mac Error?
Dec 7, 2021
How do You Get a Lexmark Printer Back Online?
Sep 29, 2020