How do I Connect My HP DeskJet 2135 Ink to WiFi?
Connect HP DeskJet 2135 Ink to WIFI:
Do you want to know how to connect your HP DeskJet 2135 ink to the Wi-Fi? If yes, then carry out the instructions given below to complete the wireless setup of the HP DeskJet 2135 printer. These instructions must be carried out during the first ISP set up or the first wireless setup. You can also use these steps to restitute the lost connection.
In order to set up a wireless connection for your printer, there are certain items that you must have. You need a working home wireless network. Apart from that, you need to ensure that your PC is connected to the same wireless network as your printer device.
Steps to Perform for the HP DeskJet 2135 Printer Setup
Mentioned below are the steps that you need to perform in order to set up your HP Deskjet printer.
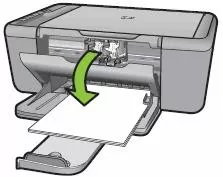
Step 1: First of all, you need to place all the sheets in the input tray.

Step 2: After that, install the cartridges before you move ahead with the wireless connection process.
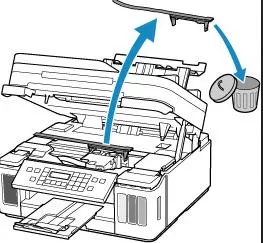
Step 3: Then, take off all the protective materials covering the printer device.
Step 4: Next, you are required to place your printer on a flat surface and connect one side of the power wire to the side of the printer and connect the other side to the electrical outlet. After that, turn on your printer.
Step 5: Open the input tray and keep the stack of 20 sheets of paper. Use the paper guide to adjust the paper.
Step 6: Make sure the guide does not bend the paper.
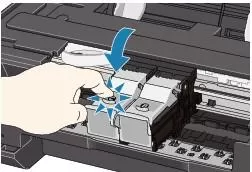
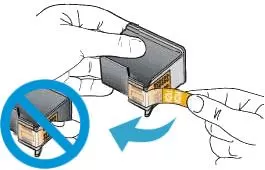
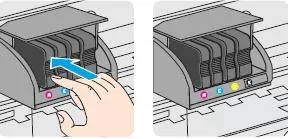
Step 7: Now, remove the ink cartridges from the packages and take off the protective orange tape.
Step 8: Open the cartridge door and place the ink cartridges in their respective slots.
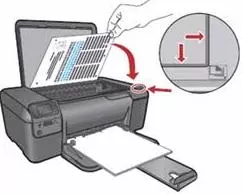
Step 9: After that, close the cartridge door and the alignment page will get printed automatically.
Step 10: Now, keep the alignment page on the scanner glass. Make sure, it is on the right-front corner.
Steps for the Wireless Setup
Here are the steps that you need to carry out for the wireless setup.
Step 1: Please ensure that you have installed the most recent HP Deskjet 2135 driver. The latest version of the driver can easily be downloaded by visiting the main website of HP. After that, see if your operating system supports the driver. After that, turn on your computer and printer and make sure that they both are on the same network.
Step 2: After that to connect your HP DeskJet 2135 ink to the Wi-Fi, download the software from the CD that came along with the printer. Alternatively, you can download the software by visiting the main HP website.
Then, carry out the instructions appearing on the screen to complete the installation process. Please ensure that you have chosen the right type of connection if prompted.
Step 3: The driver is going to do a compatibility check before the installation process. Therefore, you must make sure that the OS you are using is either Mac OS X 10.5 or Windows Vista. Now, see if your printer is connected to the computer using a wireless network. Use the USB wire if your printer asks you to do so.
Step 4: Now, use the setup method to connect your printer to the device.
Also Read:
- How to Connect HP Deskjet 3050 to WiFi?
- How to Fix an HP Printer 0xc18a0001 Error Code?
- How To Connect Hp Envy Pro 6452 Printer To Wifi?
FAQ for Connect My HP DeskJet 2135 Ink to WiFi
- Mick
 Brand: Hp Printer
- Last Update: 1 month ago
 Related Articles


Top Searches in Hp Printer
How to Fix Printer Printing Horizontal Black Lines?
May 23, 2026
How to Scan from HP Printer to Computer Windows 10?
Jun 13, 2026
How do I Get My HP Printer to Print PDF Files?
May 23, 2026
How do I Connect HP Laserjet Pro M118dW to WiFi?
May 23, 2026
How to Fix PCL XL Error on HP Printer?
May 23, 2026
Why is My HP OfficeJet Pro 8610 Printer Offline?
May 23, 2026
How do I Get My HP Printer Back Online?
May 23, 2026
Featured Articles
How to Get Canon Printer Online on MAC?
Jun 4, 2026
How to Fix Printer Printing Horizontal Black Lines?
May 23, 2026
How to Scan from HP Printer to Computer Windows 10?
Jun 13, 2026
Ricoh Printer Stuck on Processing
May 23, 2026
Brother Printer Only Printing in Black and White
Jun 21, 2026
How to Clean Kodak Printhead?
May 23, 2026
How to Install Lexmark Printer to Computer Without CD?
Jun 12, 2026
Why My Samsung Printer is Not Printing Clearly?
May 23, 2026
Top Questions
Why Won't My Canon Printer Print after Changing an Ink Cartridge?
May 23, 2026
How do I Fix a Canon Printer 1403 Error?
May 23, 2026
How do I Connect My Canon MG3050 Printer to WiFi?
May 23, 2026
How to Change Printer from Offline to Online Canon?
May 23, 2026
How to Turn My Ricoh Printer Online from Offline?
May 23, 2026
Brother MFC Printer Won't Print Black Despite Full Ink Cartridges
May 23, 2026
How to Fix Epson Printer Filter Failed or Stopped on Mac Error?
May 23, 2026
How do You Get a Lexmark Printer Back Online?
May 23, 2026