How to Add a Printer Using an IP Address?
Add a Printer Using an IP Address:
A user can add a printer using an IP address irrespective of the operating system they are using. For instance, Windows 7 system offer an in-built wizard option that automatically detects and installs files to the target PC. All the associated software programs and drivers for accessing the wireless printer are itself installed on the host machine.
But, remember it might fail to create a transmission control protocol/IP port used to establish a connection with the wireless printer associated with your business network. So, to add a printer using an IP address, all the steps and procedures should be followed correctly.
Steps to Add a Printer Using IP Address in Windows 8-
Step 1. Type Printers into the Windows Search bar.
Step 2. Select the Devices and Printers option.
Step 3. Now, choose 'Add a local printer' option.
Step 4. From the dropdown menu, click on the Create a new port and select Standard TCP/IP Port.
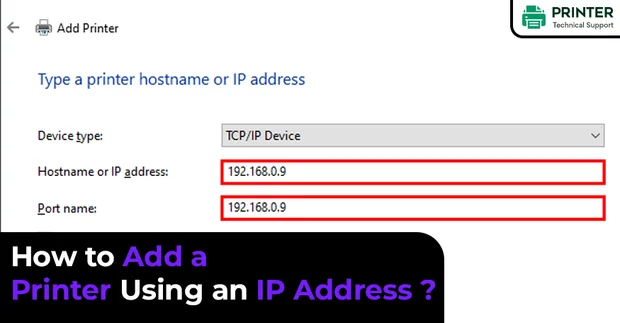
Step 5. Enter the IP address into the field Hostname or IP address, and then click Next.
Step 6. Windows automatically starts detecting the driver or you can search manually in the list. If you don't find it in the list, then Windows update and the name will appear in the list after sometime.
Steps to Add a Printer Using an IP Address in MAC OSX-
Step 1. Launch the System Preferences list.
Step 2. Select the Print and Fax option from the list.
Step 3. Click on the '+' sign or button.
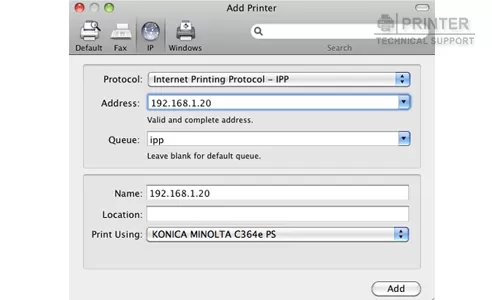
Step 4. Click on the IP tab.
Step 5. In the Address Bar field box, enter the IP address and leave the Queue box blank. Type the desired name for your printer and select either the Generic PCL or the Generic Postscript Driver, till you haven't a different driver file to use.
Steps to Add a Printer Using an IP Address in Windows 10-
Step 1: Launch “Start” menu and enter "printers” in the search box.
Step 2: Select “Printers & scanners“ tab.
Step 3: Select “Add a printer or scanner“ option under the tab.
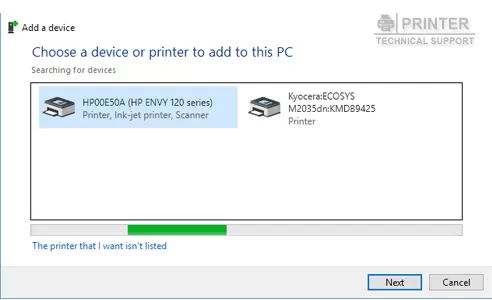
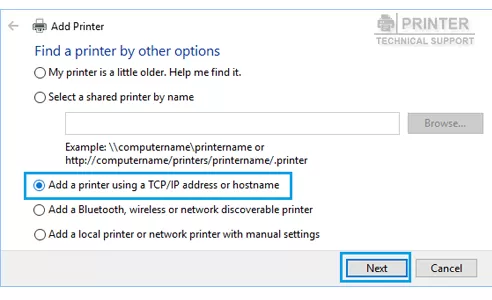
Step 4: Wait until “The printer that I want isn’t listed” option appears then select it.
Step 5: Choose “Add a printer using a TCP/IP address or hostname” option and then click “Next“.
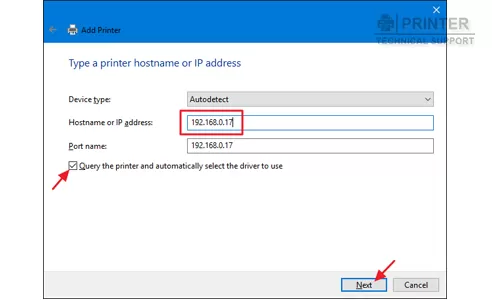
Step 6: Select “TCP/IP Device” option from the “Device type” list.
Step 7: Enter the hostname or IP address of the printer you are connecting and then Select “Next“.
Step 8: Windows will automatically find the printer if it is configured correctly. You might be required to specify more information when prompted.
Thereafter, choose the type of network adapter installed in the printer in the “Device Type” drop-down list. Alternatively, you can click “Custom” option for setting custom settings for the network printer and then select “Next“.
Step 9: Windows will now itself start installing the drivers for the printer. Once complete, you can easily print to the printer via direct IP address.
Steps to Add a Printer Using an IP Address in Windows 7-
Step 1. Firstly, launch the Start Menu and choose Devices and Printers from the menu given on the right side.
Step 2. Click 'Add a printer' option at the top bar.
Step 3. Next, select 'Add a local printer' option.
Step 4. From the dropdown menu shown, click Create a new port option and select Standard TCP/IP Port.
Step 5. Now, enter the IP address into the field labeled as Hostname or IP address, and then click Next.
Step 6. Your Windows will automatically detect the printer driver. Alternatively, you get the option to search from the list. If you don't find it in the list of drivers, then click Windows update. The desired driver name will itself start appearing in the list.
Hope this article is helpful to add a printer using an IP address.
Wireless printers are most commonly used nowadays for either home or professional use. Keeping in mind about their wide range applications, the ways of accessibility and usage have also improved. Like, these wifi printers are now been assigned a static IP address through Dynamic Host Configuration Protocol (DHCP).
This is a kind of web interface that is used to automatically allocate IP addresses to devices that connect to a network. A major point to be noted here is that these static IP addresses remain with the wireless printer and cannot be assigned to other devices. Thereby reducing device conflicts and congestion over the wireless network.
- SAM
 Brand: Hp Printer
- Last Update: 2 weeks ago
 Related Articles


Top Searches in Hp Printer
How to Fix Printer Printing Horizontal Black Lines?
May 23, 2026
How to Scan from HP Printer to Computer Windows 10?
Jun 13, 2026
How do I Get My HP Printer to Print PDF Files?
May 23, 2026
How do I Connect HP Laserjet Pro M118dW to WiFi?
May 23, 2026
How to Fix PCL XL Error on HP Printer?
May 23, 2026
Why is My HP OfficeJet Pro 8610 Printer Offline?
May 23, 2026
How do I Get My HP Printer Back Online?
May 23, 2026
Featured Articles
How to Get Canon Printer Online on MAC?
Jun 4, 2026
How to Fix Printer Printing Horizontal Black Lines?
May 23, 2026
How to Scan from HP Printer to Computer Windows 10?
Jun 13, 2026
Ricoh Printer Stuck on Processing
May 23, 2026
Brother Printer Only Printing in Black and White
Jun 21, 2026
How to Clean Kodak Printhead?
May 23, 2026
How to Install Lexmark Printer to Computer Without CD?
Jun 12, 2026
Why My Samsung Printer is Not Printing Clearly?
May 23, 2026
Top Questions
Why Won't My Canon Printer Print after Changing an Ink Cartridge?
May 23, 2026
How do I Fix a Canon Printer 1403 Error?
May 23, 2026
How do I Connect My Canon MG3050 Printer to WiFi?
May 23, 2026
How to Change Printer from Offline to Online Canon?
May 23, 2026
How to Turn My Ricoh Printer Online from Offline?
May 23, 2026
Brother MFC Printer Won't Print Black Despite Full Ink Cartridges
May 23, 2026
How to Fix Epson Printer Filter Failed or Stopped on Mac Error?
May 23, 2026
How do You Get a Lexmark Printer Back Online?
May 23, 2026