How do I Fix the Alignment on Lexmark Printer?
Fix the Alignment on Lexmark Printer:
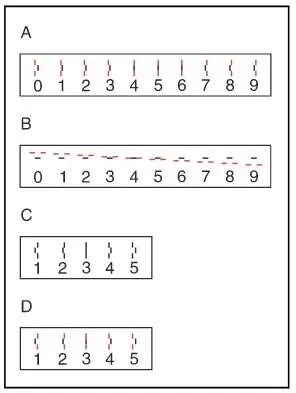
Once you are done with the replacement of your ink cartridges, you will see a pop up on the operator panel of your printer which says Print Alignment Page. This will automatically print a test alignment page. There are various test alignment patterns.
Every pattern has a letter placed on top of it. The letters are A, B, C, D. Each letter represents a meaning and the alignment which they represent are bidirectional color alignment, bidirectional black alignment, vertical alignment, and horizontal alignment.
If You Wish to Make Changes in the Lexmark Printer Alignment Value.
Step 1: On the test page of your Test A alignment group, start searching for numbers, which are given under the alignment pattern, which is very close to forming up a straight line.
Step 2: Press the Menu > or
Step 3: In the next step, you are required to choose the right alignment value. After that, you will see the test alignment on the screen.
Step 4: Perform the first three steps 3 more times in order to select the alignment value for tests B, C, and D.
After choosing the option of select to choose the correct value for D alignment, your printer device goes back to the ready state.

How to Print a Test Page to Verify or Fix Lexmark Printer Alignment Problem?
In order to get the best printing experience, it is necessary for you to align the print cartridges. In case you go for the replacement of print cartridges, then your printer will start printing the test page automatically in order to check Lexmark printhead alignment.
These are the steps that you need to carry out to fix Lexmark printer alignment problem.
Step 1: Select the option of press Menu>or
Step 2: Keep on pressing the Menu > or
Step 3: After that, you need to tap on the option of Select.
Step 4: Press Menu> and keep on pressing it until you see Align Cartridges appearing on the second line of the screen.
Step 5: Choose the option of Select. Printing Alignment Page shows up on the main screen and then the alignment test page will get printed.
Step 6: Now, go to the test page and then go to the group of Test an alignment. Look for the number given below the pattern of alignment, which is very close to shaping up a straight line.
Step 7: To see the right alignment value of the printed test page, you need to press the Menu>or
Step 8: Go to Select and then choose the right value of alignment. After that, you will view the next test alignment displayed on the screen.
Step 9: Repeat all the steps from step no. 6 to step no. 8 for choosing the values of alignment for tests B, C, and D. After you are done choosing the right value for test D alignment, your printer device will go back to the ready state.
The appearance of patterns of alignment may differ. When the test alignment page will get printed, then you will see Test A Alignment in the first line of the operator panel display. In the line after that, you will see the present alignment value.
So, these are all the steps that are necessary for you to carry out in order to fix alignment on Lexmark printer.
Also Read:
- How to Fix Lexmark Firmware Error 900.00?
- How to Fix Lexmark Printer Displays Error Code 919.224?
- How to Fix Lexmark X5650 Cartridge Error?
FAQ for Fix the Alignment on Lexmark Printer
- Mick
 Brand: Lexmark Printer
- Last Update: 1 month ago
 Top Related Question
Related Articles


Top Searches in Lexmark Printer
How do You Get a Lexmark Printer Back Online?
May 23, 2026
My Lexmark Printer is Printing Symbols
May 23, 2026
How do I Connect My Computer to My Lexmark Printer?
May 23, 2026
How to Fix Lexmark E260dn Error Lights?
May 23, 2026
Lexmark Printer not Feeding Paper
May 23, 2026
Lexmark Printer Not Communicating with MAC
May 23, 2026
How to Fix Lexmark Printer Printing Blank Pages?
May 23, 2026
Lexmark X364 Scan to PC Profile Blank
May 23, 2026
Lexmark X4650 Printer Wireless Problem
May 23, 2026
Featured Articles
How to Get Canon Printer Online on MAC?
Jun 4, 2026
How to Fix Printer Printing Horizontal Black Lines?
May 23, 2026
How to Scan from HP Printer to Computer Windows 10?
Jun 13, 2026
Ricoh Printer Stuck on Processing
May 23, 2026
Brother Printer Only Printing in Black and White
Jun 21, 2026
How to Clean Kodak Printhead?
May 23, 2026
How to Install Lexmark Printer to Computer Without CD?
Jun 12, 2026
Why My Samsung Printer is Not Printing Clearly?
May 23, 2026
Top Questions
Why Won't My Canon Printer Print after Changing an Ink Cartridge?
May 23, 2026
How do I Fix a Canon Printer 1403 Error?
May 23, 2026
How do I Connect My Canon MG3050 Printer to WiFi?
May 23, 2026
How to Change Printer from Offline to Online Canon?
May 23, 2026
How to Turn My Ricoh Printer Online from Offline?
May 23, 2026
Brother MFC Printer Won't Print Black Despite Full Ink Cartridges
May 23, 2026
How to Fix Epson Printer Filter Failed or Stopped on Mac Error?
May 23, 2026
How do You Get a Lexmark Printer Back Online?
May 23, 2026