How to Connect a HP Printer to Your Computer?
Hello, Please let me know that how to connect a HP printer to your computer. I am facing some issue in this while connecting it. Help me.
 1 Ans
1 Ans- 4 years ago
Connect HP Printer to Your Computer
You can connect your HP printer to your computer in two different ways: the first one is using a USB wire and the second one is establishing a wireless connection. With the help of a USB wire you can form a connection in three simple steps: manage the settings in your windows, access the device, and connect the printer to your computer.
To establish a wireless connection you have to first locate and manage the settings, connect with the wifi network, enter the password and connect, manage the settings of your HP printer, and lastly connect your HP printer to your PC.
How to Connect a Printer Using a USB Wire to a Computer?
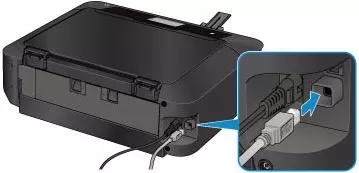
Take a USB wire and use it to connect your computer to the printer. Based on the operating system of your computer, you will get to know that a connection has been established and then you will need to download the driver to complete the installation.
When you receive the notification, open the notification. After that, you will have to walk through the steps given below.
Step 1: Open the Settings of Windows
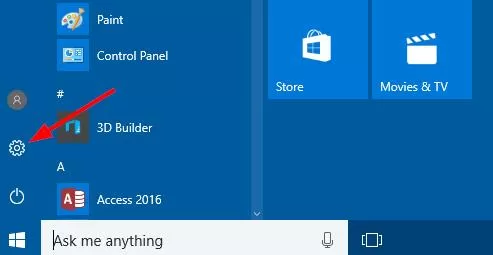
- Launch the Start menu by going to the bottom left corner of the screen.
- At the end of the leftmost column, you will view a gear icon linked to the settings Window.
Step 2: Access Devices
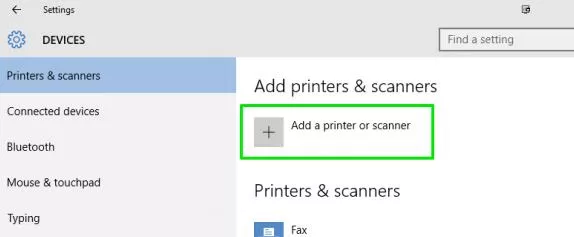
- In the initial two rows of the settings, search for the icon of Devices.
- In the left corner of the window of devices, choose "Printers and Scanners".
- The new windows will open up where you will see the option of "Add printer or scanner".
Step 3: Connect the Printer to the Computer
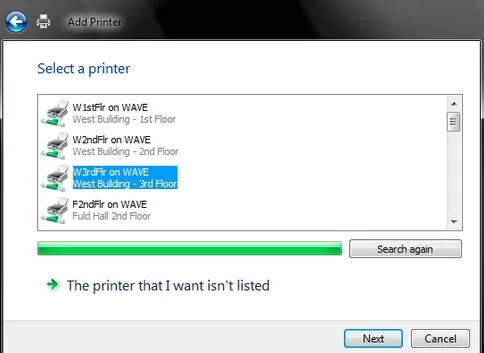
- After clicking on the option of Add printer or scanner, Windows will detect your printer device connected to a USB cable.
- In case the name of your printer shows up, then select it and get done with the installation as per the instructions on your computer.
Now, your printer should be connected and ready to print documents.
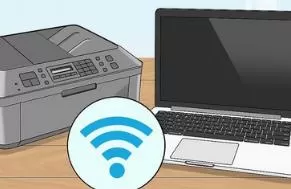
How to Connect an HP Printer Using a Wireless Network?
If you wish to connect a wireless printer, then it can be quite challenging. Here are the steps that you need to follow in order to connect the HP printer to your computer.
Step 1: Locate the Settings
- When your printer is powered on and is ready for configuration, then you will be required to connect your printer to the wireless network at your home.
- However, the steps for installation may differ from manufacturer to manufacturer, some of the printers have an LCD screen that displays the list of available wireless networks.
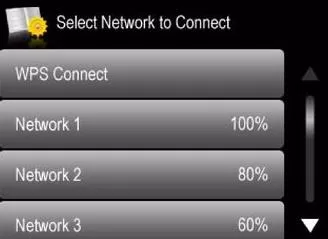
- On your screen, search around and find the setup page that enables you to adjust the LAN settings.
Step 2: Connect Your WiFi Network
- Once you are able to access your LAN settings, then the next thing that you need to do is to find your SSID.
- You can find the network name by pointing your mouse over the Wi-Fi icon. that is present at the bottom right of the taskbar.
- Your SSID is given at the side or end of the router provided by the internet service provider.
Step 3: Connect
- With the network name selected, the next thing that you need to do is to enter the password.
- Once you are done entering the password, then you will be all ready for the printing activity.
Step 4: Locate the Settings of Your Printer
- Launch the Start menu by clicking on the Windows icon at the end of the computer screen.
- Search for the link of the gear icon to your settings window and then select the "Devices" icon.
Step 5: Connect Your Printer to the PC
- Within the screen of Devices, you need to search for the option of "Add a printer or scanner".
- After clicking on the Add a printer or scanner option, the name of your printer along with the model number and name of the manufacturer will show up on the screen.
- Click on "Add device" and your PC will do everything else to complete the wireless configuration.
- Now print
So, these are the steps that you need to perform to connect the HP printer to your computer.
- 2 years ago
 Related Articles


Top Searches in Hp Printer
How to Fix Printer Printing Horizontal Black Lines?
May 23, 2026
How to Scan from HP Printer to Computer Windows 10?
Jun 13, 2026
How Do You Open the Ink Cartridge Access Door of HP Printer?
May 23, 2026
How to Fix HP Envy 5000 Printer Saying Offline Issue?
May 23, 2026
How do I Get My HP Printer to Print PDF Files?
May 23, 2026
How to Fix HP Printer Cannot Connect to Web Services?
May 23, 2026
How do I Connect HP Laserjet Pro M118dW to WiFi?
May 23, 2026
How to Fix PCL XL Error on HP Printer?
May 23, 2026
Why is My HP OfficeJet Pro 8610 Printer Offline?
May 23, 2026
How do I Get My HP Printer Back Online?
May 23, 2026
Featured Articles
How to Get Canon Printer Online on MAC?
Jun 4, 2026
How to Fix Printer Printing Horizontal Black Lines?
May 23, 2026
How to Scan from HP Printer to Computer Windows 10?
Jun 13, 2026
Ricoh Printer Stuck on Processing
May 23, 2026
Brother Printer Only Printing in Black and White
Jun 21, 2026
How to Clean Kodak Printhead?
May 23, 2026
How to Install Lexmark Printer to Computer Without CD?
Jun 12, 2026
Why My Samsung Printer is Not Printing Clearly?
May 23, 2026
Top Questions
Why Won't My Canon Printer Print after Changing an Ink Cartridge?
Oct 7, 2020
How do I Fix a Canon Printer 1403 Error?
Dec 30, 2020
How do I Connect My Canon MG3050 Printer to WiFi?
Mar 30, 2021
How to Change Printer from Offline to Online Canon?
Nov 27, 2020
How to Turn My Ricoh Printer Online from Offline?
Feb 20, 2021
Brother MFC Printer Won't Print Black Despite Full Ink Cartridges
Nov 7, 2020
How to Fix Epson Printer Filter Failed or Stopped on Mac Error?
Dec 7, 2021
How do You Get a Lexmark Printer Back Online?
Sep 29, 2020