How to Fix Printer Error Unsupported Protocol?
Hello, Please let me know how to fix printer error unsupported protocol. I am facing some issue in this while printing. Help me.
 2 Ans
2 Ans- 4 years ago
Fix Printer Error Unsupported Protocol:
Remove Your Printer and Add it Again
Step 1: Locate the printer in Devices and Printers from the instrument panel.
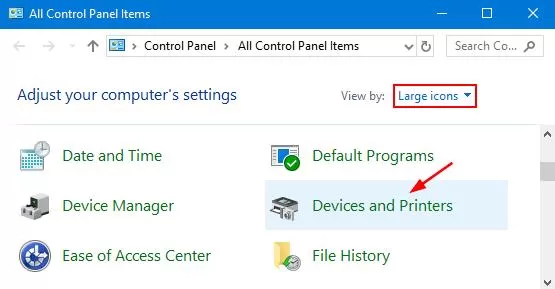
Step 2: Then, right-click it.
Step 3: Select the Remove device option from the list.
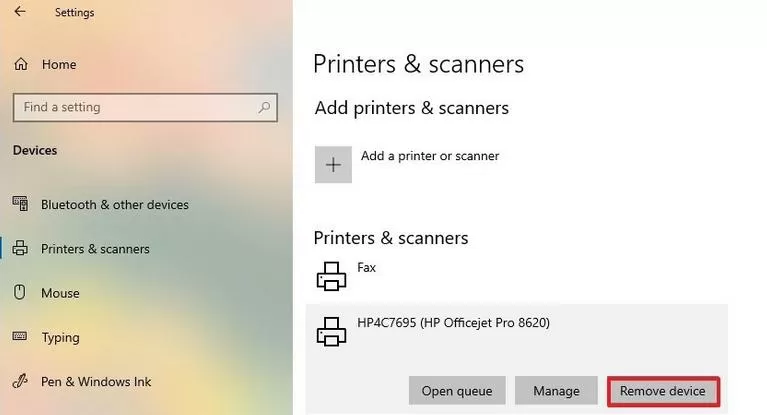
Step 4: Click Yes from the Remove Device panel.
Step 5: To add the printer back, go to Settings > Devices > Printers & Scanners.
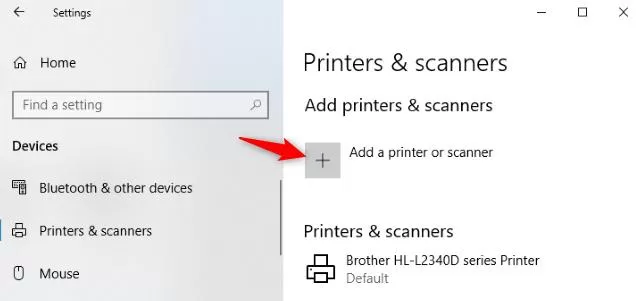
Step 6: Click the Add a Printer or Scanner button to look for nearby printers, whether they’re attached to your PC or connected to the network.
Step 7: You should see your printer’s name appear here, so click it directly.
Step 8: If you don’t see it, click the link that says The printer that I would like isn’t listed. This opens the old Add Printer dialog, which provides you the choice to scan for older sorts of printers, hook up with network printers, or add printers with custom settings.
Step 9: Then, click the subsequent button.
Step 10: Follow the instructions available on the screen to finish the installation process.
Step 11: Your printer should finally show up again within the Printers section.
- 2 years ago
Fix Printer Error Unsupported Protocol:
Despite your best efforts of using safe printing practices, you'll end up facing the subsequent printer error Unsupported Protocol. When handling this issue you'll try one among the subsequent troubleshooting tips to urge obviate it as soon as possible.
Follow the Steps Below to Fix Printer Error Unsupported Protocol
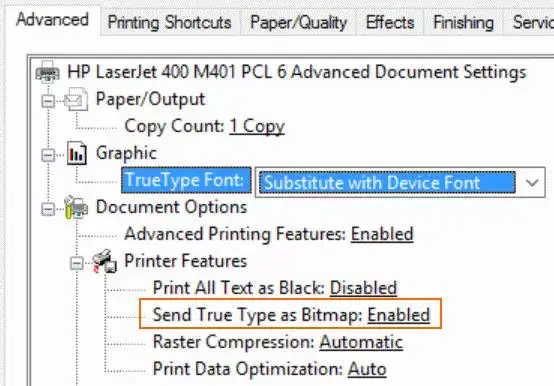
1. Put Send True Type as Bitmap as Activate
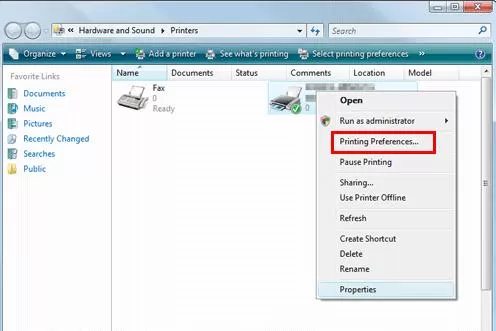
- To change your printer’s settings, head to control Panel > Hardware and Sound.
- Open Devices and Printers.
- Right-press on your printer’s icon, after that select Printing Preferences.
- Open the Advanced tab.
- Within the Printer Features section, you have to fix Send True Type as Bitmap as Enabled.
- Confirm by clicking OK and check out printing again.
2. Change the Print Optimizations Value
- In the instrument panel, right-click your printer to seek out various options.
- In the Printing Preferences panel that appears, select the Advanced tab.
- Within the Document Options section try changing the Print Optimizations value.
- Confirm and check out printing again.
If the primary procedure didn’t work, it’s an honest idea to vary the Print Optimizations value. Follow the above steps to try to do so.
3. Update Your Printer’s USB Drivers
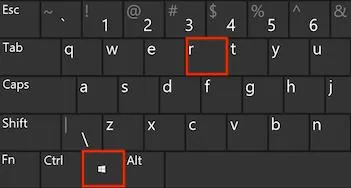
Step 1: Press the Windows logo key + R keyboard hotkey to open the Run panel.
Step 2: Then, just type devmgmt.msc within the Run panel.
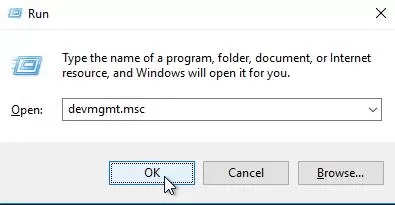
Step 3: Press Enter.
Step 4: If asked for an admin password or for a confirmation, enter the password, or tap on Allow.
Step 5: Increase Universal Serial Bus Controllers in the Device Manager.
Step 6: Find your USB port driver.
Step 7: Right-press on your USB controller driver and click on Update driver software.

Step 8: On subsequent windows, choose the Search automatically for updated drivers (connect to the web for the newest version of the drivers).
Step 9: Let the method complete.
Step 10: Finally, click OK.
- 2 years ago
 Related Articles


Top Searches in Hp Printer
How to Fix Printer Printing Horizontal Black Lines?
May 23, 2026
How to Scan from HP Printer to Computer Windows 10?
Jun 13, 2026
How Do You Open the Ink Cartridge Access Door of HP Printer?
May 23, 2026
How to Fix HP Envy 5000 Printer Saying Offline Issue?
May 23, 2026
How do I Get My HP Printer to Print PDF Files?
May 23, 2026
How to Fix HP Printer Cannot Connect to Web Services?
May 23, 2026
How do I Connect HP Laserjet Pro M118dW to WiFi?
May 23, 2026
How to Fix PCL XL Error on HP Printer?
May 23, 2026
Why is My HP OfficeJet Pro 8610 Printer Offline?
May 23, 2026
How do I Get My HP Printer Back Online?
May 23, 2026
Featured Articles
How to Get Canon Printer Online on MAC?
Jun 4, 2026
How to Fix Printer Printing Horizontal Black Lines?
May 23, 2026
How to Scan from HP Printer to Computer Windows 10?
Jun 13, 2026
Ricoh Printer Stuck on Processing
May 23, 2026
Brother Printer Only Printing in Black and White
Jun 21, 2026
How to Clean Kodak Printhead?
May 23, 2026
How to Install Lexmark Printer to Computer Without CD?
Jun 12, 2026
Why My Samsung Printer is Not Printing Clearly?
May 23, 2026
Top Questions
Why Won't My Canon Printer Print after Changing an Ink Cartridge?
Oct 7, 2020
How do I Fix a Canon Printer 1403 Error?
Dec 30, 2020
How do I Connect My Canon MG3050 Printer to WiFi?
Mar 30, 2021
How to Change Printer from Offline to Online Canon?
Nov 27, 2020
How to Turn My Ricoh Printer Online from Offline?
Feb 20, 2021
Brother MFC Printer Won't Print Black Despite Full Ink Cartridges
Nov 7, 2020
How to Fix Epson Printer Filter Failed or Stopped on Mac Error?
Dec 7, 2021
How do You Get a Lexmark Printer Back Online?
Sep 29, 2020