How to Remove Failed Resin Prints from Your 3D Printer?
Please let me know that how to remove failed resin prints from your 3D printer. I have no idea about that. Help me.
 1 Ans
1 Ans- 3 years ago
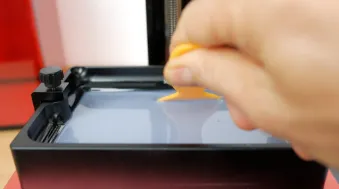
Remove Failed Resin Prints from Your 3D Printer
Resin 3D prints are definitely going to fail if they are not supported. The failed sections may even get stuck to the resin vat and it becomes nearly impossible to remove it without damage.
You must use isopropyl alcohol in order to remove the resin prints. You can also clean the vat for the next print. Below are the steps that you are required to follow in order to remove failed resin prints from your 3D printer.
Steps to Remove Failed Resin Prints from Your Resin Prints
1) Wear Protective Equipment
You must wear latex gloves and wear a respirator that is very tight-fitted. If you end up ingesting this resin by mistake, then it can be really harmful for you.
2) Remove Resin Vat from Your Printer
Unscrew the thumbscrews which you can see on the left or right sides of your vat. When they get loose, remove it by holding on to the plastic sides. After that, the vat is going to slide and come out of the printer.
3) Pour Liquid Resin from Vat in a Storage Container
In order to do it in a clean way, you must angle the vat so the liquid goes to the corner of your vat and then overflows. some vats actually have an accurate funnel design. For this, you must check your vat in case.
Your container must be covered with a lid, which you can easily tighten. If your pour something into your container for long-term storage. Please ensure that the container is either kept in a dark place or is black in color. The resin will get ruined if it gets exposed to light.
4) Remove Failed Prints from Your Vat
You are required to use at least 90% isopropyl alcohol, pour it into your vat so it covers the failed prints. Now, allow it to sit for a few minutes. After that use your hands to massage the prints from the end of the vat.
The thin sheet that is at the end of the vat is delicate. Therefore, you must not use any sharp objects. In case the prints don't detach from the end of the vat, then you need to put pressure on the underside of the vat where you see the failed prints, this will enable you to remove the failed print.
5) Clean the Vat
The cleaning can easily be done using an IPA and cloth. Pour it on your Vat and then use the cloth to wipe a resin, which is left in your vat. Once you are done cleaning it, check if there is a large amount of IPA left in your vat, then take one more container and pour it into your container.
6) Replace Your Vat
Wait for IPA to evaporate completely and then keep the vat in your printer just the way you removed it and then finally tighten the screws.
- 2 years ago
 Related Articles


Top Searches in Hp Printer
How to Fix Printer Printing Horizontal Black Lines?
May 23, 2026
How to Scan from HP Printer to Computer Windows 10?
Jun 13, 2026
How Do You Open the Ink Cartridge Access Door of HP Printer?
May 23, 2026
How to Fix HP Envy 5000 Printer Saying Offline Issue?
May 23, 2026
How do I Get My HP Printer to Print PDF Files?
May 23, 2026
How to Fix HP Printer Cannot Connect to Web Services?
May 23, 2026
How do I Connect HP Laserjet Pro M118dW to WiFi?
May 23, 2026
How to Fix PCL XL Error on HP Printer?
May 23, 2026
Why is My HP OfficeJet Pro 8610 Printer Offline?
May 23, 2026
How do I Get My HP Printer Back Online?
May 23, 2026
Featured Articles
How to Get Canon Printer Online on MAC?
Jun 4, 2026
How to Fix Printer Printing Horizontal Black Lines?
May 23, 2026
How to Scan from HP Printer to Computer Windows 10?
Jun 13, 2026
Ricoh Printer Stuck on Processing
May 23, 2026
Brother Printer Only Printing in Black and White
Jun 21, 2026
How to Clean Kodak Printhead?
May 23, 2026
How to Install Lexmark Printer to Computer Without CD?
Jun 12, 2026
Why My Samsung Printer is Not Printing Clearly?
May 23, 2026
Top Questions
Why Won't My Canon Printer Print after Changing an Ink Cartridge?
Oct 7, 2020
How do I Fix a Canon Printer 1403 Error?
Dec 30, 2020
How do I Connect My Canon MG3050 Printer to WiFi?
Mar 30, 2021
How to Change Printer from Offline to Online Canon?
Nov 27, 2020
How to Turn My Ricoh Printer Online from Offline?
Feb 20, 2021
Brother MFC Printer Won't Print Black Despite Full Ink Cartridges
Nov 7, 2020
How to Fix Epson Printer Filter Failed or Stopped on Mac Error?
Dec 7, 2021
How do You Get a Lexmark Printer Back Online?
Sep 29, 2020