How to Shrink a Photo to a Smaller Size for Printing?
Hello, Please let me know that how to shrink a photo to a smaller size for printing. I am facing some issue in shrink a photo. Help me.Also Read:
- How to Fix HP OfficeJet Pro 8600 Offline Error?
- How to Clean the Print Heads on a HP 8600 Printer?
- How to Clear an HP Check Printer Cartridge Error Code?
Steps to Shrink a Photo to a Smaller Size for Printing using PicResize.com

- Open PicResize.com for photo resizing without adding their website information on the completed image.
- Tap on the browse button to choose the image from your computer system that you want to crop for printing.
- Now click on the “Continue” button.
- Enter your preference for how much smaller you want your finished photo. Options for special effects are also available but are not required to make your photo smaller.
- While you scroll down the page, check for a drop-down menu preceded by “save as”.
- Select the final file format of how do you want your photo to be. The options are JPG, GIF, PNG, and BTP.
- Now click on the “Resize pic” option.
- Wait for a while till the image is delivered.
- When it has completed, you will be directed to a page where you will see the message: "Success! Please select a task."
- Click on “save to disk” and then follow the on-screen instructions to save the cropped image in the computer.
Steps to Shrink a Photo to a Smaller Size for Printing using ShrinkPictures.com
- Open ShrinkPictures.com for photo resizing without adding their website information on the completed image.
- Tap on the browse button to choose the image from your computer system that you want to crop for printing.
- You will get two further options: Special effects is not necessary and selecting “better” for compression is ok for printing purposes.
- Click on the “Reize” (red button).
- Wait for a while till the image is rendered to a smaller size.
- When it has completed, you will be directed to a page where you will see the message: “your image has been resized”.
- While you scroll down the page until you see the image of your picture.
- On the above of your picture, read the text in red that says “Download this picture now”.
- And then follow the onscreen instructions to download the revised image to your system.
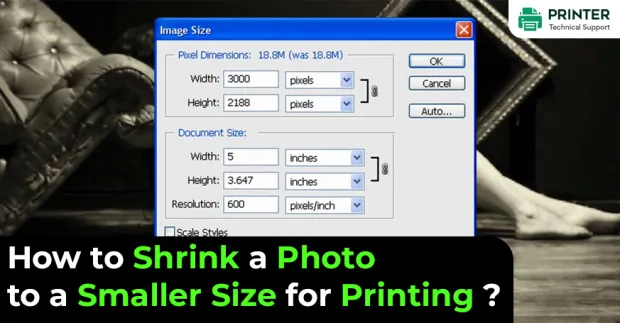
Steps to Shrink a Photo to a Smaller Size for Printing using Word processing document
- Go to your word processing program and embed your image in the favoured location of your document.
- In case you are using OpenOffice then click on “Insert” from the toolbar menu. Now from the drop-down menu, click on “picture” and choose “From file” for the application to browse the system.
- Tap on the image and the image will appear with a frame of small boxes at each corner and in the centre of each side.
- Press "Ctrl " (or "Control") on your keyboard, and at the same time, locate the mouse on the box that is on the lower right-hand corner of the image and move the box near the upper left-hand corner of the image. This will allow you to push the photo to a smaller size of your selection. This will shrink it
- while still maintaining its correct dimensions.
- In order to continue working on your word processing program, you need to move your mouse towards a blank spot of a page and then left-click.
- By doing so, the frame around your image will disappear and you are free to continue working on your document.
Despite wherever you obtained your photograph, it's rarely the proper size for printing. For photos that are solely a bit larger than necessary, you will be able to alter photograph sizes in data processing programs like OpenOffice.
All photograph and image writing computer code enable you to size a photograph to a smaller size, however, if you simply have a couple of photos to shrink otherwise you don't need to require the time to be told to use new computer code, there are Internet-based photograph resizing tools that are quick and straightforward to use.
- Keith
 Brand: Hp Printer
- Last Update: 1 month ago
 Related Articles


Top Searches in Hp Printer
How to Fix Printer Printing Horizontal Black Lines?
May 23, 2026
How to Scan from HP Printer to Computer Windows 10?
Jun 13, 2026
How do I Get My HP Printer to Print PDF Files?
May 23, 2026
How do I Connect HP Laserjet Pro M118dW to WiFi?
May 23, 2026
How to Fix PCL XL Error on HP Printer?
May 23, 2026
Why is My HP OfficeJet Pro 8610 Printer Offline?
May 23, 2026
How do I Get My HP Printer Back Online?
May 23, 2026
Featured Articles
How to Get Canon Printer Online on MAC?
Jun 4, 2026
How to Fix Printer Printing Horizontal Black Lines?
May 23, 2026
How to Scan from HP Printer to Computer Windows 10?
Jun 13, 2026
Ricoh Printer Stuck on Processing
May 23, 2026
Brother Printer Only Printing in Black and White
Jun 21, 2026
How to Clean Kodak Printhead?
May 23, 2026
How to Install Lexmark Printer to Computer Without CD?
Jun 12, 2026
Why My Samsung Printer is Not Printing Clearly?
May 23, 2026
Top Questions
Why Won't My Canon Printer Print after Changing an Ink Cartridge?
May 23, 2026
How do I Fix a Canon Printer 1403 Error?
May 23, 2026
How do I Connect My Canon MG3050 Printer to WiFi?
May 23, 2026
How to Change Printer from Offline to Online Canon?
May 23, 2026
How to Turn My Ricoh Printer Online from Offline?
May 23, 2026
Brother MFC Printer Won't Print Black Despite Full Ink Cartridges
May 23, 2026
How to Fix Epson Printer Filter Failed or Stopped on Mac Error?
May 23, 2026
How do You Get a Lexmark Printer Back Online?
May 23, 2026