How to Troubleshoot Access Denied Error While Sharing a Network Printer?
An ‘Access Denied’ Error occurs sometimes when you share a printer over a LAN network. If you don’t have administrator login credentials in order to access the network printer user account to share it over the network.
If the File and Printer Sharing service is not installed on a Windows computer. Here are the below methods for troubleshooting the ‘Access Denied’ Error While Sharing a Network Printer.
Install File and Printer Sharing
Step 1: Go to the start button and click on the control panel.
Step 2: Now search for network and sharing centre in the next window.
Step 3: Click on Change adapter settings from the left side of the new window.
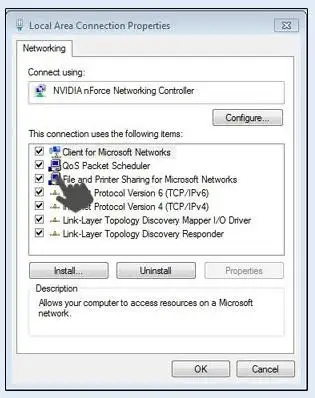
Step 4: Right-click on the LAN icon and then click on properties.
Step 5: Click on File and Printer Sharing for Microsoft Networks.
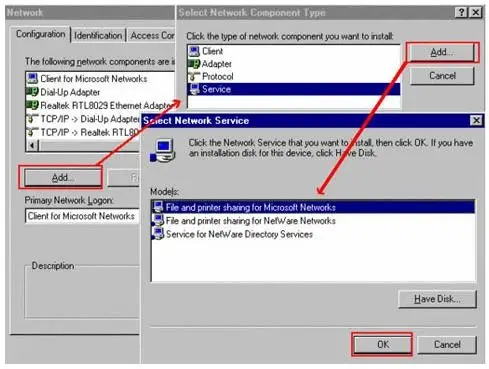
Step 6: In case you cannot find the above option, then you have to click on install and click on service.
Step 7: Click on Add and choose the File & Printer Sharing option as mentioned.
Step 8: A dialogue box will pop up on your screen, click on OK and then close it in order to install the windows services.
In case the windows prompt you to restart your computer system, perform the reboot to allow the installation process to complete.
Check the Printer Network Connections to Troubleshoot ‘Access Denied’ Error While Sharing a Network Printer-
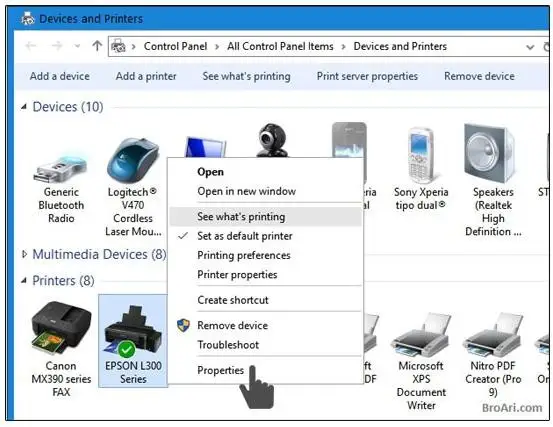
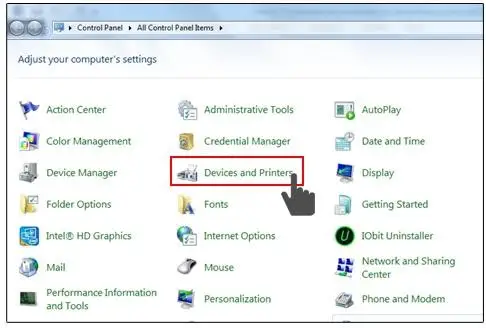
Step 1: Go to devices and printers that will show you the list of your installed printers in Windows.
Step 2: Press and hold the Windows + R key to open that, and the Run dialogue box will appear.
Step 3: Go to the control panel and then click on it.
Step 4: Search for devices and printers, under the control panel and select that.
Step 5: You will see your printer icon in the available list and if not, then ensure the USB cable interface connected to the computer is seated tightly.
If you are connecting your printer to your computer system for the first time, you need to install its drivers and software through the CD or download the same from the printer manufacturer's website.
Configure for Network Sharing
In case your printer is not configured for sharing over a network earlier then firstly you need to change your sharing status. Below are the few steps to perform that.
Step 1: Right-click on the printer icon that you will get under devices and printers.
Step 2: Click on properties and then on sharing.
Step 3: Ensure that the Share this Printer checkbox is selected to enable network sharing and click OK for that.
Connect to the Shared Printer to Troubleshoot ‘Access Denied’ Error While Sharing a Network Printer
After you are done sharing the network printer, you will be required to connect it to the printer to other systems as well.
- Go to devices and printers.
- Select Add printer.
- Click on Add a network printer.
- Now you just have to follow the on-screen directions for installing the newly shared network printer.
Most of the time you have this downside right once making a brand new LAN association in their network and usually, the error popup message shows once on every time you are trying to open the shared folder settled on the other computer.
Access Denied Network Error occurs due to the kind of network-related permission problem. But sometimes there are some other reasons for this error to show up on your computer’s screen and here’s the list of those reasons which can be perhaps occurring on your computer.
We hope the above article helped you to Troubleshoot the ‘Access Denied’ Error While Sharing a Network Printer and resolve the issue with a few easy methods.
Also Read:
- How to Fix HP Laptop Touchpad Not Working on Windows 10?
- The Best Printers for Small Businesses
- 7 Best HP Printers for Home Office 2026
- Sam
 Brand: Hp Printer
- Last Update: 3 weeks ago
 Related Articles


Top Searches in Hp Printer
How to Fix Printer Printing Horizontal Black Lines?
May 23, 2026
How to Scan from HP Printer to Computer Windows 10?
Jun 13, 2026
How do I Get My HP Printer to Print PDF Files?
May 23, 2026
How do I Connect HP Laserjet Pro M118dW to WiFi?
May 23, 2026
How to Fix PCL XL Error on HP Printer?
May 23, 2026
Why is My HP OfficeJet Pro 8610 Printer Offline?
May 23, 2026
How do I Get My HP Printer Back Online?
May 23, 2026
Featured Articles
How to Get Canon Printer Online on MAC?
Jun 4, 2026
How to Fix Printer Printing Horizontal Black Lines?
May 23, 2026
How to Scan from HP Printer to Computer Windows 10?
Jun 13, 2026
Ricoh Printer Stuck on Processing
May 23, 2026
Brother Printer Only Printing in Black and White
May 23, 2026
How to Clean Kodak Printhead?
May 23, 2026
How to Install Lexmark Printer to Computer Without CD?
Jun 12, 2026
Why My Samsung Printer is Not Printing Clearly?
May 23, 2026
Top Questions
Why Won't My Canon Printer Print after Changing an Ink Cartridge?
May 23, 2026
How do I Fix a Canon Printer 1403 Error?
May 23, 2026
How do I Connect My Canon MG3050 Printer to WiFi?
May 23, 2026
How to Change Printer from Offline to Online Canon?
May 23, 2026
How to Turn My Ricoh Printer Online from Offline?
May 23, 2026
Brother MFC Printer Won't Print Black Despite Full Ink Cartridges
May 23, 2026
How to Fix Epson Printer Filter Failed or Stopped on Mac Error?
May 23, 2026
How do You Get a Lexmark Printer Back Online?
May 23, 2026