Share Printers & Files Even Though HomeGroup has been Removed in Windows 10
Is there anyone who knows how to share printers & files even though HomeGroup has been removed in Windows 10. I am facing some issue while doing this. Help me.
 1 Ans
1 Ans- 4 years ago
Share Printers & Files Even though HomeGroup has been Removed in Windows 10
The Homegroup feature was introduced in the Windows 7 operating system to simplify the process of sharing resources across a small network with other users. A homegroup comprises a group of computers on a home network which allows sharing printers and files with other people in your homegroup.
Homegroup was available in Windows 8, Windows 8.1 and Windows 10 but recently Microsoft has removed the feature from the latest version of Windows 10. You might have noticed that the homegroup feature is no longer available if you are using a new version of windows.
You won't find any features of homegroup anywhere in the latest version of Windows 10 as the feature has been removed from the control panel, file explorer and settings app.
Microsoft has retired the homegroup feature in windows 10 because according to Microsoft, the homegroup feature was useful for the pre-mobile and pre-cloud data whose functionality is now built right into Windows 10 and apps.
Whether it is using Onedrive to share files or connecting printer and computer on your home network via the Share features, Windows 10 makes sharing content by connecting multiple devices streamlined and simple and this is the main reason why the homegroup feature has been removed as is no longer operational in Windows 10.
How to Share Files and Folders and Printers without Homegroup Features?
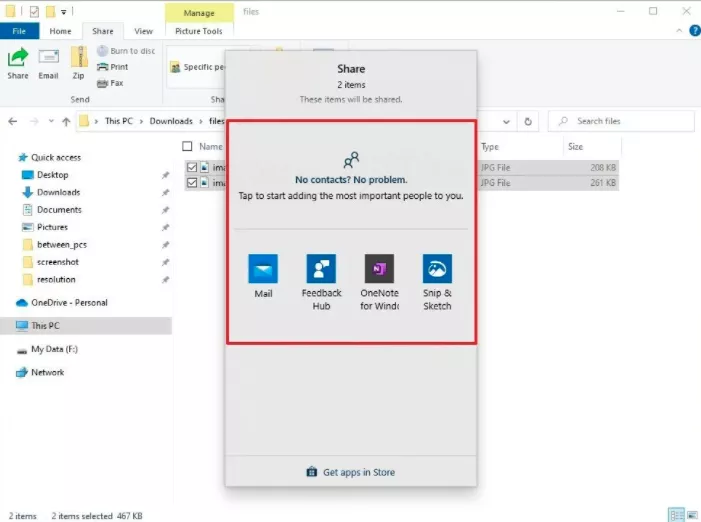
1. Send Files with the Share Feature
You can use the share feature to share one or more files with another user inside the home office network or across the world only one time as it comes built into file explorer and modern apps.
Step 1- Open the File Explorer
Step 2- Browse to the folder location where the files are kept
Step 3- Select the desired files
Step 4- Click on the Share tab
Note- You can alternatively right-click the selection and choose the share option in the context menu and also this option can be found in many apps that you acquire from the Microsoft store.
Step 5- Click on the Share button
Step 6- Select the contact, application or nearby sharing device
Step 7- To share the content continue with the on-screen directions.
2. Share Files with OneDrive
Windows 10 comes with built-in Onedrive functionality to share files and folders with friends, families and colleagues. You can use the Onedrive cloud storage service to share your files, folders and documents with others and in addition to this, you can also sync files and folders between computers that allows you to easily share them with others.
Step 1- Click on the file explorer
Step 2- From the left panel click the Onedrive folder
Step 3- Browse to the folder location to select the files
Step 4- Select the share option by right-clicking on the file
Step 5- Click the anything with the link can edit option if you want to edit the file
Step 6- If you only want someone else to view the file clear the allow editing option.
Step 7- Click on the apply button
Step 8- Click the copy link option to copy the file to the clipboard or confirm the email address of the person you want to share the file with
Step 9- You can add a personalized message if you wish to add.
Step 10- Click on the send button
3. Sharing Printers in Windows 10
Step 1- Open the Settings app by pressing the WIN + I key together or selecting the start menu.
Step 2- Now go to the devices option.
Step 3- Select printer and scanner section clicking on devices.
Step 4- Click the install printer name in the right-side panel
Step 5- Click on the manage button
Step 6- Click on the printer properties link once it opens the information page of the printer
Step 7- Go to sharing tab once the properties window of the printer opens
Step 8- Click on the change sharing options button
Step 9- Enable share this printer option after launching the properties window and add or modify the printer name
Step 10- Apply the changes and you are done with sharing.
- 2 years ago
 Related Articles


Top Searches in Hp Printer
How to Fix Printer Printing Horizontal Black Lines?
May 23, 2026
How to Scan from HP Printer to Computer Windows 10?
Jun 13, 2026
How Do You Open the Ink Cartridge Access Door of HP Printer?
May 23, 2026
How to Fix HP Envy 5000 Printer Saying Offline Issue?
May 23, 2026
How do I Get My HP Printer to Print PDF Files?
May 23, 2026
How to Fix HP Printer Cannot Connect to Web Services?
May 23, 2026
How do I Connect HP Laserjet Pro M118dW to WiFi?
May 23, 2026
How to Fix PCL XL Error on HP Printer?
May 23, 2026
Why is My HP OfficeJet Pro 8610 Printer Offline?
May 23, 2026
How do I Get My HP Printer Back Online?
May 23, 2026
Featured Articles
How to Get Canon Printer Online on MAC?
Jun 4, 2026
How to Fix Printer Printing Horizontal Black Lines?
May 23, 2026
How to Scan from HP Printer to Computer Windows 10?
Jun 13, 2026
Ricoh Printer Stuck on Processing
May 23, 2026
Brother Printer Only Printing in Black and White
May 23, 2026
How to Clean Kodak Printhead?
May 23, 2026
How to Install Lexmark Printer to Computer Without CD?
Jun 12, 2026
Why My Samsung Printer is Not Printing Clearly?
May 23, 2026
Top Questions
Why Won't My Canon Printer Print after Changing an Ink Cartridge?
Oct 7, 2020
How do I Fix a Canon Printer 1403 Error?
Dec 30, 2020
How do I Connect My Canon MG3050 Printer to WiFi?
Mar 30, 2021
How to Change Printer from Offline to Online Canon?
Nov 27, 2020
How to Turn My Ricoh Printer Online from Offline?
Feb 20, 2021
Brother MFC Printer Won't Print Black Despite Full Ink Cartridges
Nov 7, 2020
How to Fix Epson Printer Filter Failed or Stopped on Mac Error?
Dec 7, 2021
How do You Get a Lexmark Printer Back Online?
Sep 29, 2020